| |

Example to create struts 2 application in MyEclipseHere, we are going to create the struts 2 application using myeclipse ide. We don't need to care about the jar files because MyEclipse provides these jar files. You need to follow these steps to create struts 2 application.
1) Create a web projectTo create web project, click on the file menu - new - project - web project - write the project name e.g. firststruts - finish. 2) Add struts 2 capabilitiesTo add struts 2 capabilities, select you project - click on the myeclipse menu - add project capabilities - add struts capabilities. 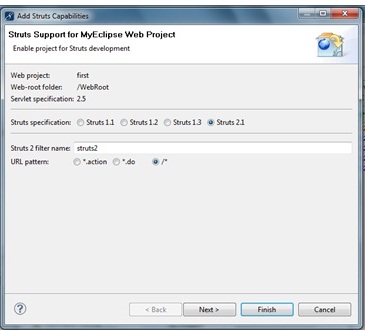
Select the 2.1 and /* as the url pattern - finish. 3) Create input page (index.jsp)It uses struts core tags to create a form with fields. index.jsp4) Create the action class (Product.java)It is the simple action class containing properties with setters and getters. It contains the execute method also for defining the business logic. Product.java5) Map the request in (struts.xml) file and define the view componentsThis xml file registers the action and view components. struts.xml6) Create view components (welcome.jsp)This jsp page displays the information set in the action object. welcome.jsp7) start server and deploy the projectTo start the server and deploy the project, right click on your project - Run As - MyEclipse server application.
Next TopicStruts2 Interceptors Tutorial
|
 For Videos Join Our Youtube Channel: Join Now
Feedback
- Send your Feedback to [email protected]
Help Others, Please Share


