Excel Macros
MS Excel, or Microsoft Excel, is powerful spreadsheet software that most people regularly use for certain tasks, such as recording data or performing various mathematical or analytical operations. While working with Excel regularly, users often encounter scenarios when they repeatedly have to perform certain tasks every one or two days. Doing the same tasks repeatedly from scratch takes time and effort. However, we can perform some repetitive tasks using Excel with just a few clicks. This is where the Excel Macros feature comes into play.
This tutorial discusses the brief introduction of Excel Macros and other essential topics like recording, saving, editing, and executing them at our convenience.
What is the Macros in Excel?
Macros refers to an existing record and playback tool that helps us record an Excel action or a set of actions. These actions are saved as instructions in the form of codes. We can execute the recorded actions as many times as needed and whenever needed. Since all mouse clicks and keystrokes are recorded sequentially, Excel executes them step-by-step on the given data. Furthermore, the recorded Macro can be later edited to make minor changes to suit our needs accordingly.
Excel offers two different ways to create Macros. The first method involves a basic record and play process, executing them later to perform repeated steps or actions. Another method involves coding with VBA (Visual Basic for Applications), requiring good coding knowledge.
How to access Macros in Excel?
To enable or use Macros in our Excel workbook, we have to take advantage of the Developer tab. The Developer tab in Excel contains advanced options or tools, allowing users to work with amazing hidden features. Unfortunately, the Developer tab itself is hidden in Excel by default. Therefore, we must first unhide the Developer tab and access the respective tools. On the Developer tab, we can access amazing features like Macros, Add-ins, VBA (Visual Basic for Applications), etc.
Enabling a Developer tab is a one-time process and includes the following steps:
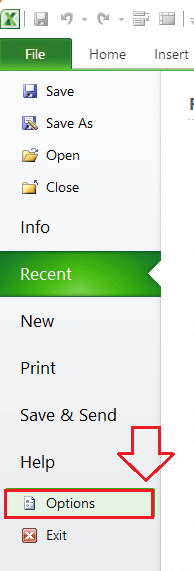
- First, we need to go to the File tab and click Options from the menu list.
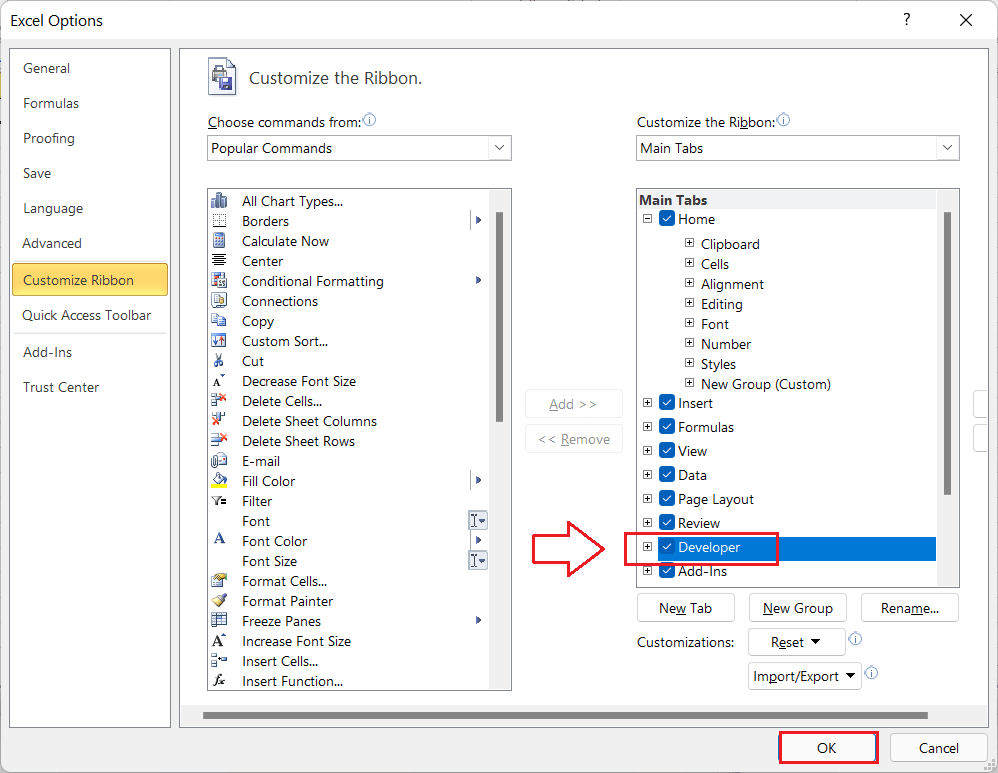
- We need to click the 'Customize Ribbon' from the left-side list in the Excel Options window. This will display respective options in the right-side panel.

- We must click or select the checkbox associated with the Developer tab and click the OK This will enable the Developer tab on the Ribbon.
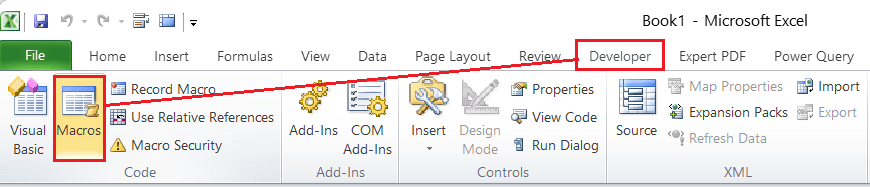
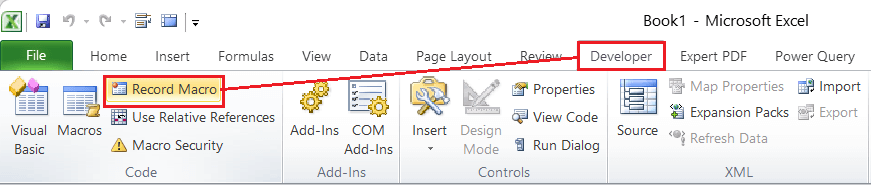
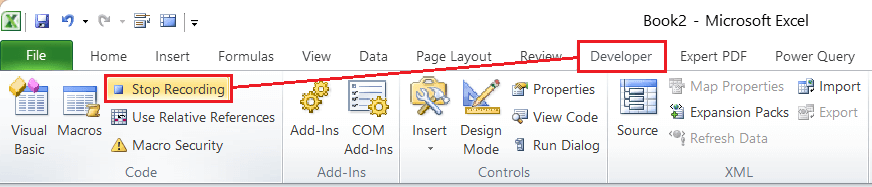
Once the Developer tab is enabled, we will see it inside the Excel ribbon, similar to any other typical tab. We can find the Macros button under the Code section inside the Developer tab, as shown below:
How to record a Macro?
Once we have enabled the Developer tab, we can access the Macros, including the recording feature. We can record a Macro using the following steps:
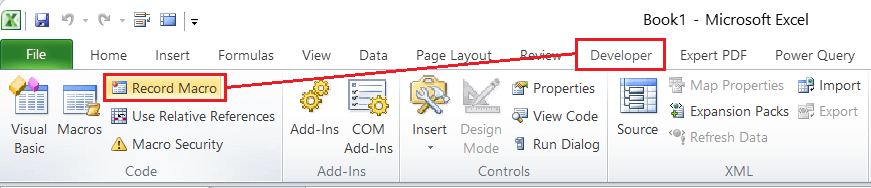
- First, we need to navigate the Developer tab and click the 'Record Macro' button under the 'Code' section.
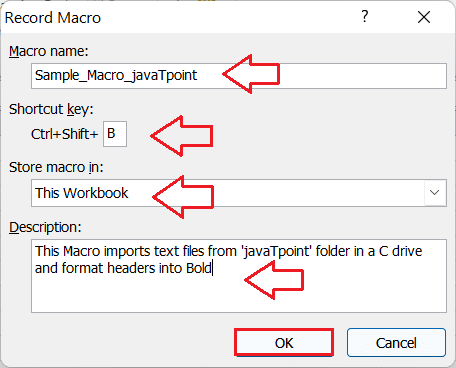
- As soon as we click the 'Record Macro' button, we see a 'Record Macro' dialogue box, as shown below:
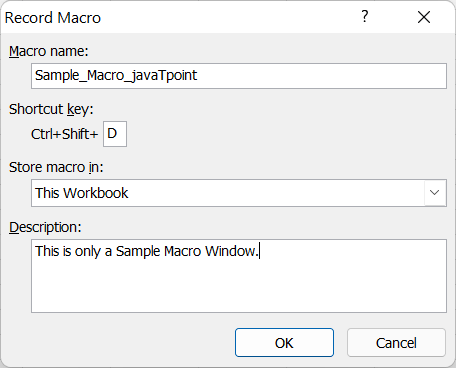
In the dialogue box, we need to enter the following data:
- Macro Name: We can assign different names for different Macros based on their action or working. However, we must ensure not to use space characters or other special characters. It is better to use only alphabets in combination with underscores if needed. Also, we cannot use the same Macro name multiple times.
- Shortcut Key: We can assign a key combination for the respective Macro we will create. This will be helpful while executing the corresponding Macro. We can execute the associated Macro by pressing certain assigned keys. We must ensure not to assign the shortcut key combinations that are already in use, or else Excel will overwrite them. It is recommended to assign the desired shortcut by combining it with the Shift key.
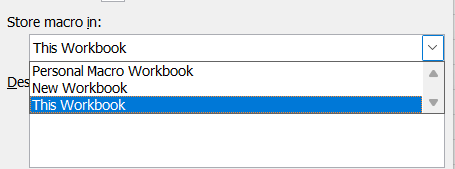
- Store Macro in: It is the drop-down list containing the following 3 options: 'This Workbook', 'Personal Macro Workbook', and 'New Workbook'.
- This Workbook- It creates Macro in the current workbook only. If we try to use the created Macro in a new Excel workbook, the created Macros earlier will not be displayed. That way, we can only use such Macros in the respective workbook.
- Personal Macro Workbook- It creates and stores Macros in the workbook. However, Macros will only be displayed on a new Excel sheet.
- New Workbook- It opens a new Excel workbook, and the actions performed in a newly created workbook will be recorded for future use.
- Description: We can write a description for each Macro that will help us understand the purpose of the created Macro. It is recommended to write a detailed description to make it easy for anyone to know the associated action (s) for the respective Macro.
- Once we have given all the required data in the 'Record Macro' dialogue box, we must perform all the actions we want to save in a Macro. The actions refer to the steps to complete any particular task in Excel, such as adjusting the formatting.
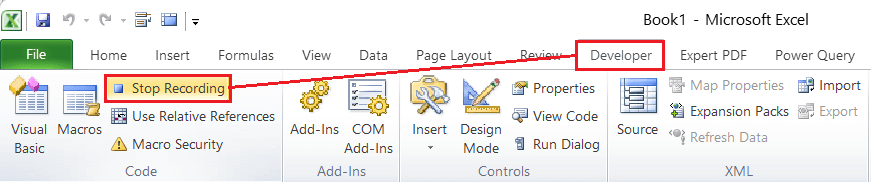
- After we have completed our task (or performed the desired set of actions), we must again navigate the Developer tab and click on the 'Stop Recording' button. This will record/ create a Macro.
How to save an Excel workbook with Macro?
When we try to record a Macro in Excel, it asks us to choose between storing a Macro in the same workbook (as 'This Workbook') or a personal workbook (as 'Personal Macro Workbook'). Depending on the option we choose to store a Macro, we have to perform different methods to save it. Let us discuss both the ways one by one:
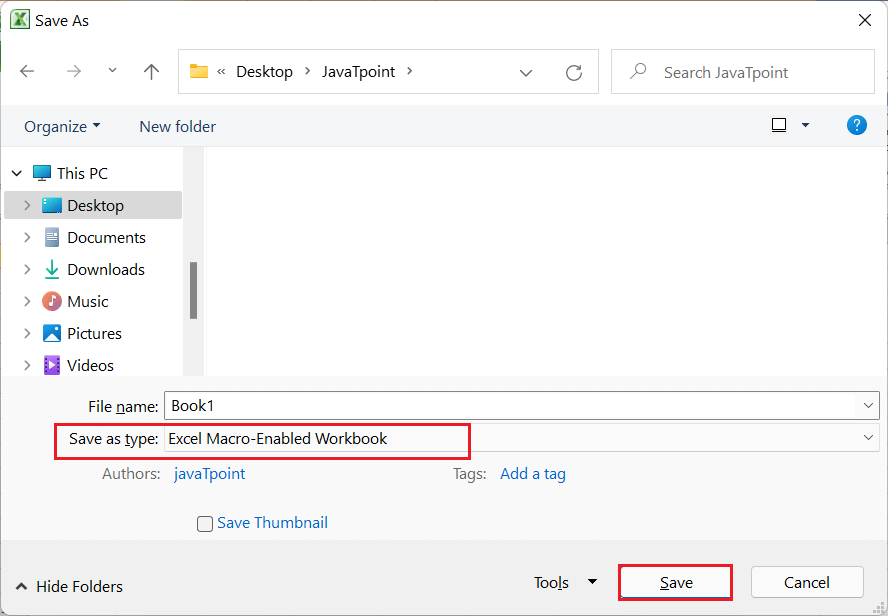
- When selecting to store Macro in as 'This Workbook': When we select to store the Macro by choosing the 'This Workbook' option while recording, we can save the workbook by going to File > Save As > Excel Macro-Enabled Workbook. In this case, we don't need to save the Macro explicitly. It will be saved automatically in the workbook.
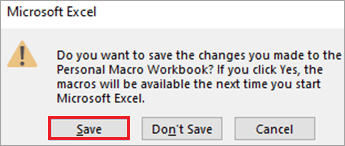
- When selecting to store Macro in as 'Personal Macro Workbook': When we select to store the Macro choosing the 'Personal Macro Workbook' option, we have to save the Macro explicitly. In this case, we cannot save it like other Excel formats. Instead, we save it using the pop-up dialog that Excel displays when we try to close the workbook. We must use the 'Save' button in the pop-up. If we don't save it using the pop-up, the Macro will be deleted after closing the workbook.
How to view/edit the code of Macro?
As discussed above, Excel Macro records all the actions in the form of VBA codes. Therefore, we can view and edit the VBA codes after recording them in Excel. Based on the recorded actions, Excel generates the codes.
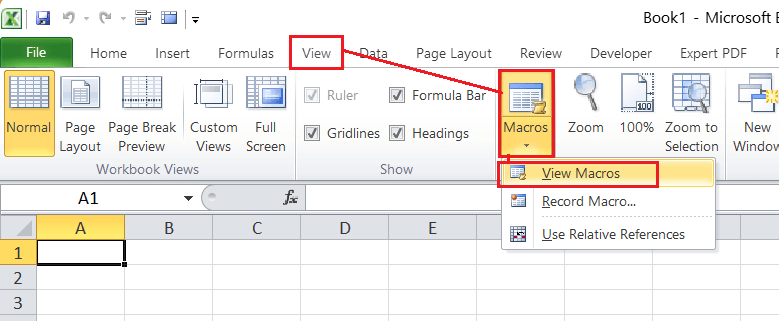
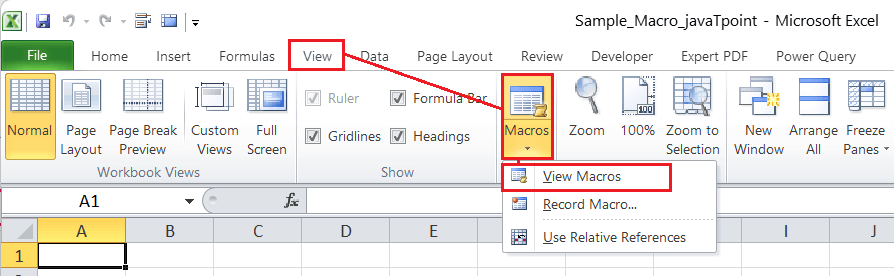
Suppose our workbook contains a Macro. We need to navigate the View tab > Macros > View Macros. Also, we can press the keyboard shortcut 'Alt + F8' to quickly access this feature. It will list all the existing Macros of the respective workbook inside the Macro dialogue box.
If several Macros are created for the corresponding workbook, we can type the name inside the 'Macro Name' box to instantly locate the desired Macro. After that, we must select the Macro by clicking. After we select any Macro, the buttons on the right side of the window get activated. We can execute, edit, or delete the selected Macro using the respective button.
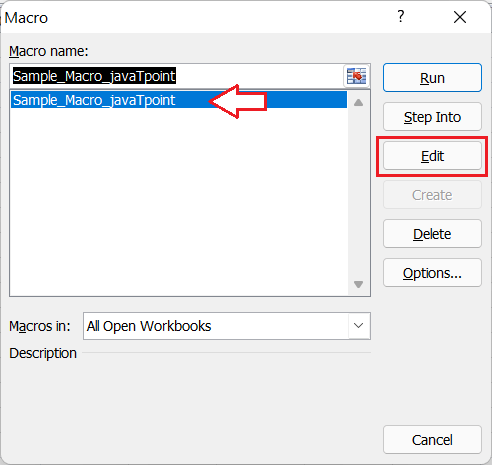
To view or edit the recorded Macro, we need to click the Edit button. This will open/ launch the VBA window, displaying the code of the selected Macro. We can make changes in the code accordingly. However, it requires basic knowledge of VBA codes and programming.
Additionally, we can directly access the sheet codes by pressing the keyboard shortcut 'Alt + F11'.
How to run/execute a Macro in Excel?
Many methods can be used to run/ execute a Macro. However, the most useful method is to use keyboard shortcut keys that we assign while recording a Macro. The following are a few other commonly used ways by which a Macro can run:
Executing a Macro using the Shape
One of the easiest ways to run a macro is to use (click or press) an inbuilt Shape. We can insert a particular shape and associate the 'Run Macro' command with it to be executed. This way, whenever we need to execute a script, we can click on that shape. One advantage of using shapes to run a macro in a sheet is that we can insert multiple shapes, with each associated with a different unique macro.
Below are the steps we should follow to run a macro using an Excel Shape:
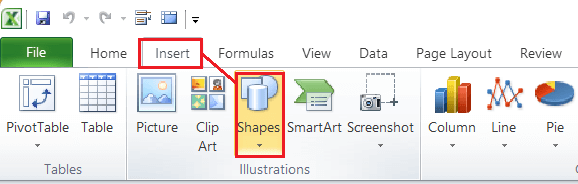
- First, we need to navigate the Insert tab and click on the Shapes Next, we must click on any desired shape to insert it into our active sheet.
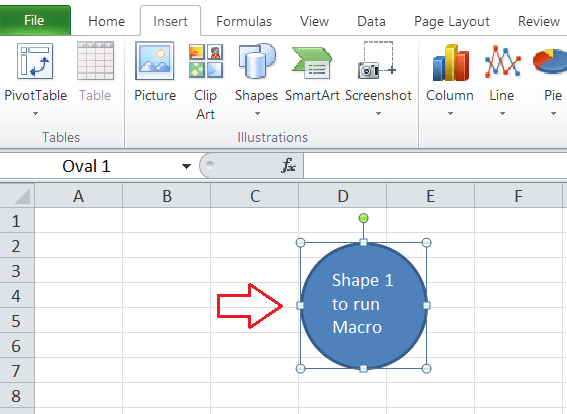
- After selecting the desired shape, we must click on any area to insert the shape within the sheet. We can move the position within the sheet accordingly. Also, we can format the shape and insert the text inside the shape to make it more meaningful for the Macro.
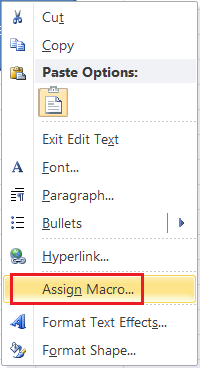
- Once the shape has been inserted into the sheet, we must press the right-click button on it and select the 'Assign Macro' option.
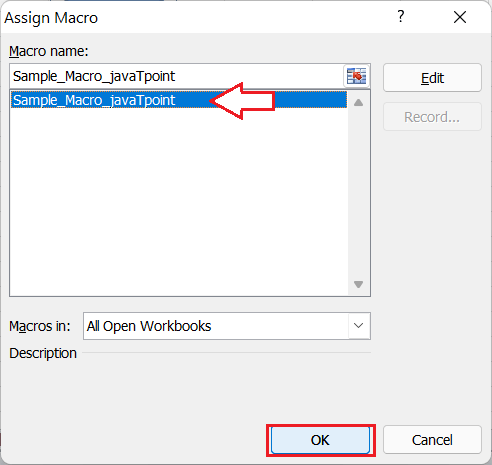
- In the next window, we must select any existing recorded Macro that we wish to assign for the inserted (or selected) shape in the sheet. After that, we must click the OK
Executing a Macro using the Button
When we insert a shape to execute a Macro, we can format it accordingly. However, this is not possible with the Macro button. It follows the standard Excel format. Like the previous method, we can assign any desired Macro to a button and click on it to execute that associated Macro whenever needed. Below are the steps we should follow to run a macro using Excel Button:
- First, we need to go to the Developer tab and click on the Button tool under the' Controls' section.
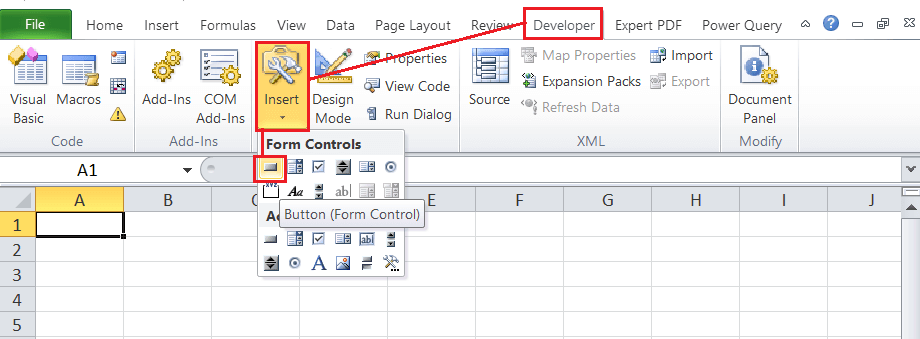
- In the next step, we must click on any area on the sheet where we want to insert the Macro-enabled button. As soon as we click anywhere in the sheet, we see the 'Assign Macro' window. We need to select the Macro that we want to link with the button to execute and click the OK

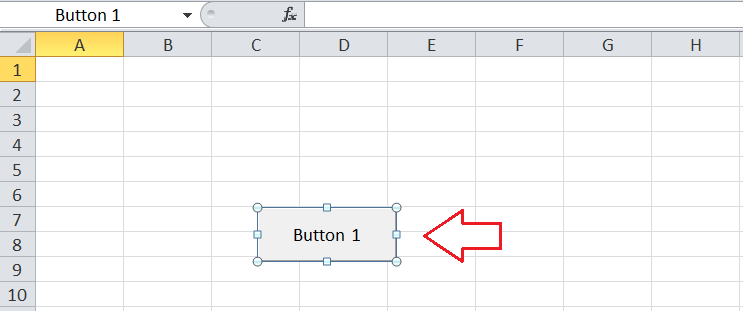
- After that, we get a rectangular button inserted in the area we clicked. Clicking on this button will immediately execute the respective Macro.
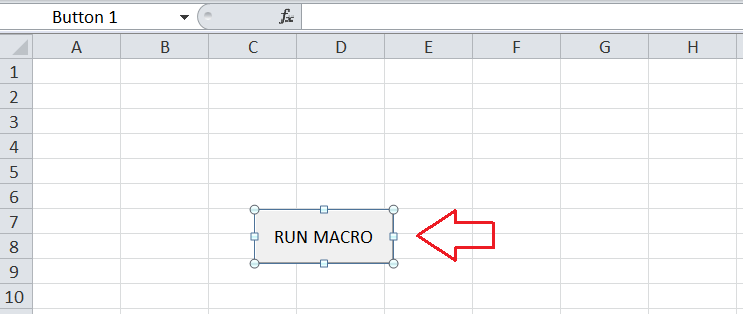
Although we cannot adjust the formatting for the button, like color and shape, we can edit the text inside it. We can type any desired text to make it easy to understand the functioning of that particular button.
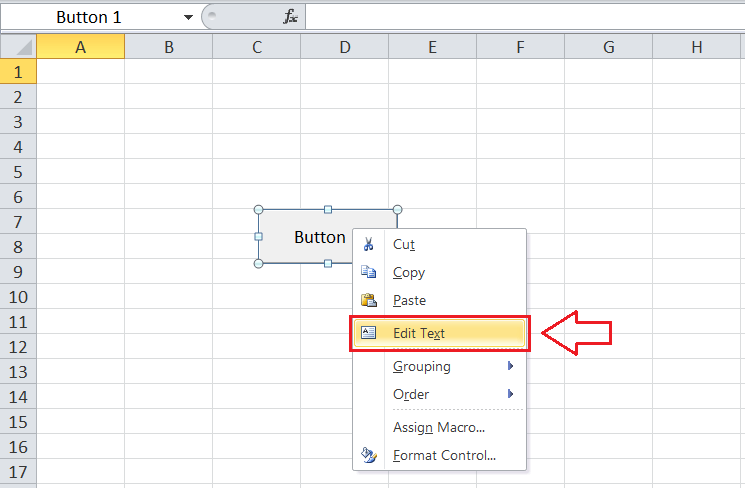
To edit the text inside the Macro button, we must press the right-click button and select the 'Edit Alt Text' option. After that, we can enter any desired name accordingly.
Executing a Macro using the Ribbon
When multiple macros are saved or recorded in the same workbook, defining different tasks, it is better to use the ribbon tool to execute a specific macro. All macros are listed under a single list when we use the Macros tool from the Ribbon, making it easy to select and execute any desired macro. Below are the steps we should follow to run a macro using Excel Ribbon:
- First, we need to go to the Developer tab (enable it, if not enabled), then click on the Macros tool/ button under the section named 'Code'.

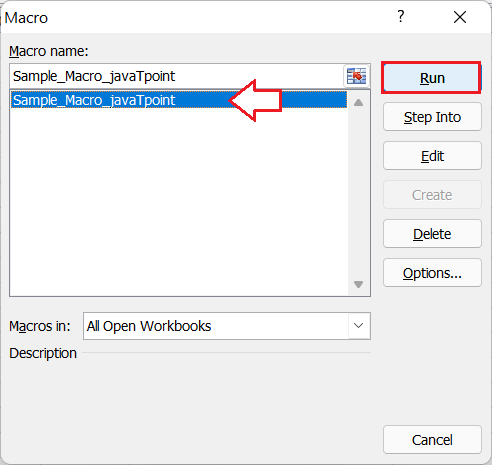
- We see a list containing all Macros created or saved in the opened workbooks (Excel Windows) in the next window.
- Next, we need to select a Macro and click on the 'Run' button.
Executing a Macro using the VBA
If the user and creator of the Macros are the same, then we can also run/ execute Macro using the VBA editor. Below are the steps we should follow to run a macro using Excel VBA:
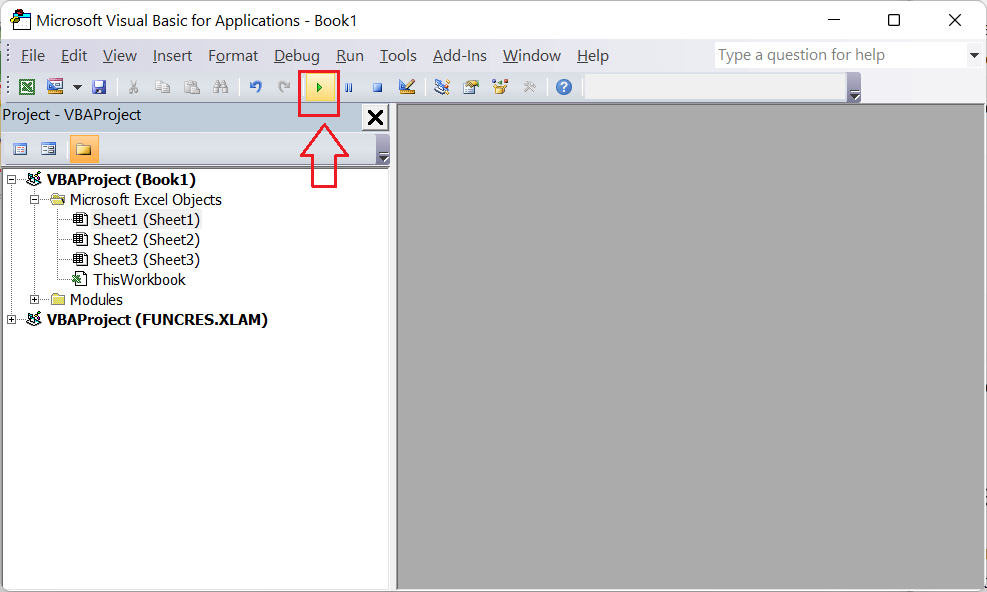
- First, we need to go to the Developer tab on the Ribbon and click on the 'Visual Basic' button, as shown below:

- We must locate the 'Run Macro' button in the next window. Also, we can press the 'F5' function key.
- We will see a list of all Macros associated with that particular workbook in the next window. Like the previous method, we must select the desired Macro and click the 'Run' button.
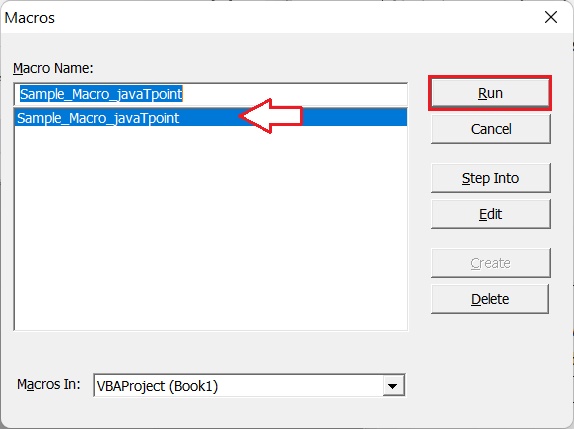
As soon as the 'Run' button is pressed, the selected Macro will be executed, and the respective action (s) will be performed.
Enabling the Macro Security Settings in Excel
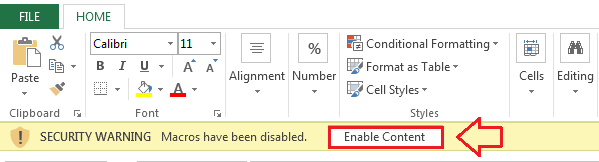
When we try to open an Excel workbook with Macros, we usually see a security warning saying: "Macros have been disabled". It is displayed under the Ribbon, and we must click the 'Enable Content' button to access/ use Macros in the corresponding worksheet.
Apart from this, we can also prevent this security setting from occurring in our Excel. We need to change the 'Trust Center Settings' from Excel Options. It is a one-time process and includes the below steps:
- First, we need to navigate the 'File' tab, click 'Options', and select the 'Trust Center' in the category list. Under this category, we must click the 'Trust Center Settings' button.
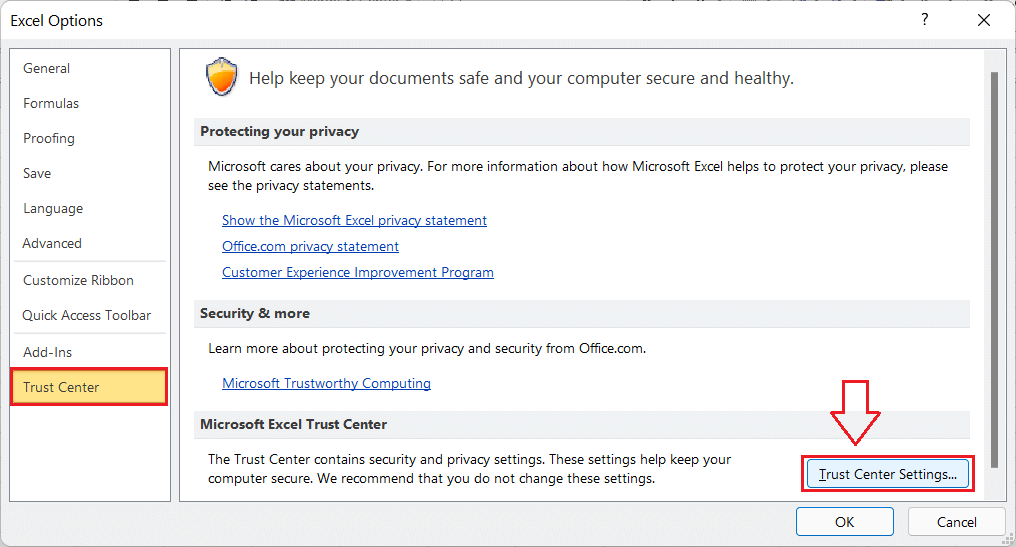
This will launch an additional window/ dialogue box of the 'Trust Center'.
- In the next (Trust Center) window, we must select 'Macro Settings' from the category list. We must click on the radio button associated with the 'Enable all macros' option here. After that, we must click the OK
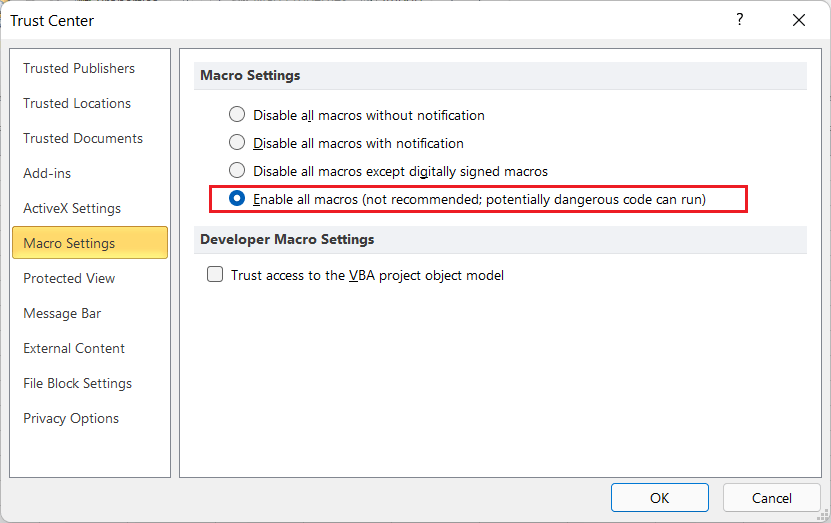
Once we have completed the above steps, we will not see any notification while opening a macro-enabled Excel file. However, it is recommended to use the default option (Disable all macros with notification) as it prevents macros from running without our knowledge. It is helpful to use default settings when we download excel file from the internet or get it from other unknown/ untrusted sources.
Step by Step Example of Recording and Executing a Macro in Excel
Now, we have already discussed and understood the basics of Excel Macros. Let us now understand the concept and importance of using Macros in Excel with the help of an example.
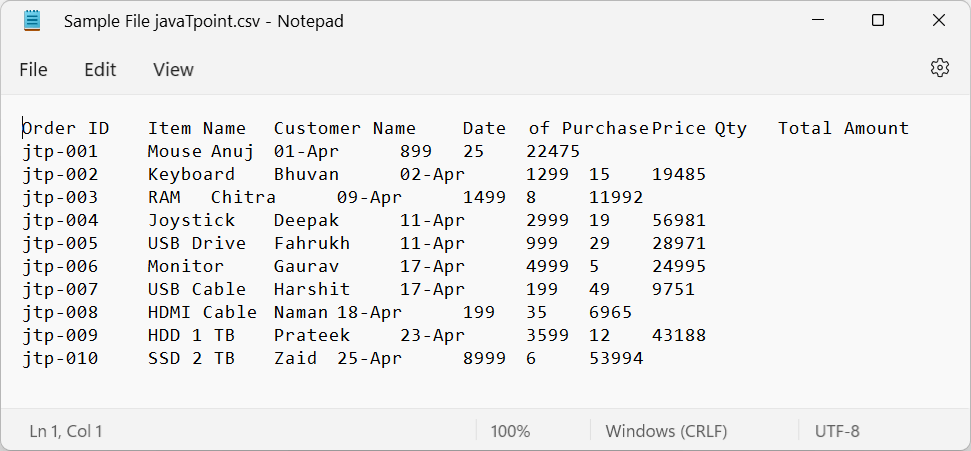
Suppose we frequently receive text files from our clients, and we import these text files into Excel and format the data in the same pattern every time. So, we can create a Macro and execute it whenever we need to work with the newly received text files.
Consider the following text file as an example data set, where we have details of the different items along with their prices and sold quantities:
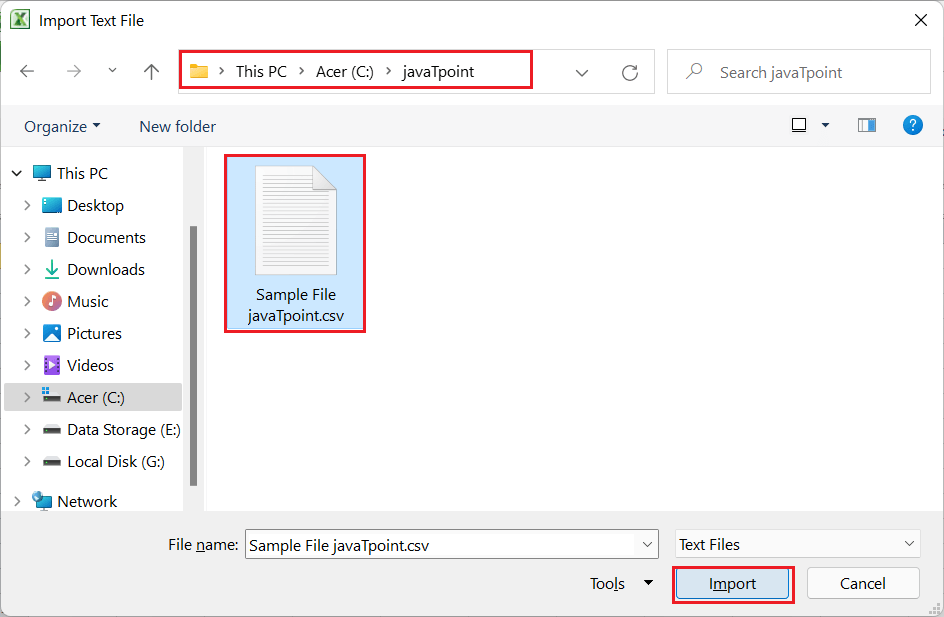
Suppose that our text file is saved in a 'javaTpoint' folder in drive 'C'. We must perform the below steps to record a Macro to execute the process of exporting the data from the text file into an Excel file and format it accordingly.
- First, we need to open an Empty Excel workbook. We must go to the Developer tab > Record Macro in this newly created workbook. This will open an additional window, as shown below:
In the above image, we need to provide all the details. For example purposes, we type the 'Macro name' as 'Sample_Macro_javaTpoint' and provide other data like the below image:
- After giving all the necessary data, we click the OK button, and recording for the Macro starts immediately. We must now perform the actions/ operations that we want to record. Thus, we place the cursor in the first cell, navigate the Data tab, and select the 'From Text' button under the 'Get External Data' section.
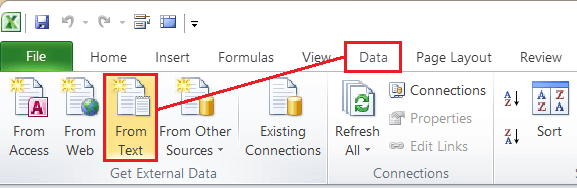
This will launch File explorer, using which we can select our text file from the 'javaTpoint' folder under drive 'C'.
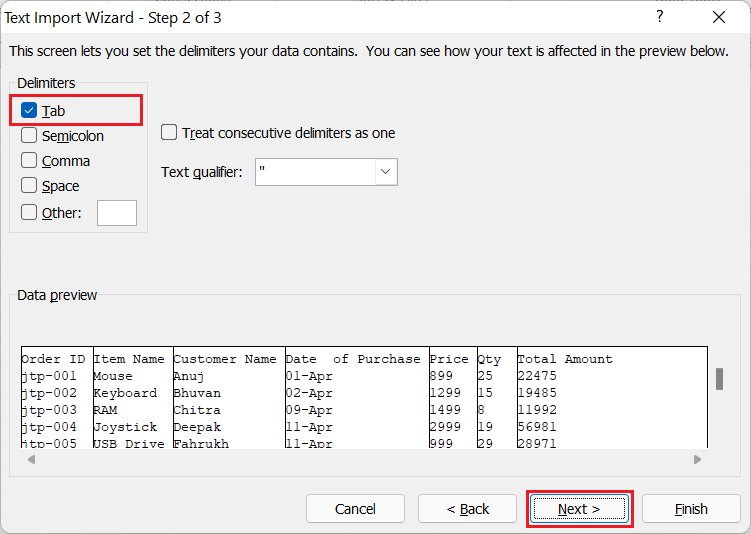
- After we select/ import the text file into Excel, we will see 'Text Import Wizard'. It will look like this:
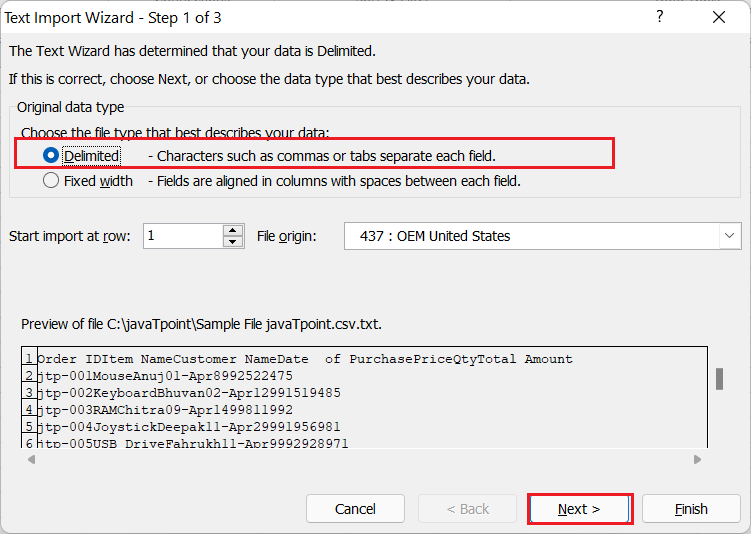
We must ensure that the displayed (highlighted) options are arranged the same as in the image above. After that, we must click the 'Next' button to go to Step 2.
- In the next step, we must select the 'Delimiters' to separate the data in our text file into different columns. Since the data in our example text file is separated using the tabs, we select the 'Tab' option in step 2. After that, we must click the 'Next' button.
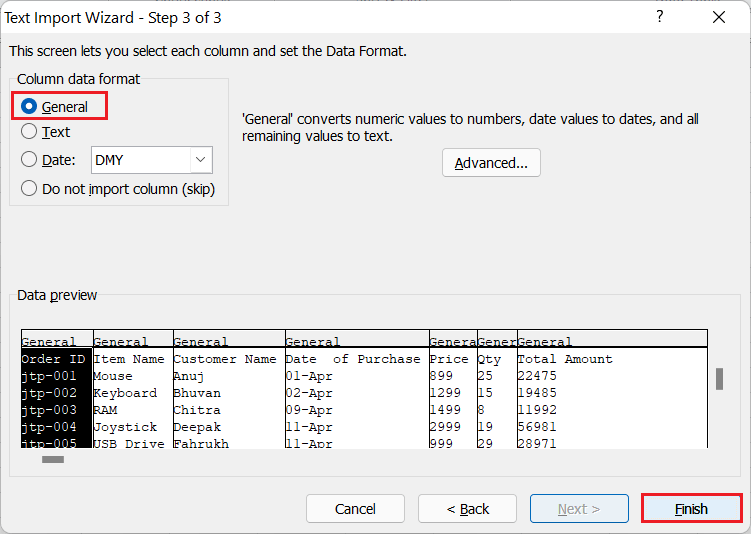
- In step 3, we must select the 'General' option and click the 'Finish' button. This will import the data from the text file into our Excel workbook.
- After that, we can format the data accordingly. For example purposes, we make the text in headers Bold.

- Once all the desired actions are performed, we must click on the 'Stop Recording' button under the 'Developer' tab.
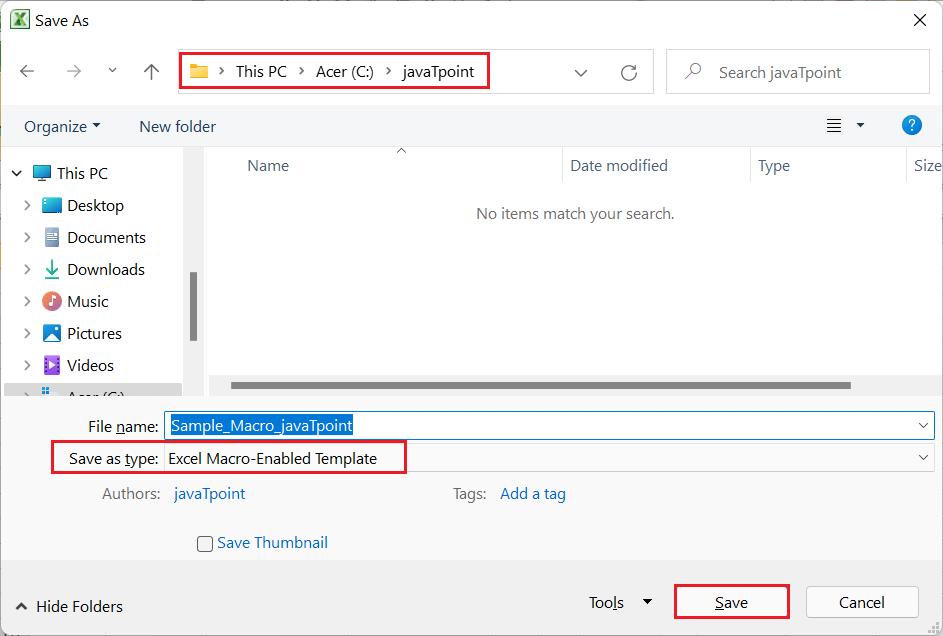
- Next, we delete all the imported data from our worksheet and save the workbook as 'Excel Macro-enabled Workbook'. We can also create another copy of this 'Macro-enabled workbook' based on the number of text files we need to convert.
We can go to 'View > Macros > View Macro' in our newly created Macro file to see the recorded Macro.
- Whenever we receive a text file to convert, we need to open a copy of the Macro-enabled Excel file and execute the Macro we created. Since we created a shortcut (Ctrl + Shift + B) to execute a Macro while creating it, we can execute our script using the shortcut.
|

 For Videos Join Our Youtube Channel: Join Now


