| |

Angular Lifecycle hooksA component instance has a lifecycle that starts when Angular instantiates the component class and renders the component view and its child views. The lifecycle continues with change detection, as Angular checks when data-bound properties change and updates both view and component instances as needed. The lifecycle ends when Angular destroys the component instance and removes its rendered template from the DOM. Directives have a similar lifecycle, as Angular creates, updates, and destroys instances in execution. Your application can use lifecycle hook methods to tap into key events in a component's lifecycle or instruct new instances to start, start detecting changes when needed, update during deployment, and clean up the instances before deleting them. PrerequisitesBefore working with lifecycle hooks, you should have a basic understanding of the following: React to lifecycle eventsYou can respond to events in the lifecycle of a component or directive by implementing one or more lifecycle hook interfaces in the Angular core library. Hooks allow you to act on a component or directive instance as appropriate, as Angular creates, updates, or destroys that instance. Each interface defines a prototype for a single hook method, whose name is the interface name prefixed with ng. For example, the OnInit interface has a hook method called ngOnInit(). Suppose you implement this method in your component or directive class. In that case, Angular calls after checking the input properties of that component or calling the directive for the first time. You don't need to implement all of the lifecycle hooks, just all you need. Lifecycle event sequenceAfter your application instantiates a component or directive by calling its constructor, Angular calls the hook methods that you have invoked at the appropriate point in that instance's lifecycle. Angular executes hook methods in the following order. You can use it to perform the following types of tasks.
Lifecycle example setThe live example demonstrates the use of lifecycle hooks through a series of exercises presented as components under the control of the root AppComponent. In each case, a parent component serves as a test rig for a child component that exposes one or more lifecycle hook methods. The following table lists the exercises with a brief description. The sample code is also used in the following sections to demonstrate specific functions.
Initializing a componentUse the ngOnInit() method to perform the following initialization tasks. Perform complex initialization outside the constructor. Components must be cheap and safe to manufacture. It would be best not to worry that a new component will contact a remote server before you decide to demonstrate it or you are under test. A ngOnInit() is a good place for a component to fetch its initial data. Set the component after Angular has set the input properties. Constructors should do nothing more than set initialized local variables to simple values. Keep in mind that the data-bound input properties of the instruction are not set until after construction. If you need to initialize the directive based on those properties, set them when ngOnInit() is run. The ngOnChanges() method is your first time accessing those properties. Angular calls ngOnChanges() before ngOnInit(), but several times after that. It only calls ngOnInit() once. Cleanup on the destruction of the instancePut cleanup logic in ngOnDestroy(), which logic should run before Angular destroys the instruction. It is the place to free resources that will not be automatically garbage-collected. If you neglect to do so, you risk a memory leak.
The ngOnDestroy() method also has time to notify another part of the application that the component is going away. General examplesThe following examples demonstrate the call sequence and relative frequency of various lifecycle events and how hooks can be used separately or together for components and instructions. Sequence and frequency of all lifecycle eventsTo show how Angular calls hooks in the expected order, PeekABooComponent displays all the hooks in a component. The following snapshot shows the status of the log after clicking the Create button and the Destroy button. 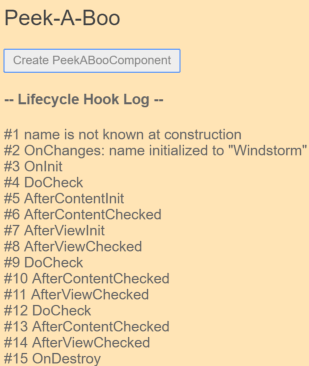
The order of log messages follows the defined hook calling order: onchange, oninit, doCheck (3x), afterContentInit, aftercontentChecked (3x), afterviewInit, afterviewChecked (3x), and onDestroy. Note that the log confirms that the input property (the name property) does not have a specified value in its creation. Input properties are available to the onInit() method for further initialization. The user clicked on the Update Hero button, and the log would show another OnChange and two more triples of DoCheck, AfterContentCheck and AfterViewCheck. Note that these three hooks often fire, so it's important to keep their logic as lean as possible. Use directives to watch the DOM.The spy example demonstrates how you can use the hook method for components as well as directives. SpyDirective implements two hooks, ngOnInit() and ngOnDestroy(), to detect a viewed element in the current view. This template implements SpyDirective on an <div> in the ngFor hero repeater managed by the native SpyComponent. The instance does not do any initialization or cleanup. It tracks the presence and disappearance of an element in the scene by recording instructions when they are instantiated and destroyed. Such a spy directive can provide insight into a DOM object that you cannot change directly. You may not touch the implementation of the original <div> or modify any third-party components. However, you can view these elements with a directive. The directive defines ngOnInit() and ngOnDestroy() hooks that log messages to the parent using the injected LoggerService. You can apply spy to any parent or component element and see that it is simultaneously initialized and destroyed as that element. Here, it is attached to the repeating hero <div>: src/app/spy.component.html Each spy build and destruction hook signifies the presence and disappearance of an attached hero <div> with an entry in the log. Adding a hero creates a new hero <div>. The spy's ngOnInit() logs that event. The reset button clears the list of heroes. Angular removes all hero <div> elements from the DOM and destroys their spy directives at once. The spy's ngOnDestroy() method reports its last moments. Use component and directive hooks togetherIn this example, a CounterComponent uses the ngOnChanges() method to log a change each time the parent component increments its InputCount property. This example applies SpyDirective to the CounterComponent log from the previous example to see the creation and destruction of log entries. Using change detection hooksAngular calls the ngOnChanges() method of a component or directive whenever it detects a change in input properties. The onchange example demonstrates this by monitoring the onchange () hook. The ngOnChanges() method takes an object that maps each changed property name to a simple change object that holds the current and previous property values. This hook iterates over the changed properties and logs them. The example component, OnChangesComponent, has two input properties: hero and power.src/app/on-changes.component.ts Here's the sample in action as the user makes changes. 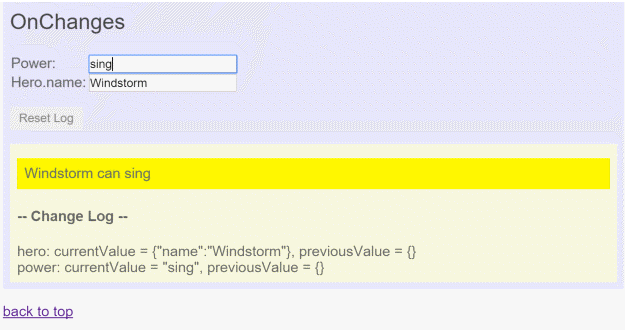
The log entries appear as the string value of the power property change. However, note that the ngOnChanges() method does not catch changes in the hero. It is because Angular calls the hook only when the value of the input property is changed. In this case, a hero is the input property, and the value of the hero property is a reference to the hero object. The object reference did not change when the value of its name property changed. Responding to view changesAs Angular traverses the view hierarchy during change detection, it needs to ensure that changes in one child do not attempt to cause changes in its parent. Because of how unidirectional data flow works, such a change will not be done properly. If you need to make a change that reverses the expected data flow, you must trigger a new change detection cycle to submit that change. The examples show how to make such changes safely. The Afterview sample explores the afterviewInit() and afterviewChecked() hooks that Angular calls after creating a component's child view. Here's a child view that displays a hero's name in an <input>: ChildViewComponent The following hooks take action based on changing values within the child view, which can only be accessed by querying the child view using the @ViewChild property. AfterViewComponent (class excerpts) Responding to Estimated Content ChangesContent projection is a way of importing HTML content from outside the component and inserting that content into the component's template at a specified location. You can identify the content projection in the template by looking at the following constructions.
AngularJS developers know this technique as transclusion. The AfterContent sample explores the afterContentInit() and afterContentChecked() hooks, which Angular calls after projecting external content into the component. Consider this variation on the previous Afterview example. This time, instead of including the child view within the template, it imports the content from the parent of the AfterContent component. Following is the basic template. Note that the <app-child> tag resides between the <after-content> tags. Do not put content between element tags of a component unless you intend to project that content into the component. Now, let's look at the component's template. The <ng-content> tag is a placeholder for external content. It tells Angular where to insert that content. In this case, the inferred content is the <app-child> from the parent. 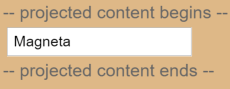
Using hook after materialThe after material hooks are similar to the after-view hooks. The main difference is in the child component.
The following AfterContent hooks take action based on changing values in a ContentChild, which can be accessed by simply querying for them using a property decorated with @ContentChild. Defining custom change detectionTo monitor changes where ngOnChanges() won't catch them, you can implement your change checking, as shown in the DoCheck example. This example shows how you can use the ngDoCheck() hook to detect and act on changes that Angular doesn't catch on its own. The DoCheck sampler extends the OnChanges sampler with the following ngDoCheck() hook: This code inspects some values of interest, grabs and compares their current position against previous values. It writes a special message to the log when there is no real change in hero or power so that you can see how many times DoCheck() is called. The results are illuminating. 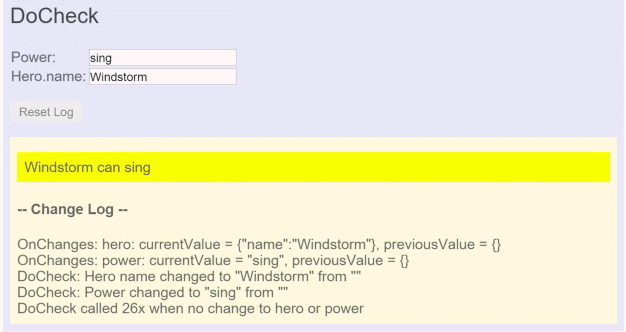
While the ngDoCheck() hook can detect when the hero's name has changed, it is very expensive. This hook is called peak frequency - after each change detection cycle, no matter where the change occurred. In this example, it has been called more than twenty times before the user can do anything. Most of these initial checks are triggered by Angular's first rendering of unrelated data elsewhere on the page. Simply moving the cursor to another <input> initiates the call. Relatively few calls reveal true changes to the relevant data. If you use this hook, your implementation must be extremely lightweight, or the user experience suffers. An Angular 2 application goes through a complete set of processes or lifecycles from start to finish. The following diagram shows the entire process in the lifecycle of an Angular two application. 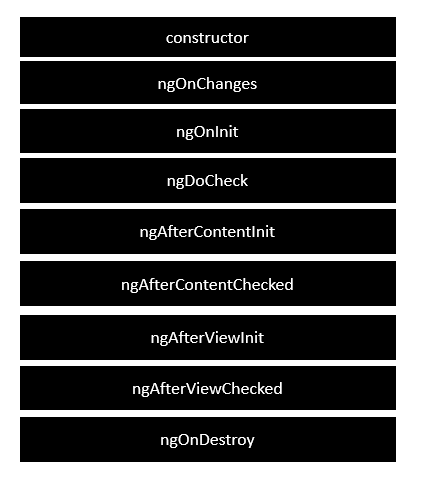
The following is a description of each lifecycle hook. ngOnChanges - This method is called when the value of a data-bound property is changed. ngOnInit - This is called when a directive/component is initialized after Angular has displayed data-bound properties. ngDoCheck - This is for detecting and acting on changes that Angular may or may not detect automatically. ngAfterContentInit - This is called in react after Angular projects external content into the component's view. ngAfterContentChecked - This is called in react after Angular has checked the estimated content in the component. ngAfterViewInit - This is called in React after Angular has initialized the component's views and child views. ngAfterViewChecked - This is called in React after Abngular has checked the component's views and child views. ngOnDestroy - This is the cleanup step just before the Angular destroy directive/component. The following is an example of implementing a lifecycle hook. In the App.component.ts file, enter the following code. In the above program, we specifically call the ngOnInit lifecycle hook to refer to its value. The value parameter must be set to "hello". Once you have saved all the code changes and refreshed the browser, you will get the following output. 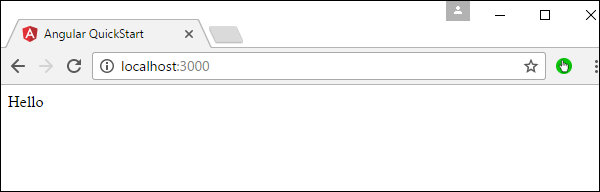
Next TopicAngular RouterLink
|
 For Videos Join Our Youtube Channel: Join Now
Feedback
- Send your Feedback to [email protected]
Help Others, Please Share


