Arduino AccelerometerIn this topic, we will discuss a project based on an accelerometer. The value will be read from the series of accelerometer and received in the Arduino IDE's serial monitor. It means the data will be read and received over the serial port. We will use a three-axis accelerometer that gives acceleration for each Axis as an analog voltage for separate pins. We would be using the ADXL3xx accelerometer series. For example, ADXL320, ADXL322, ADXL321, ADXL335, etc. In this project, we are going to work with the ADXL335 accelerometer. What is accelerometer? The accelerometer is the device capable of detecting changes in motion in the form of acceleration. It can also measure the vibration of a structure. The acceleration is defined as the change in speed or velocity over time. The motion sensors are present inside the accelerometer. How does accelerometer work? The acceleration (change in motion) or the vibration generates the force that causes the piezoelectric material to be stressed. The microscopic crystals structure present in it creates the voltage from the stress. The accelerometer interprets this voltage. The voltage is further used to determine the orientation and velocity. Usage of Accelerometer The uses of the accelerometer are listed below:
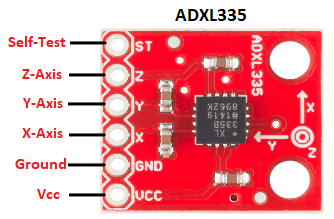
ADXL335 AccelerometerThe structure of ADXL335 is shown below: 
The position of the three axis (X-axis, Y-axis, and Z-axis) will change according to the ADXL335 accelerometer's position. If we hold the board in a different position, the direction of the three-axis will also change. Moving the board in a particular direction will cause a change in the voltage of the respective axis. We can measure the changed voltage on the Arduino. When we hold the board up and flat, the measured acceleration of 9.8m/s^2 will appear on the Z-axis. It is also called as the gravity. Here,
1.0G = of 9.8m/s^2
where, G is the acceleration due to earth gravity. The sensitivity of ADXL335 accelerometer is: s = 0.33V/G. Gravity force per ADC (Analog to Digital Converter) unit is: 
It is because the sensors need 3.3V to operate. The accelerometer at rest will read half of its maximum analog voltage. Note: Some accelerometers work at 5V while some at 3.3V. We need to make sure about the voltage because the 3.3V accelerometer may be damaged with a 5V supply.Let's start the project. Hardware RequiredThe components required for the project are listed below:
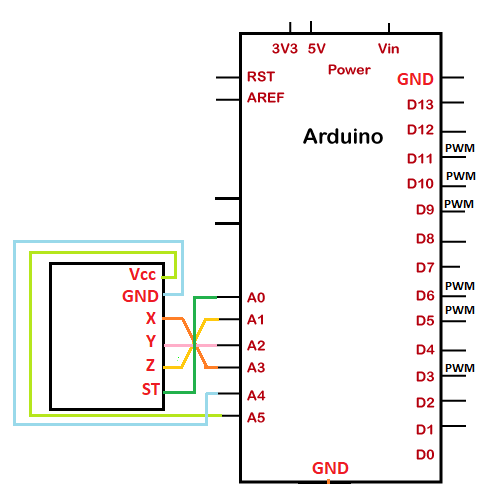
PrincipleWe can directly plugged-in the accelerometer onto the Arduino. It is because the accelerometer operates on minimal current. The Arduino UNO has six analog pins. The three analog pins will be connected to the Vcc, Self-Test, and the Ground pin. The other three analog pins will be used to read the analog output of the accelerometer. StructureThe structure of the project is shown below: 
ConnectionThe connection for the above project is explained below:
SketchWe will upload the code on the Arduino connected with the accelerometer. The output can be clearly seen on the Serial Monitor in the Arduino IDE. Consider the below code:
Next TopicUltrasonic distance sensor
|
 For Videos Join Our Youtube Channel: Join Now
Feedback
- Send your Feedback to [email protected]
Help Others, Please Share


