| |

Arduino LCD DisplayThe LCD (Liquid Crystal Display) is a type of display that uses the liquid crystals for its operation. Here, we will accept the serial input from the computer and upload the sketch to the Arduino. The characters will be displayed on the LCD. The library that allows us to control the LCD display is called Liquid Crystal Library, which is discussed below: The library is declared as: The library is based on a compatible chipset called Hitachi HD44780. It is found on most of the LCDs that are based on text. It works with either an 8-bit mode or 4-bit mode. Here, the bit mode signifies the data lines in addition to the enable, rs, and rw control lines (optional). LCD StructureThe LCD display has a 16-pin interface. The structure of the LCD is shown below: 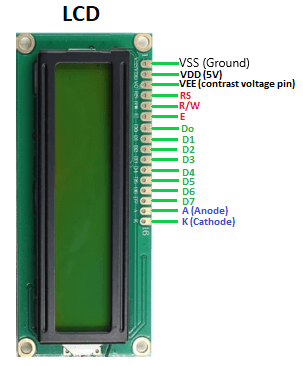
The Liquid Crystal Display has a parallel interface. It means that the microcontroller operates several pins at once to control the LCD display. The 16-pins present on the LCD display are discussed below:
The Register Select (RS) pin controls the memory of the LCD in which we write the data. We can select either the data register or the instruction register. The LCD looks for the upcoming instruction, which is present in the instruction register.
The Read/Write pin selects the reading or writing mode.
The Enable (E) mode is used to enable the writing to the registers. It sends the data to the data pins when the mode is HIGH.
These are eight data pins numbered as D0, D1, D3, D3, D4, D5, D6, and D7. We can set the state of the data pin either HIGH or LOW. Pin 1 of the LCD is the Ground pin, and pin 2 is the Vcc or the voltage source pin. The pin 3 of the LCD is the VEE or the contrast pin. For example, we can connect the potentiometer's output to the VEE and can adjust the contrast of the LCD. The A and K pins are also called as Backlight pins (Bklt+ and Bklt-). Principle of LCDThe process includes putting the data (to be displayed on the LCD screen) into the data registers. The instructions in the Register Select are kept in the instruction register. The liquid crystal library has simplified process to display the characters on the LCD. The LCDs can be controlled in 4-bit or 8-bit modes, which requires 7 and 11 Input/Output pins from the particular Arduino board. Let's discuss a project to display the text on the LCD. Hardware RequiredThe components required for the project are listed below:
Structure of the projectThe structure of the project is shown below: 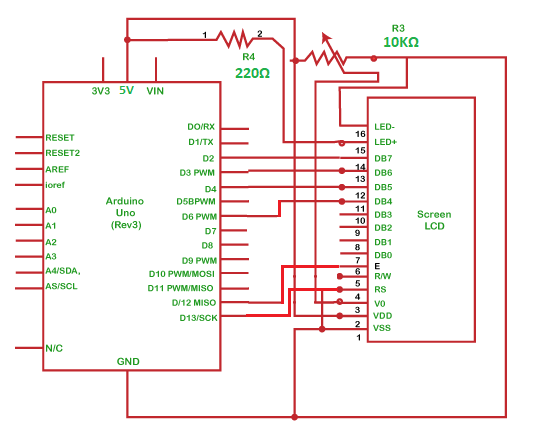
ProcedureThe connection is explained below: We need to first connect the data pins of LCD to the digital pins.
SketchThe code to display the specified message on the LCD display is given below: Connection DiagramWe will show the connection using the Simulator so that the connections become clearer and more precise. We can make the same connection using the hardware devices. 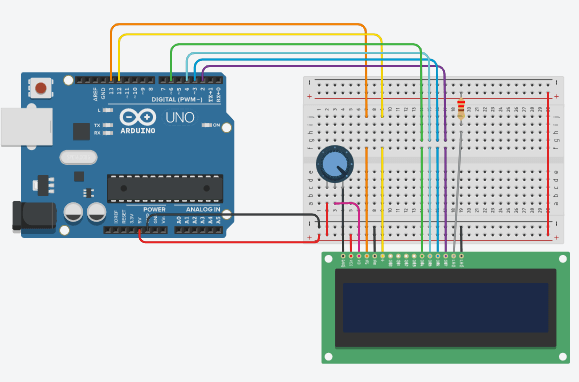
Output The message 'Hello Arduino' will be printed on the LCD display, as shown below: 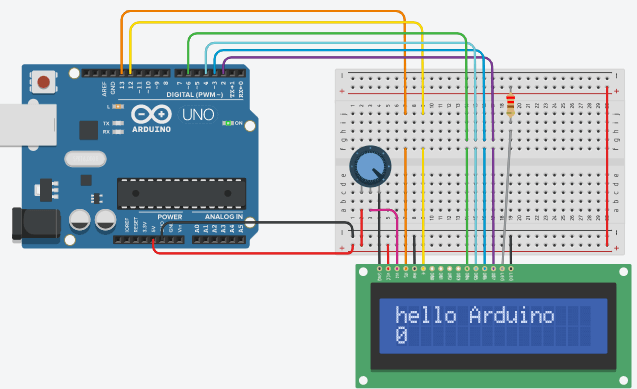
Next TopicArduino Potentiometer
|
 For Videos Join Our Youtube Channel: Join Now
Feedback
- Send your Feedback to [email protected]
Help Others, Please Share


