| |

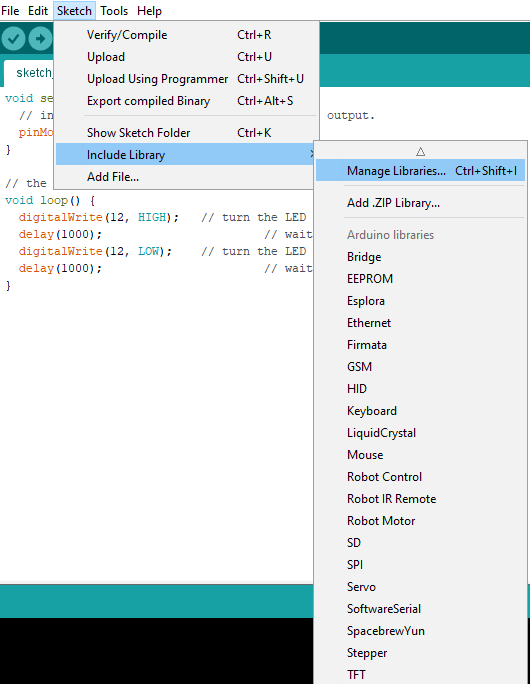
Arduino LibraryThe Library is considered as the advanced feature, which extends the capabilities of the Arduino IDE. It means that the libraries provide extra functionality to the programming platform of Arduino. The libraries in Arduino are written in C or C++ (.cpp). These libraries allow us to manipulate data and work with the hardware. To implement any Library in the Arduino IDE, go to the Sketch -> Import Library. There are several libraries available for download. We can also create our own library. Let's discuss some of the libraries. Standard LibrariesThe standard libraries are listed below: EEPROMIt stands for Electronic Erasable Programmable Read Only Memory. The EEPROM is associated with the microcontroller present on the AVR or Arduino Boards. The EEPROM library allows us to read the bytes stored in the memory when the power of the board is off. The size of EEPROM varies in different boards, such as 1KB or 1024 bytes on the ATmega328P. It can also be of 4KB or 4096 bytes on the Microcontroller ATmega2560, etc. The library is declared as: For example, EEPROM Read, EEPROM Clear, EEPROM Write, EEPROM Get, EEPROM Update, EEPROM Put, EEPROM Iteration, etc. Ethernet LibraryThe Ethernet library works with the Arduino Ethernet shield and other related devices. The Ethernet library allows us to connect the Arduino board to the Internet. The SPI bus acts as an intermediate between the board and the shield. The associated library is: For example, TelnetClient, WebServer, WebClientRepeating, WebClient, ChatServer, DnsWebClient, UdpNtpClient, UdpSendReceiveString, etc. Firmata LibraryFor the programming environment, we can create custom firmware without producing our own objects and protocols. It is used to implement the firmware protocol, which communicates with the software on the host computer. The associated library is: GSM LibraryThe GSM library exists on the IDE version 1.0.4 and up. The GSM library allows us to perform the operations on the Arduino board similar to the GSM phone, such as internet connection, send and receive messages, and to place voice calls. The library is declared as: Liquid Crystal LibraryIt is a library that permits Arduino to communicate with LCDs, which are based on a compatible chipset called Hitachi HD44780. Such chipsets are found on most types of text-based LCDs. It works with either an 8-bit mode or 4-bit mode. Here, the bit mode signifies the data lines in addition to the enable, rs, and rw control lines (optional). The library is declared as: The examples are Hello World, Cursor, Blink, etc. SD LibraryIt allows writing to or reading from SD cards. For example, Arduino Ethernet Shield. The file names include the paths separated by the forward slashes, which are passed to the SD Library. But, SPI is used for the communication between the SD card and the Arduino. The library is declared as: The examples are Dump files, List Files, Read Write, etc. Servo LibraryThe Servo library permits Arduino to work with servo motors. It allows controlling the integrated shaft and gears. We can also position shaft at different angles between 0 and 180 degrees. The servo library on Arduino boards can support upto 12 motors, while on Arduino Mega board, it can support upto 48 motors. The library is declared as: SPI LibraryThe SPI (Serial Peripheral Interface) is a serial data protocol. The microcontrollers use the serial protocol to communicate over short distances with one or more peripheral devices quickly. The required connection of SPI is a full-duplex that allows devices to simultaneously sent and receive data. The library is declared as: The examples are Dump files, List Files, Read Write, etc. Stepper LibraryThe Stepper library in Arduino permits to control of bipolar or unipolar stepper motors. The library is declared as: The Stepper includes stepper speed control, stepper one revolution, etc. Software Serial LibraryThe Software Serial Library permits serial communication over digital Input/output pins. The 0 and 1 pins are inbuilt on Arduino for the serial interface. We can include multiple serial ports in our code that can operate with speed upto 115200 bps (bits per second). The library is declared as: TFT LCD LibraryThe TFT LCD library is included in the IDE version 1.0.5 and later. It allows the Arduino to communicate with the TFT LCD screen. It further helps to draw images, shapes, lines, and text to the screen. The SD card slot present on the onboard screen can be used by implementing the SD library. The TFT library for communication depends on the SPI library with the SD card and screen. The library is declared as: WiFi LibraryThe WiFi library permits Arduino to establish a connection with the internet. It can either be a server to receive the incoming connections or a client to perform outgoing connections. The personal encryptions supported by the WiFi library are WPA2 and WEP except for WPA2 Enterprise. Arduino uses the SPI bus to communicate with the WiFi shield. The library is declared as: The examples include WiFiWebClient, WiFiWebServer, etc. Audio LibraryThe Audio library is compatible with the Arduino Due board only. It enables the board to playback .wav files from the specific storage devices, such as the SD card. It plays sounds by using the DAC0 and DAC1 pins. The library is declared as: The example is a Simple Audio Player. Audio Zero LibraryIt enables the board (Arduino Zero, MKR1000, and MKRZero) to playback .wav files from the storage devices, such as the SD card. Arduino Zero and MKR1000 board play sound by using the DAC0 pin. The library is declared as: The example is the Simple Audio Player Zero. Arduino Sound LibraryThe Arduino Sound Library permits the board to analyze and play audio data, which is provided by Arduino on SAMD21 based board using the I2S bus. The SAMD21 based boards are Arduino Zero, MKR1000, MKRZero, or Genuino Zero. The library is declared as: The examples include WavePlayBack, ClapDetector, WhistleDetector, etc. Now, let's discuss the process to install the library in Arduino. How to install a library in Arduino?The steps are listed below: Arduino Library Manager
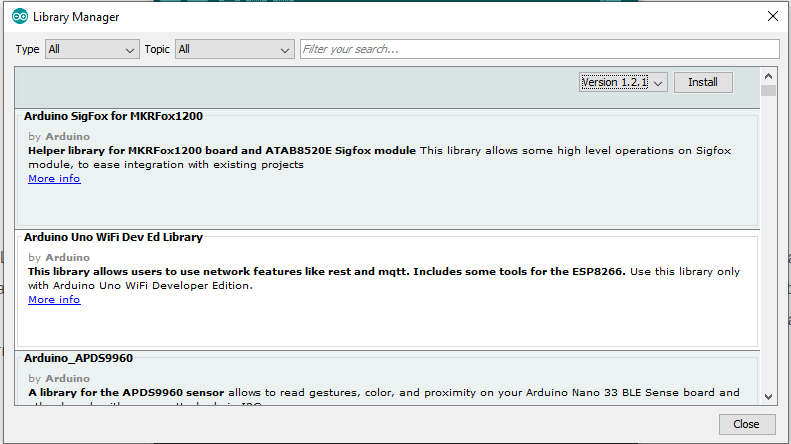
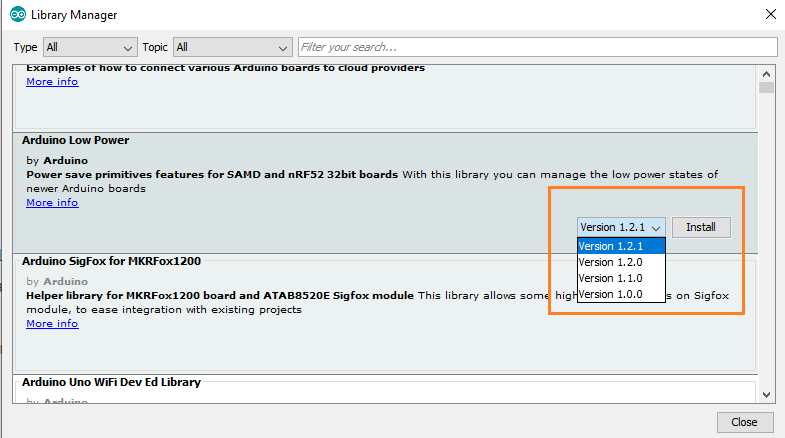
Sometimes there is only one version available for download. In such case, the dropbox of the version will not appear. Hence, it's normal. We need to wait for the library to download. The downloading will depend on the connection speed. The 'INSTALLED' tag will appear in front of the library that is already installed on our computer. Importing a .zip LibraryIf we want to add our own library, we can select the desired folder from our computer. The particular zip file containing the library can be imported in the Arduino. It is shown below: 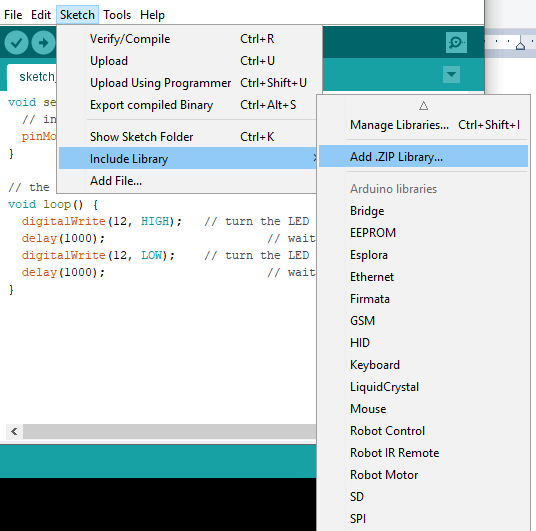
We can also recheck from the option Sketch -> Include library to see that the added libraries are present or not on the list. We are not required to unzip the downloaded library. The file will remain in the .zip format. We can download the 3rd party libraries starting with the Arduino IDE version 1.0.5.
Next TopicArduino LCD Display
|
 For Videos Join Our Youtube Channel: Join Now
Feedback
- Send your Feedback to [email protected]
Help Others, Please Share


