| |

Arduino Serial |Serial.begin()Serial CommunicationThe serial communication is a simple scheme that uses the UART (Universal Asynchronous Receiver/Transmitter) on the Microcontroller. It uses,
For a 3.3V board, it uses
Every message sent on the UART is in the form of 8 bits or 1 byte, where 1 byte = 8 bits. The messages sent to the computer from Arduino are sent from PIN 1 of the Arduino board, called Tx (Transmitter). The messages being sent to the Arduino from the computer are received on PIN 0, called Rx (Receiver). These two pins on the Arduino UNO board look like the below image: 
When we initialize the pins for serial communication in our code, we cannot use these two pins (Rx and Tx) for any purpose. The Tx and Rx pins are also connected directly to the computer. The pins are connected to the serial Tx and Rx chip, which acts as a serial to USB translator. It acts as a medium for the computer to talk to the Microcontroller. The chip on the board looks like the below image: 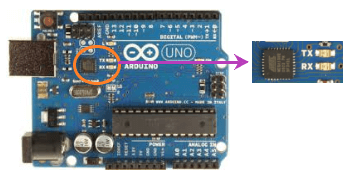
The object can include any number of data members (information) and member functions (to call actions). The Serial.begin( ) is a part of the serial object in the Arduino. It tells the serial object to perform initialization steps to send and receive data on the Rx and Tx (pins 1 and 0). Let's discuss Serial.begin( ) in detail. Arduino Mega has four serial ports. The Tx pins on the Mega board are listed below:
The Rx pins on the Mega port are listed below:
The communication with the Tx and Rx pins would cause interference and failed uploads to the particular board. If we require a serial port for communication, we need to use a USB-to serial adapter. It is a mini USB connector, which converts the USB connection to the Serial RX and TX. We can directly connect the adapter to the board. There are five pins present on the USB-to serial adapter, including RX, TX, reset button, and GND (Ground). Serial.begin ( )The serial.begin( ) sets the baud rate for serial data communication. The baud rate signifies the data rate in bits per second. The default baud rate in Arduino is 9600 bps (bits per second). We can specify other baud rates as well, such as 4800, 14400, 38400, 28800, etc. The Serial.begin( ) is declared in two formats, which are shown below:
Where, serial: It signifies the serial port object. speed: It signifies the baud rate or bps (bits per second) rate. It allows long data types. config: It sets the stop, parity, and data bits. Example 1: The serial.begin (4800 ) open the serial port and set the bits per rate to 4800. The messages in Arduino are interchanged with the serial monitor at a rate of 4800 bits per second. Let's consider another example. Example 2: It is shown below: 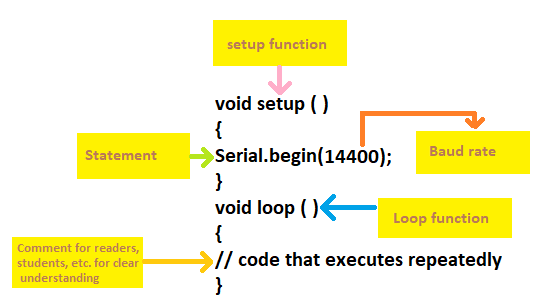
Next TopicArduino Serial.print ( )
|
 For Videos Join Our Youtube Channel: Join Now
Feedback
- Send your Feedback to [email protected]
Help Others, Please Share


