| |

Arduino SwitchSwitches are used to turn ON/OFF devices and to connect different parts of a circuit. The slide-switch in Arduino moves the slider of the switch from the open position (ON) to the closed position (OFF). It allows the flow of current in the circuit without the need for splice wire. The slide switches are widely used in small circuits applications. There are two types of circuits, which are shown below:
The closed circuits have closed loop. Electrons can easily flow in a closed circuit and light up an LED. 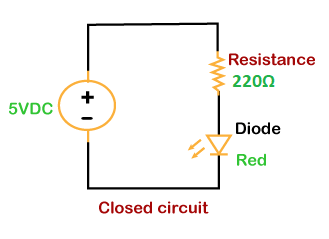
The open circuits have open ends, due to which electrons cannot flow through the circuit. 
We can use an electronic component switch, to open and close circuits without the need to disconnect the wires by hand again and again. Types of SwitchesThere are major four types of switches in Arduino, which are listed below:
It is a switch that has one input and one output. The circuit is ON when the switch is closed and vice versa. 
It is a three-terminal switch. It has a single input, which can switch between two outputs. 
It is a switch with one input and three outputs, where each input corresponds to any of the output in a circuit. 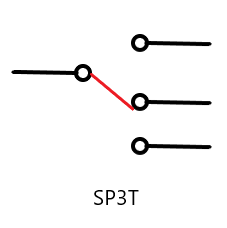
It is a switch with two inputs and four outputs. Each input of a switch in Arduino can be connected to either of the two outputs. 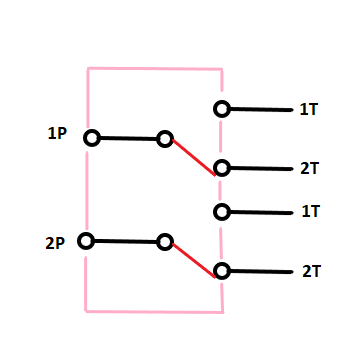
where, Pole: It signifies the number of circuits the switch can control. Throw: It signifies the number of positions in which each pole of the switch can connect to it. Code ExampleLet's discuss an example to light an LED using a Switch. Here, we will use the SPDT (Single Pole Double Throw) Switch. If we leave one side of the switch, it can work as SPST (Single Pole Single Throw) switch. Components Required The required components are listed below:
The steps for such an example are listed below: 1. Attach the green LED on the breadboard. 2. Connect a resistor in series with the LED. 3. Attach Slide switch on the breadboard, as shown below: 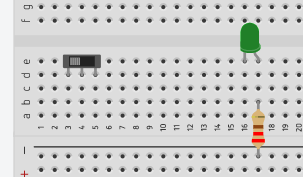
4. Connect the negative pin of the LED to the Ground. 5. Connect the positive terminal of LED in series with the resistor to PIN 8. 6. Connect the common terminal or the middle terminal to pin number 3. It is because the middle terminal is the input terminal. 7. Connect one end of slide switch to Ground and another end to 5V. The circuit is shown below: 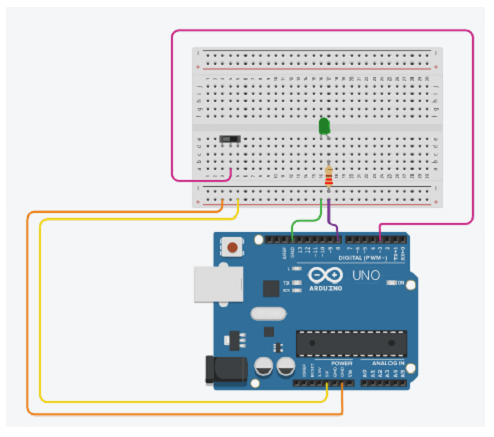
Now, we need to write the code on the coding screen. The code is given below:
Next TopicArduino Button
|
 For Videos Join Our Youtube Channel: Join Now
Feedback
- Send your Feedback to [email protected]
Help Others, Please Share


