| |

Arduino temperature sensorThe temperature sensor in Arduino converts the surrounding temperature to voltage. It further converts the voltage to Celcius, Celcius to Fahrenheit, and prints the Fahrenheit temperature on the LCD screen. We will use a temperature sensor (TMP 36) of low voltage. Such sensors are also stable while dealing with large capacitive loads. It is also suitable for automotive applications. The temperature sensors TMP 35, TMP 36, and TMP 37 are the sensors with the same features. The operating voltage of the TMP 36 sensor ranges from 2.7V to 5.5V. The sensor will look like the image shown below: 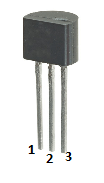
It has three terminals, which are listed below:
Here, we will connect the DC voltage pin to 5V on the Arduino UNO board.
We will consider the Analog voltage output pin as the output.
We will connect the GND pin to Ground on the Arduino UNO board. Let's start the project. Hardware RequiredThe components required for the project are listed below:
PrincipleWe will connect the LCD Display and TMP 36 temperature sensor with the Arduino UNO R3 board. The sensor detects the surrounding temperature and converts it into volts, to Celsius to Fahrenheit, and displays Fahrenheit temperature on the LCD screen. We need to open the URL: Arduino LCD display for details about LCD display. ConnectionThe steps to set up the connection are listed below:
Sketch Consider the below code: We will show the connection using the Simulator because the connections become clearer and more precise. We can make the same connection using the hardware devices. 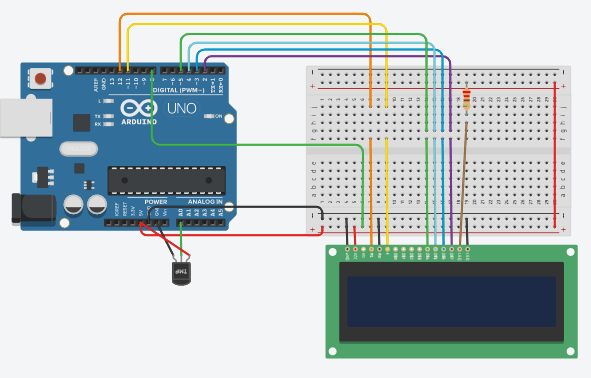
Output The output is now visible on the LCD screen. For better understanding, let's consider the output on the Serial Monitor. 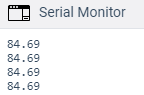
It is the temperature in Fahrenheit.
Next TopicArduino Motion Sensor
|
 For Videos Join Our Youtube Channel: Join Now
Feedback
- Send your Feedback to [email protected]
Help Others, Please Share


