| |

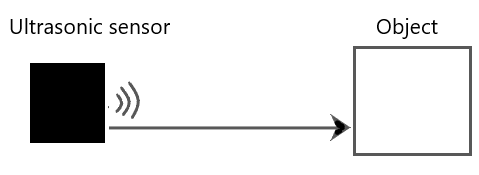
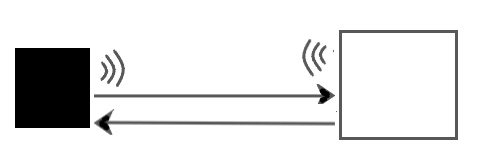
Arduino Ultrasonic distance sensorThe Ultrasonic sensor or HC-SRO4 is used to measure the distance of the object using SONAR. It emits the Ultrasound at a frequency of 40KHZ or 40000 Hz. The frequency travels through the air and strikes the object on its path. The rays bounce back from the object and reach back to the module. The four terminals of HC-SRO4 are VCC, TRIG, ECHO, and GND. The voltage supply or VCC is +5V. We can connect the ECHO and TRIG terminal to any of the digital I/O pin on the specific Arduino board. The Ultrasonic sensors work best for medium ranges. The resolution is 0.3cm. The medium ranges of the sensor are 10cm to 3m. It works best at this duration. The maximum range the sensor may detect is 4.5m. How does Ultrasonic sensor work?Let's understand how the sensor works.
ExampleLet's consider an example. An object is 40cm away from the Ultrasonic sensor. The speed of sound in air is 340m/s. We need to calculate the time (in Microseconds). Solution: v = 340m/s = 0.034cm/us (centimeter/microseconds) time = distance/speed time = 40/0.034 time = 1176 microseconds The speed of sound from the echo pin will double because the wave travels forward and backward (bounces). So, to calculate the distance, we need to divide it by 2. It is shown below: distance = time x speed of sound/2 distance = time x 0.034/2 Structure of Ultrasonic SensorThe structure of HC-SRO4 is shown below: 
Ultrasonic sensor Timing DiagramWe will set the TRIG pin to HIGH for some time (about 3 to 100 microseconds). As soon the TRIG pin is LOW, the Ultrasonic sensor sends the pulses and sets the ECHO pin to HIGH. When the sensor gets the reflected pulses, it sets the ECHO pin to LOW. We need to measure the time for which the ECHO pin was HIGH. The timing diagram of the ultrasonic sensor HC-SRO4 is shown below: 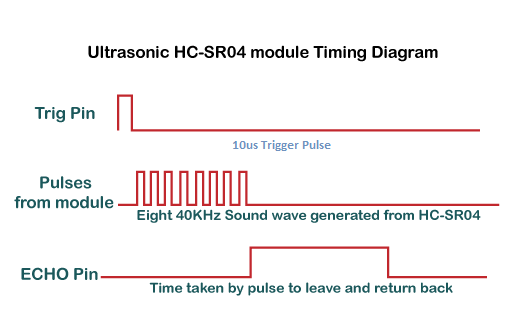
Let's start creating the Arduino ultrasonic sensor to measure distance. Hardware RequiredThe components required to create the project are listed below:
PrincipleWe need to first set the TRIG (triggered) pin at HIGH. It will send out the burst of 8 cycles called the sonic burst, which will travel at the sound speed. It will be further received by the ECHO pin. The time traveled by the sound wave is considered the ECHO pin's output time in microseconds. 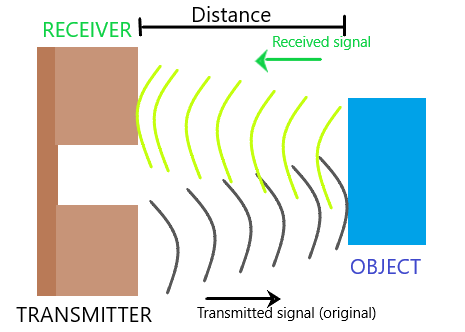
We will use the PulseIn() function to read the time from the output of the ECHO pin. It will wait for the specified pin to go HIGH and LOW. The function would return the timing at the end. The TRIG pin is set LOW for 4 microseconds and then HIGH for 15 microseconds. The timing will be calculated in microseconds. ProcedureThe steps to connect the Ultrasonic sensor to the board are listed below:
SketchConsider the below code: Steps to upload the code to the projectThe steps are listed below:
Connection DiagramThe connection diagram is shown below: 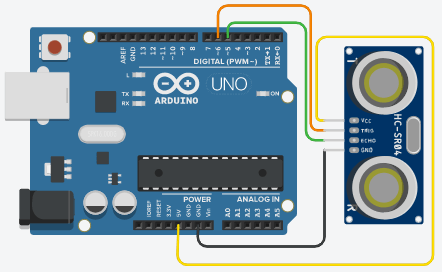
Output The output on the serial monitor will appear as: 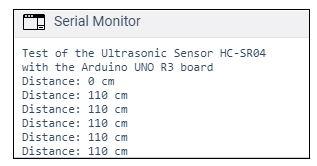
Next TopicUltrasonic Range finder
|
 For Videos Join Our Youtube Channel: Join Now
Feedback
- Send your Feedback to [email protected]
Help Others, Please Share


