| |

Blending Modes in PhotoshopThe Blending tool is used to blend the pixels of two images to apply different effects. The Blend mode feature is very useful in Photoshop. It assists us in repairing the photos and apply a pattern from a different image. It is also helpful in converting the darker images into lighter images and vice versa. The blending mode defines the control of the pixels how they will be affected by a tool. The following terms are used when visualizing an effect of the blending mode. Base Color: The original color in the image is the base color. Blend Color: The blend color is the color that will be applied to the image using the editing tool. Result Color: The result color is the final color that will be resulted after applying the blend tool. We can understand the colors term by the following formula:
Base color + Blend Color= Result Color
Photoshop provides several blending modes. These blending modes can be specified in the following six categories:
To access the blending mode, right-click on the layer and select the blending options. 
Under the Blending options, we can find the Blending modes. 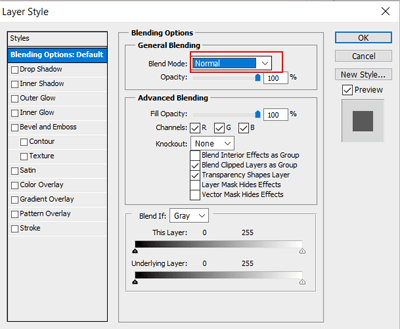
We can select different blending modes from the Blend Mode drop-down menu. To quickly access the blending mode, we can also use the drop-down menu given at the top of the Layers panel. 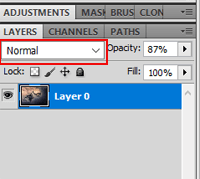
The following Blending Modes are available in Photoshop: Normal: Every image has the normal blending mode by default. It edits or paints each pixel to make it attractive. Dissolve: The dissolve mode edits or paints each pixel to make it the result color. The dissolve mode randomly replaces the image pixels with the original or blend colors. Behind: The Behind mode applies on the transparent pixels of the image. It will only work when the lock transparency is deselected in the layer. Clear: In this mode, each pixels are edited, thus, they become transparent. It works with the shapes tools, paint bucket tool, pencil tool, brush tool, stroke command, and fill command. To use this mode, the layer must be transparency deselected. Darken: The darken mode looks for the available colors in the channel and selects the darker base or blend color and makes it darker. The pixels which have a lighter color than the blend colors are replaced. Pixels having darker color will remain unchanged. Multiply: In this mode, the base color is multiplied by the blend color and results a darker color. When we multiply any color with black, it produces the black color, and multiply any color with white does not change the color. The multiplying effect is similar to drawing on paper with multiple pens. Color Burn: It darkens the original color to display the blend color by increasing the contrast. Blending with white keep the pixels unchanged. Lighten: It selects the lighter color among the original, and blend color as the output color. The darker pixels than the blend color is replaced and the lighter pixels are remain unchanged. Screen: The screen mode checks for the available color information from each channel and multiply the inverse of the original color and blend color. It will always produce light output color. Screening having black color does not change the color. Color Dodge: It brightens the base color to reflect the blend color. It decreases the contrast between the original color and blend color. When we blend with black color, it does not change anything. Linear Dodge (Add): It brightens the base color by increasing the brightness to display the blend color. When we blend with black color, it does not change anything. Overlay: The overlay mode applies the color based on the original color. It applies patterns or colors by preserving the highlights and shadows of the original color. It does not replace the original color but mix them with the blend color and reflects the lights and darkness of the base color. Soft Light: it makes the image pixels darker or lighter based on the blend color. Hard Light: The hard light mode applies the colors on the image according to blend color. It is similar to shining a harsh spotlight on an object. Vivid Light: It increases or decreases the contrast according to the blend color. Thus, it burns or dodges the colors of the image. Linear Light: It increases or decreases the brightness according to the blend color. Thus, it burns or dodges the colors of the image. Pin Light: The Pin light mode replaces the colors according to the blend color. Hard Mix: The hard mix mode applies the red, green, and blue channel values to the RGB values of the original color. Difference: The differences mode checks for the available color information in each channel available in the image. It subtracts either the base color from the blend color or blend color from the base color depending on the higher brightness. When we blend with white, it will invert the base color values, and blending with black does not change anything. Exclusion: The Exclusion mode is much similar to the difference mode. But, it has lower contrast than the Difference mode. When we blend with white color, it will invert the original color values, and blending with black does not change anything. Subtract: The subtract mode checks for the color information in each channel and removes the blend color from the original color. Divide: The divide mode checks for the available color information in each channel. It divides the blend color from the original color values. Hue: The Hue mode uses the original and blend color's luminance and saturation to create a result color. Saturation: The saturation color uses the original color and blend color's luminance and hue to create a result color. When we paint an area using this tool in no saturation area, it will not change anything. Color: The color mode uses the original color and blend color and creates a result color. It will preserve the grey level of the image. It is useful for coloring monochrome images. Luminosity: The luminosity mode uses the original color's hue and saturation and blend color's luminance to create a result color. It applies the invert effect of the color mode. Lighter Color: The lighter color mode compares all channel values between the base color and blend color and displays the higher value color. Darker Color: The darker color mode compares all channel values for the original color (base color) and blend color and displays the lower color value. How to Apply Blending ModeBy applying the blending mode, we can easily mix the pixels of two images to provide an image a new look. Generally, the blending mode is used to lighten or darken the image. To apply a blending mode, choose an effect to apply and select the blending mode for that. The blending mode will define how your effects will be applied to the image.
Next TopicPhotoshop Brush Tool
|
 For Videos Join Our Youtube Channel: Join Now
Feedback
- Send your Feedback to [email protected]
Help Others, Please Share


