| |

Connect Spring Cloud Config Server to Local Git RepositoryIn this section, we are going to learn how to connect spring-cloud-config-server to the local git repository. First, we will find the folder path. Right-click on git-localconfig-repo -> Properties -> copy the Location label address and paste it into the application.properties file. Add the annotation @EnableConfigServer in the SpringCloudConfigServerApplication.java file. Type the following URL in the browser: localhost:8888/limits-service/default Output In this we have establish the connection between SprinCloudConfigServer and the Git repository. We can see that it displays a set of property and values. It also retrieves the file name of the property file from where these values (minimum and maximum) are retrieved. The important thing about SpringCloudConfigServer is that it stores configuration for multiple services. It can also store configuration for each of the services for different environments. 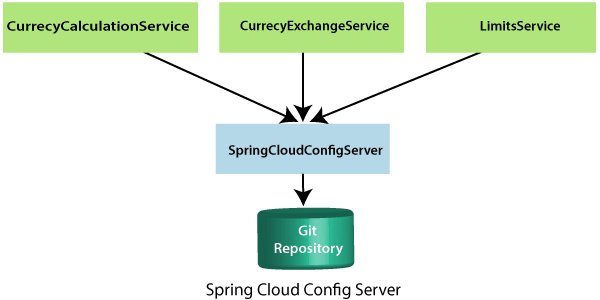
In the above figure, there are three services CurrencyCalculationService, CurrencyExchangeService, and LimitsService. The LimitsService has four environment services Dev, QA, Stage, and Production. We can configure these three services in SpringCloudConfigServer. Configuration for Multiple Environment in Git Repositoryservices Dev, QA, Stage, and Production. We can configure these three services in SpringCloudConfigServer. Configuration for Multiple Environment in Git Repository In the spring-cloud-config-server project, we have added a link to git-localconfig-repo, which contains the limits-service.properties file. It becomes the default configuration for the limits-service. However, we can overwrite them for a specific environment. To overwrite these values, copy the limits-service.properties and paste in the folder git-localconfig-reporename it with limits-service-dev.properties. Now update the minimum and maximum values. Again copy the same file and paste it in the same folder. Rename it with limits-service-qa.properties. Now update the minimum and maximum values. If we want to pick the default value of the maximum instead of modified value, put a introduction-to-currency-conversion-and-currency-exchange-service symbol at the starting of the statement. Now the second statement becomes a comment. When we execute it, it picks up the maximum value 888 from the default properties file instead of maximum value 111. Whenever we make the changes in the file, commit the changes in the local repository. Now open the Git Bash and execute the following commands: Create the directory in which we want to add files. Add the files into the Git repository. Now check the status of the files that have to be committed. 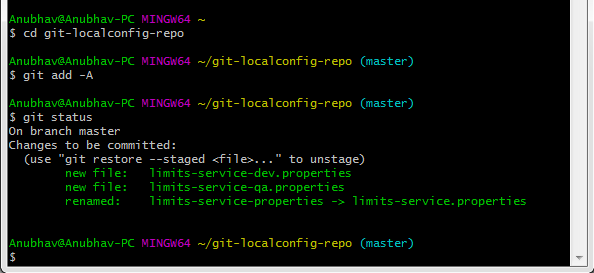
Now commit the changes 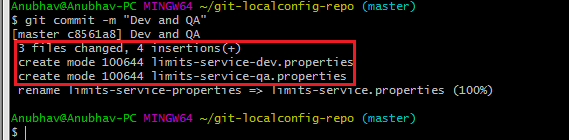
Now we can access the properties Dev and QA. Type the following in the address bar of the browser. Output We can observe that it is retrieving the property sources. These list of property are in the list of priority. The heights priority is whatever values are configured in the QA file. If there is a value that is not present in the QA file, then the value from the default file will be picked up. So whatever is in the QA file gets the highest property. Connect limits-service to Spring Cloud Config ServerIn this section, we will connect limits-service to pick up the configuration from the spring-cloud-config-server. We do not need to configure values in the application.properties file. Move to the limits-service project and rename the application.properties file to bootstrap.properties. We do not need to configure values in the bootstrap.properties. All the configuration values picked from the spring-cloud-config-server. Specify the URI in the bootstrap.properties. limits-service is the critical path of the bootstrap.properties. Based on the application name, we are going to pick up values from the local Git repository. Now restart the LimitsServiceApplication.java. Configuring profiles for Limit ServiceThe point to understand here is that all the configuration for the limits-service is coming from the Git repository. We did not configure anything in the limits-service. The advantage of configuring stuff in the Git repository is that the entire configuration of limits-service is separated from the deployment of the limits-service. It will automatically pick up from the Git repository. Now open the bootstrap.properties and add the dev profile into it. When we run the limits, it shows the following output: If we look at the limits-service-dev.properties file, the values are fetching from there. Suppose we want to pick a maximum value from the limits-service.properties and minimum value from limits-service-dev.properties then remove the maximum value from the limits-service-dev.properties. The limits-service-dev.properties file looks like this: Now commit the changes by using the following commands: 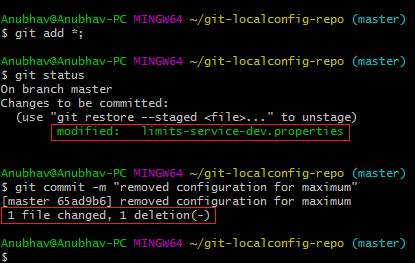
Now start the LimitsServiceApplication.java. When we start the LimitsServiceApplication, it picks values from the SpringCloudConfigServer. We can observe that it picks the maximum value from the limits-service.properties (default service) that is 888 and the minimum value from the limit-service-dev.properties that is 1. However, we have overwritten the minimum value of the default service. Let's see what happens when we change the profile dev to qa. Open bootstrap.properties and write qa in place of dev. The application will start and pick up the changes. Now execute the limits. Output
{
maximum: 222,
minimum: 2
}
These are the values that are coming from the qa environment configuration. |
 For Videos Join Our Youtube Channel: Join Now
Feedback
- Send your Feedback to [email protected]
Help Others, Please Share


