| |

Create a Python Directory Tree GeneratorIn this tutorial, we will learn about the directory tree generator tool for our command line in Python. Python developers should have the skill to create a user-friendly application with the command line interface (CLI). This skill helps to create tools to automate and speed up tasks in our working environment. The application, when run from the command line, will accept a directory path as an argument and display a directory tree diagram on the screen. Additional options will be available to customize the output. A Directory Tree Generator Tool in PythonThis tutorial will teach us to build a command-line tool to list the contents of a directory or folder in a tree-like diagram. There are various solutions available to achieve this task, such as the tree command, which is available on most operating systems. There are also several tools available such as treelib, dirtriex, and so on. However, we will create our own solution to get a better understanding. Our directory tree generator will have a user-friendly CLI. It also comes with unique features, such as displaying a tree diagram with the contents of a directory on our terminal. This project will consist of a command-line application where we must provide the directory as a path. We walk through its internal structure and generate a tree-like diagram listing the directory's contents. Before diving into the solution, let's look at the problem. Laying Out the ProjectTo create the directory structure, we need to create some modules and packages; we will provide the project with a coherent Python application layout. Outlining the SolutionGenerating a tree diagram that accurately reflects the contents of a directory in the file system may seem simple on the surface, but it actually involves a significant amount of complexity. Traversing the directory and presenting the information in a user-friendly manner requires careful consideration and attention to detail. The task of finding a specific file within a directory can be approached by using recursion. Imagine we are in our home directory and using a file manager to search for a file. If the file is not immediately found, we can navigate into subdirectories and repeat the process, opening each subdirectory to check for the file. This process is divided into the following steps:
Repeat steps 2 and 3 until the file is found or all subdirectories have been searched. In summary, when we work with the directories and their contents, we need to follow the recursion approach. This is the approach that will be used in this tutorial. In general, the following steps will be taken:
In the first step, we need to provide the directory path at the command line. We can do it using the Python argparse module from the standard library. In the second step, we will use the pathlib library which will provide several tools to manage and represent the file system paths. We will also use the regular Python list to use store the list of entries in the directory structure. Organizing the CodeThe single-responsibility principle can be used to organize the code. Our directory tree generator app has three responsibilities
The CLI-related code will be written in the cli.py. We will write the high-level DirectoryTree class to generate and display the tree diagram. The executable code will be in the main() function. The class will have a method called .generate() that will be responsible for generating and displaying the directory tree diagram. A low-level _TreeGenerator class will be created to traverse the directory structure and build the list of entries that will form the tree diagram. This class will have a method called .build_tree() to perform this operation. The tree diagram will contain the three components.
The tree diagram will have a head representation, which will consist of the name of the root directory, and an additional pipe (│) character to connect the head and body of the tree. The tree body representation will have the name of the root directory and an additional pipe (|) character to connect the tree and body.
The combined directory tree structure will look like as below - 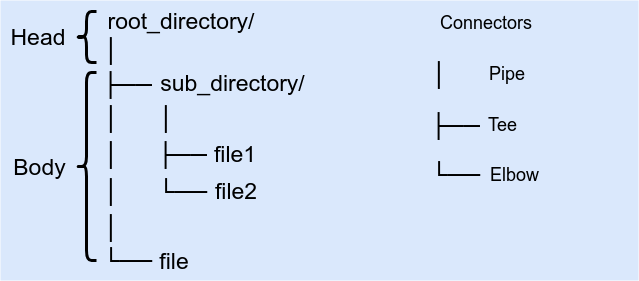
The build_tree() method of the tree generator class will return a list of all the entries that make up the directory tree diagram. To display the diagram, the generate() method of the directory tree object needs to be called. Our tree directory doesn't need any external libraries. Now we will follow several steps to build a command line interface. Step - 1: Setting Up the Project StructureIn the first step, we need to comprehensible application layout for the directory tree generator project. Now, we will create a new directory on the file system named mytree_project/. Inside the directory, we need to create two empty files.
Next, we will create the sub-directory named mytree/, which has the following empty files.
Now, our project directory looks as below. Further, we need to do the additional setup. We add the following content in our __init__.py file. Python uses __init__.py files to turn a normal directory into a package. The packages contain the modules such as my_tree.py and cli.py in this project. Packages and modules are the tools that enable organization and structuring of Python code. They allow for grouping code into smaller and more manageable units, making it easier to reuse and share. The Python standard library also utilizes this method of organization, with various modules being grouped into packages. This provides developers with easy access to pre-existing code for frequently used tasks. Finally, we will create the sample directory to test the application and make sure it works correctly. The structure is similar to the general layout of a Python project. We will use the sample directory structure to test the directory tree generator tool throughout the step. Step - 2: Generating a Directory Tree Diagram in PythonTill now, we have set up the sample project's layout. In this section, we will write the code for the project's main functionality. In other word, we will write the code to generate the full directory tree diagram from an input directory path. Let's understand the following example. Example - Explanation - In the above code, we import two modules, os and pathlib. The os module provides a way to interact with the operating system, while the pathlib module provides an object-oriented way to work with file paths. We define three variables, PIPE, ELBOW and TEE. These variables contain string characters '│', '└──' and '├──' respectively. These characters are used to create a tree-like structure when displaying the directory structure. We also define PIPE_PREFIX and SPACE_PREFIX variables. These variables contain the string '│ ' and ' ' respectively. These strings are used as prefixes for the lines in the tree-like structure, and are used to indicate the level of the directory or file in the structure. The above code builds a tree-like structure of a directory or file system, where PIPE, ELBOW and TEE are used to indicate the levels and PIPE_PREFIX and SPACE_PREFIX are used for creating a proper visual representation. Though the code does not execute any actions, we are preparing the necessary variables and objects to be used in a function that could traverse the directory structure and display it in a tree-like format. Creating High-Level DirectoryClassIn this section, we will define the class to create the directory tree diagram and show it to the screen. Let's understand the following code. Example - This code defines a class called DirectoryTreeGenerator. The class has a __init__ () method that takes a single argument, root_dir, which represents the root directory of the tree structure. In the __init__() method, an instance of another class _TreeGenerator is created and passed the root_dir as argument. This instance is then assigned to an instance variable, self._generator. The class also has a method called generate that is used to generate the tree structure. This method uses the self._generator instance to call the build_tree() method. The build_tree() method returns an iterator containing the tree structure, which is then assigned to the variable tree. The generate method then uses for loop to iterate through the tree variable and print each entry. It will print the tree structure to the console. In the next section, we will create the _TreeGenerator class. Creating _TreeGenerator ClassNow, we will create the _TreeGenerator class that traverses the file system and generates the directory tree diagram. Example - Explanation - In the above code, we define a class _TreeGenerator. The class has an __init__() method that takes a single argument root_dir, which represents the root directory of the tree structure. This method sets the value of the instance variable self._root_dir to the root_dir passed as argument after converting it to pathlib.Path object. It also initializes an empty list self._tree The class also has a method called build_tree() that is used to generate the tree structure. This method first calls the _tree_head() method which appends the root_dir and os.sep to the self._tree list. Then it calls the _tree_body() method and passes the root_dir as an argument. This method is responsible for building the body of the tree structure. After the _tree_body() method is called, the build_tree() method returns the self._tree list. The _tree_head method is used to construct the head of the tree structure and is called the build_tree method. It appends the root_dir and os.sep to the self._tree list. The above code is the first part of the code snippet. Now we will create the _tree_body() method in _TreeGenerator class. Let's see the following code. Example - Explanation - This code defines a class _TreeGenerator. The class has an __init__() method that takes a single argument, root_dir, which represents the root directory of the tree structure. This method sets the value of the instance variable self._root_dir to the root_dir passed as an argument after converting it to pathlib.Path object. It also initializes an empty list self._tree The class also has a method called build_tree() that is used to generate the tree structure. This method first calls the _tree_head() method, which appends the root_dir and os.sep to the self._tree list. Then it calls the _tree_body() method and passes the root_dir as an argument. This method is responsible for building the body of the tree structure. After the _tree_body() method is called, the build_tree() method returns the self._tree list. The _tree_head() method is used to construct the head of the tree structure and is called by the build_tree() method. It appends the root_dir and os.sep to the self._tree list. Now we will write the _tree_body() method within the _TreeGenerator class, provides the core functionality of generating the directory tree diagram. It takes the path of a directory as an input and recursively traverses the file system under that directory. It then creates a visual representation of the directory structure and generates the corresponding directory tree diagram. Example - The code in the _tree_body() method provides the low-level functionality of the class. It takes a directory path as an argument, traverses the file system under that directory, and generates the corresponding directory tree diagram.
The purpose of this method is to traverse the directory and all its subdirectories, adding the appropriate information to the tree structure as it goes. Running the Directory Tree Generator CodeWe have completed the code in the above section. Now we will run the code to generate the directory tree. Open the Python interactive shell on the project's root directory and type the following code. We can also create another file and import the relevant class. Example - Output:
│
└── sample\
    ├── __pycache__\
    │   └── sample.cpython-38.pyc
    │
    ├── sample.py
    └── __init__.py
Output - 2: Root directory file │ ├── mytree\ │ ├── hello\ │ │ └── test_hello.py │ │ │ ├── sample\ │ │ └── sample\ │ │ ├── __pycache__\ │ │ │ └── sample.cpython-38.pyc │ │ │ │ │ ├── sample.py │ │ └── __init__.py │ │ │ │ │ ├── __pycache__\ │ │ ├── my_tree.cpython-38.pyc │ │ └── __init__.cpython-38.pyc │ │ │ ├── cli.py │ ├── my_tree.py │ └── __init__.py │ ├── readme.md └── tree.py Explanation - This code imports a class called "DirectoryTreeGenerator" from a module called "mytree.py". Then it creates an instance of the class called "tree" and initializes it with the argument "./sample". Finally, it calls the "generate()" method on the "tree" object, which likely generates a directory tree based on the path passed to the constructor. Let's see the entire code implementation of a directory tree generator. Code Implementation We will get the output according to the passed path in the DirectoryTreeGenerator() class. ConclusionThis tutorial included how we can generate the directory tree using Python. We have defined a step-by-step process to achieve the goal. This project will be very helpful in large-scale application where we can easily identify which file resides in which directory. |
 For Videos Join Our Youtube Channel: Join Now
Feedback
- Send your Feedback to [email protected]
Help Others, Please Share


