| |

How to create Product in Magento 2?Magento 2 has six different types of products, as we have already discussed in the previous section. We can add these products to our website.
To add these different products in our webpage, follow the below steps:
Create a Simple ProductTo create the Simple Product, follow the below steps: Step 1: At the left of the Admin Panel, Go to Catalog >> Product. 
Step 2: Click on the Add Product drop-down list and select the Simple Product. 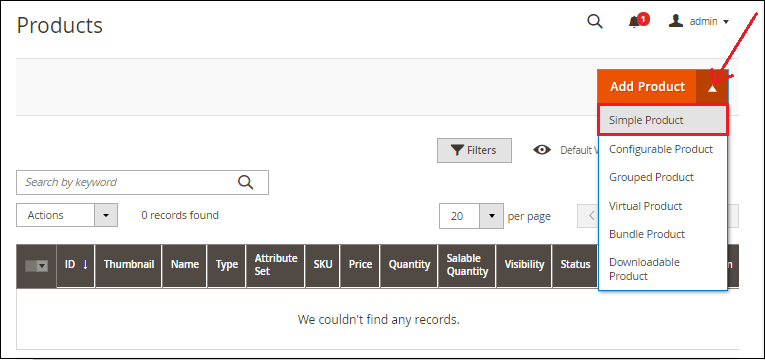
Step 3: Enter the product details which are required in the given fields and click on the Save button. We can directly add the product in a particular category by clicking on Category drop-down list and even create a new Category by clicking on the Category button. 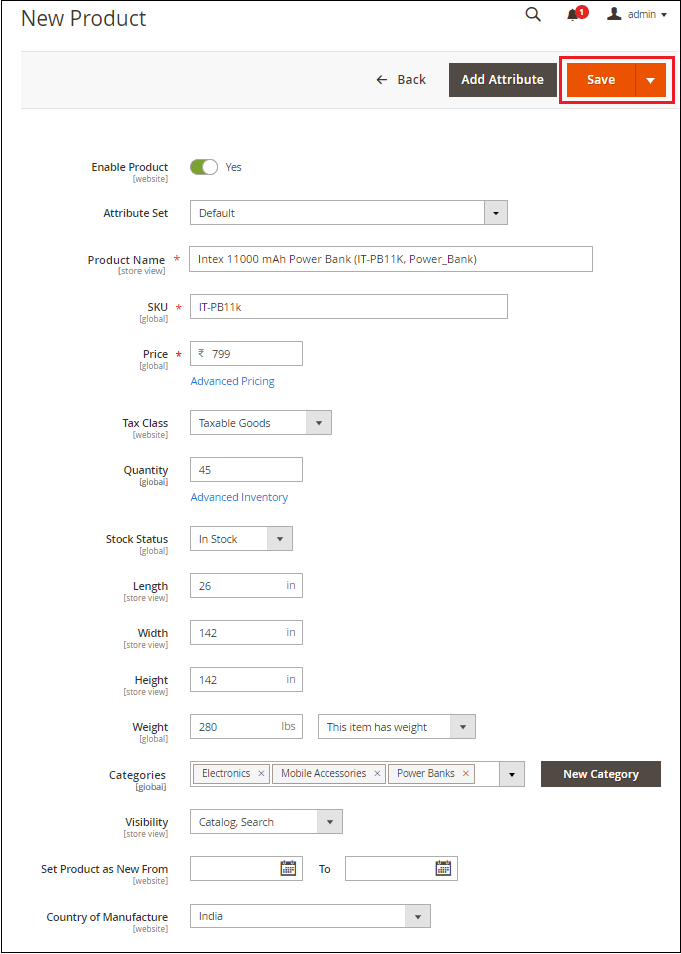
Step 4: The given product Power Bank is added to the Mobile Accessories category under Electronics. Similarly, choose the category of your product under which you want to add your new product and click on Done. 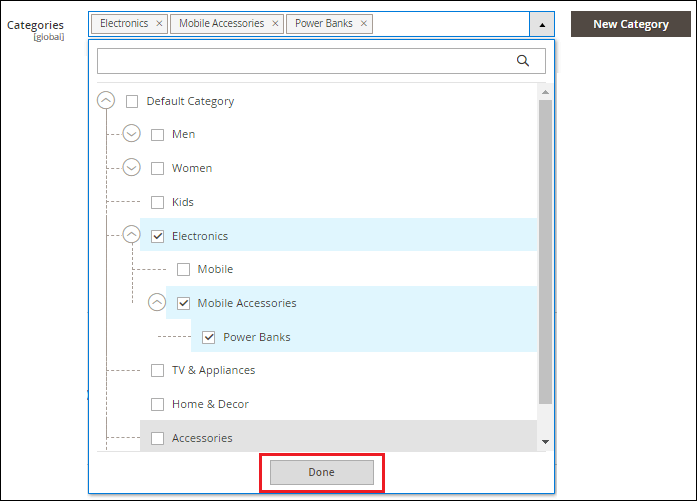
Note: Do not forget to add the product category. For the complete tutorial of Product Category, click here.Create a new category
It is difficult to create a category in the middle. So, create the categories of the product before adding the product to the website. See the previous tutorial for Product Category Creation. 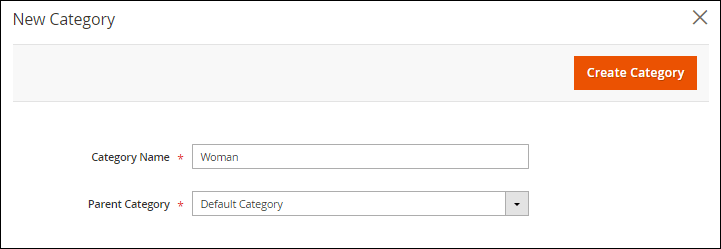
For the Simple Product, we need to fill the following details.
Step 5: Expand the Content section, where you can add a description for the product in the Description field. Add the description and short description here. 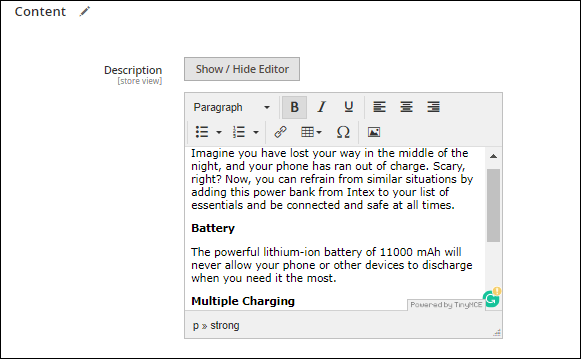
Step 6: In the image and video section, we can add the image or video of the product. Expand the Image and Video section and click on Browse to find or drag the image here to add the image of the product. Select the images from your system and Save. 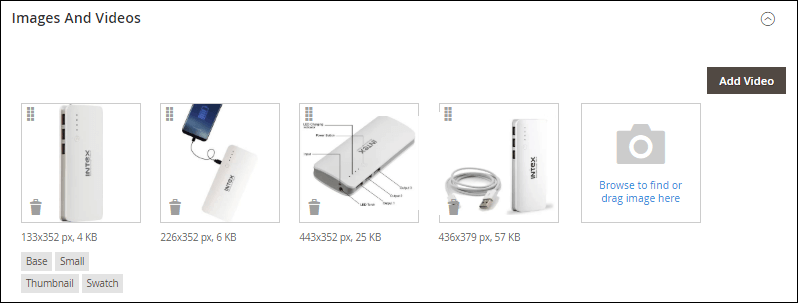
Things to remember
Create a Configurable ProductHere we will create configurable products based on the color attribute. To create the Configurable Product, follow the below steps: Step 1: At the left of the Admin Panel, Go to Catalog >> Product, similar to the simple product. 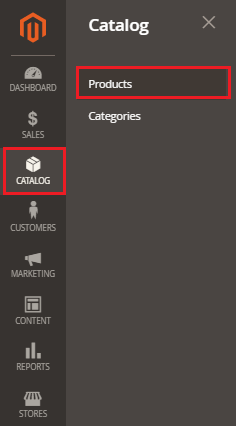
Step 2: Click on the Add Product drop-down list and select the Configurable Product. 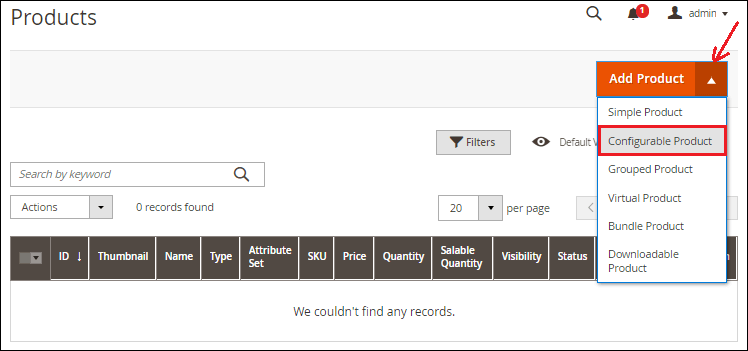
Step 3: Fill the product details which are required in the given fields such as product name, SKU, Quantity, etc. and click on the Save button. We can directly add the product in a particular category by clicking on Category drop-down list and even create a new Category by clicking on the Category button. 
Step 4: Mark the checkbox of the category under which you want to add your product, and click on Done. 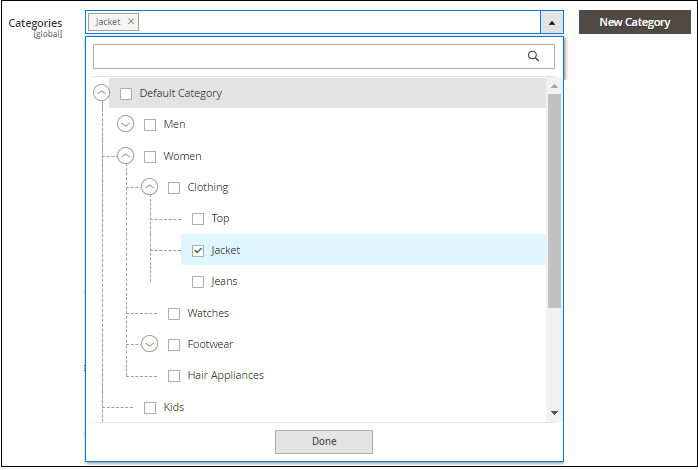
Note: Do not forget to add the product category. For the complete tutorial to add Product Category, click here.Step 5: Expand the Content section, where we can add the description of the product in the Description field. Add the description and short description here. 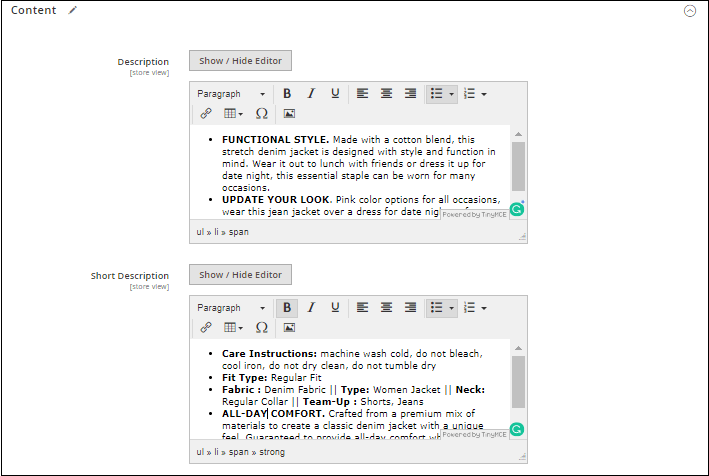
Step 6: For Configurable product, we can add the configuration. It allows the customers to choose different options (e.g., Jacket color). Explore the Configuration and click on Create Configuration. 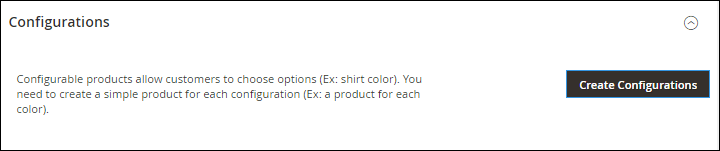
Step 7: Select the color attribute. You can also create other attributes if available for your product. Check the color and click on Next. 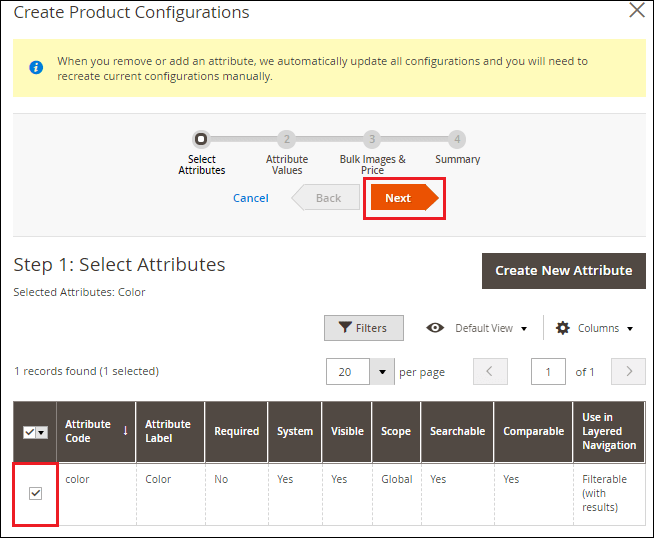
Step 8: Click on Create New Value and add different colors available for your product. Check or uncheck the available color for your product and click Next. 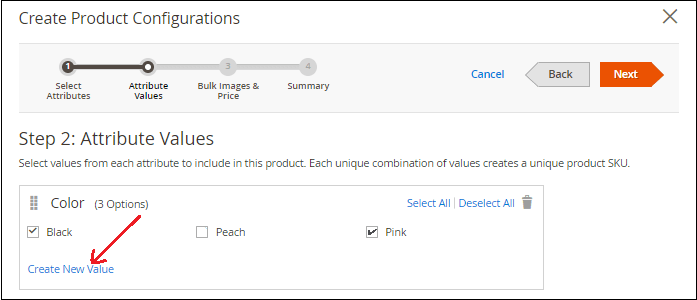
Step 9: Now, you need to configure the Image, Price, and Quantity of the product. Add the images of the product by attribute like color. We can choose any option as per our requirement. We either apply a single set of images to all SKU, unique image by attribute, or either skip it. 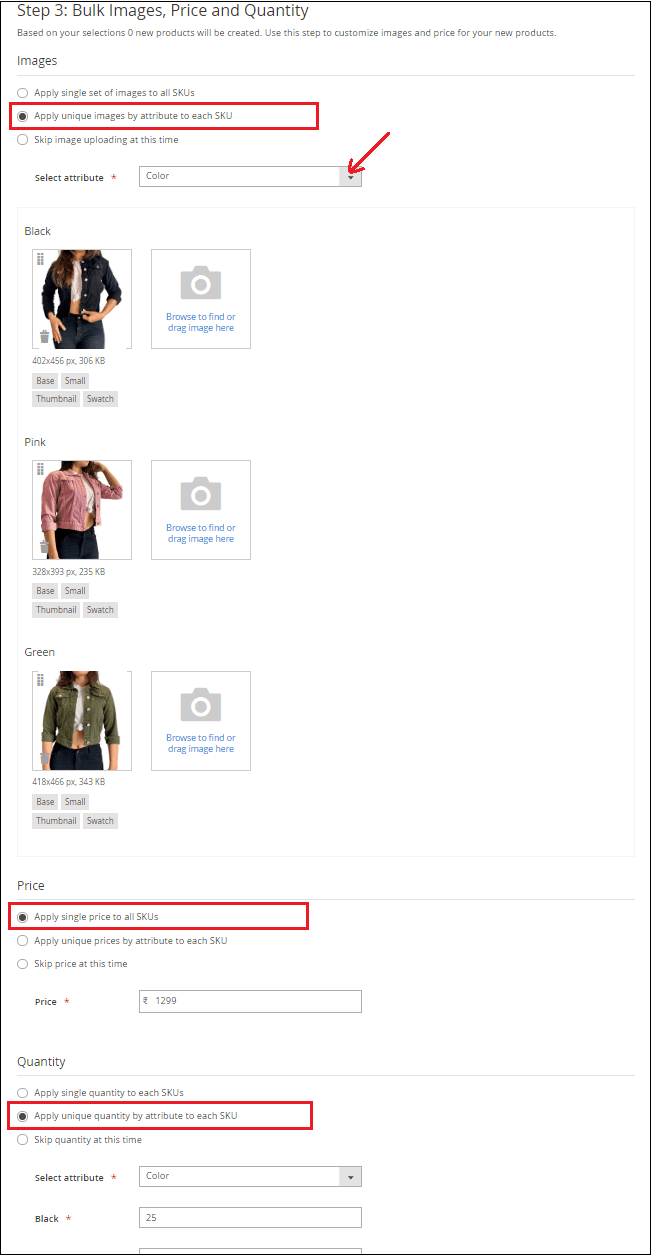
Step 10: Summary of the product is generated here. Now, click on the Generate Products and move ahead. 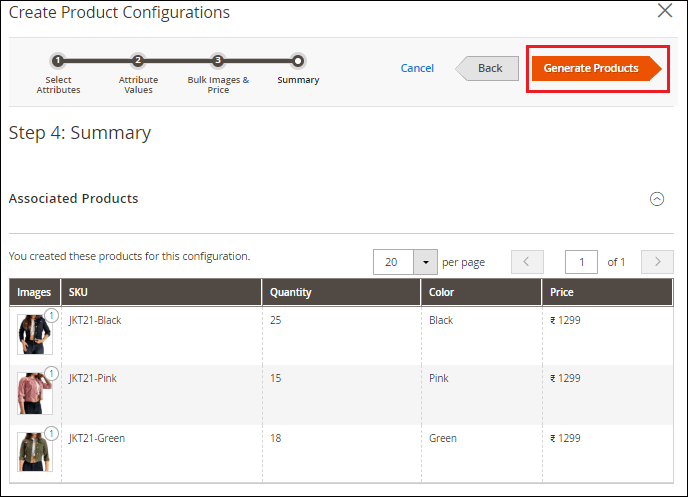
Step 11: Save the configured product from the top by clicking on the Save button. These products will be shown by selecting their attributes. 
Step 12: Expand the Image and Video section and browse or drag the image here of the product. We can use any image as a base image, which will be initially visible to the customer on the website before selecting the color attribute. 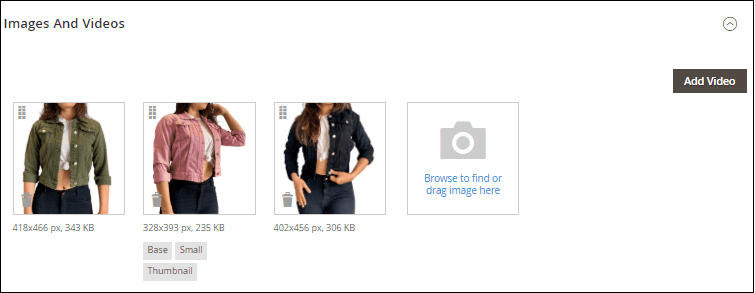
Step 13: Click on the image you want to make the base image. A pop up will open where mark the Base option and get back to the previous page. Save the changes we made by clicking on the Save button. We will make the pink jacket as a base image here. 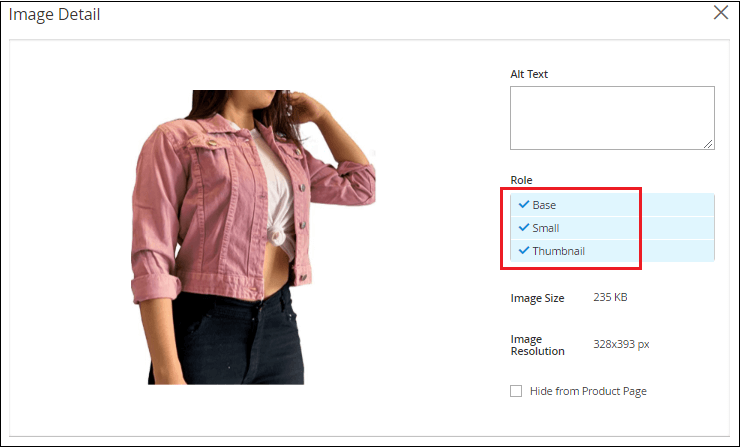
Things to remember
Create a Grouped ProductTo create the Grouped Product, follow the below steps: Follow Step 1 to Step 6 is similar to the Simple product. Firstly add the product in the store database as a simple product, and then grouped products will be created. Step 7: Click on the Add Product drop-down list and select the Grouped Product. 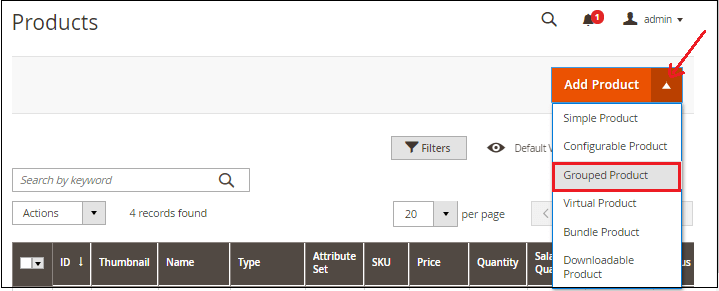
Step 8: Fill the product details which are required in the given fields and click on Save. Note that the quantity field is not enabled because the value is already taken from the individual products, which make up the group. 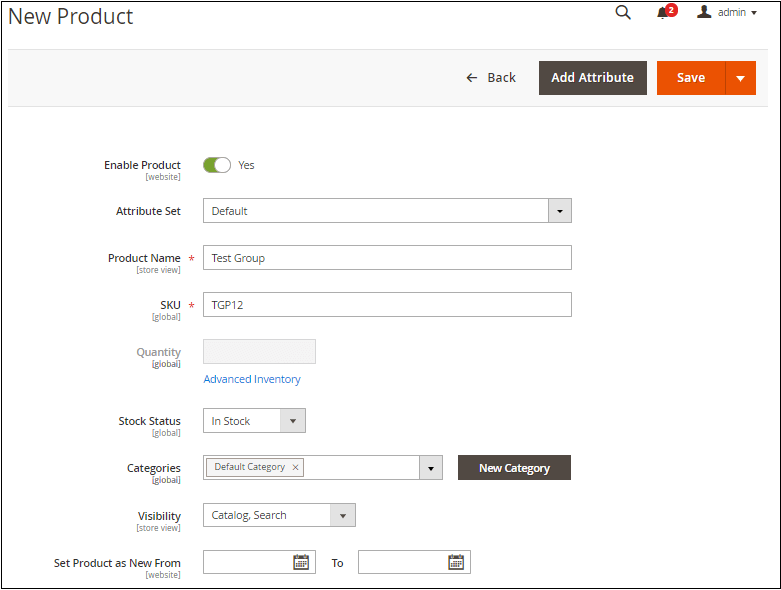
Step 9: Expand the Content section and provide a description of the grouped product. 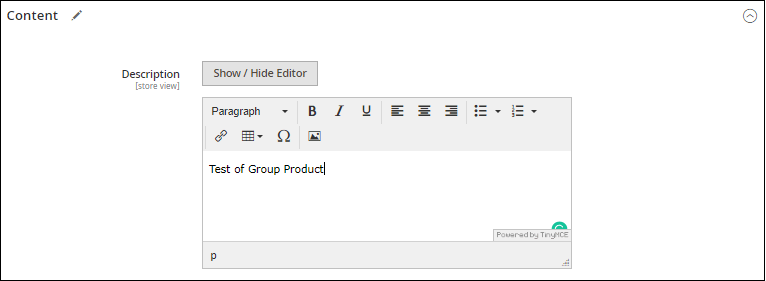
Step 10: Now, expand the Grouped Product section below the Content and click on Add Product to Group. 
Step 11: In the given list of products, mark the checkbox of each product which you want to add in the group. Then click on Add Selected Products as given in the below screenshot. 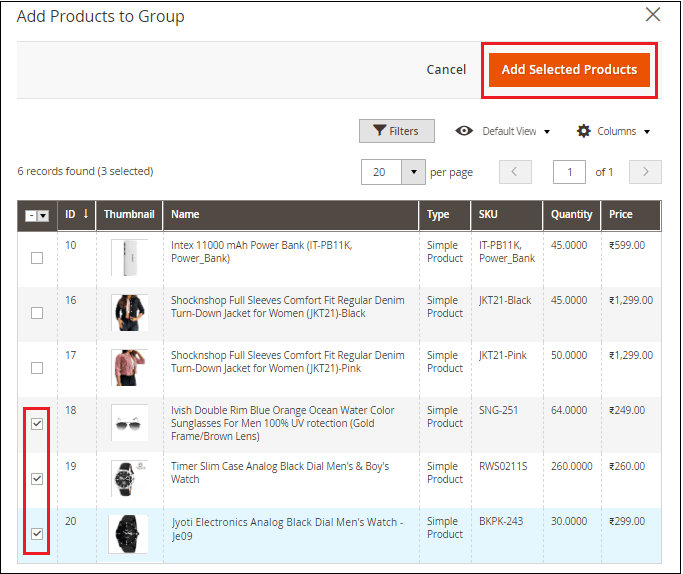
Step 12: The selected items will be visible in the grouped product section, as you can see in the below screenshot. Enter the default quantity of the grouped product and Save. 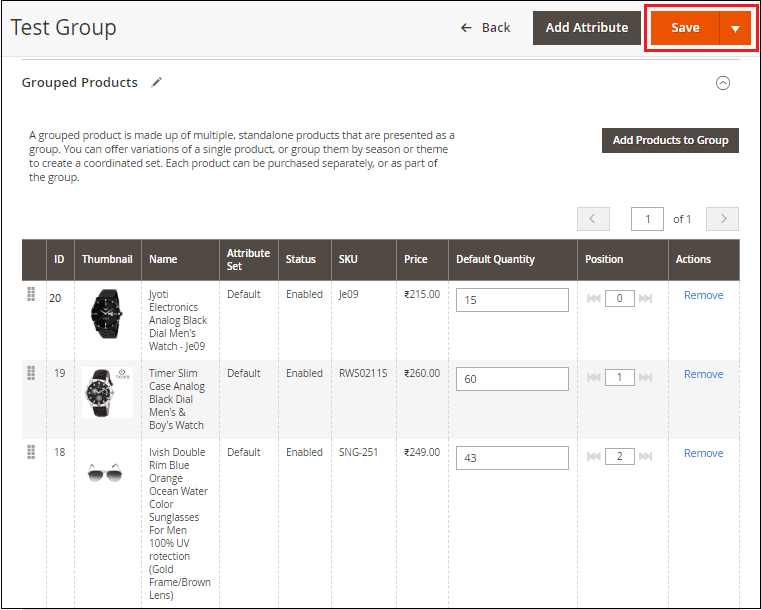
Click on the Remove option that is corresponding to the item, which you want to remove from the group. Step 13: Expand the Image and Video section and click on Browse to find or drag the image here to add the image for grouped products. Select the images from your system and Save. 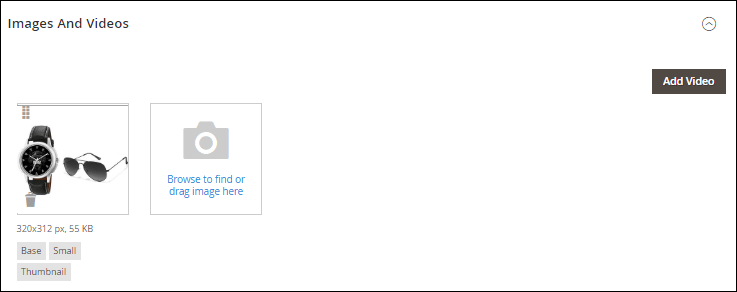
Things to remember
Create a Virtual ProductTo create the Virtual Product, follow the below steps: Step 1: At the left of the Admin Panel, Go to Catalog >> Product, similar to the simple product. 
Step 2: Click on the Add Product drop-down list and select the Virtual Product. 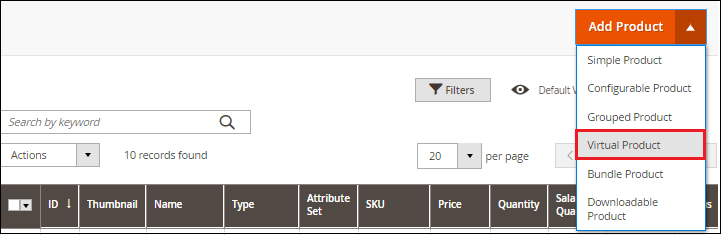
Step 3: Fill the product details which are required in the given fields such as product name, SKU, Quantity, etc. Click on the Save button and continue. 
Note that this item has no weight because the virtual product is not shipped. So, the Weight field is not enabled. Step 4: Add the product in a specific category by clicking on the category drop-down list. If the category does not exist, then create a new category. Follow the steps given below for creating a new category. Create a new category
It is a bit difficult to create a category in the middle. So, create the categories of the product before adding the product to the website. See the previous tutorial for Product Category Creation. 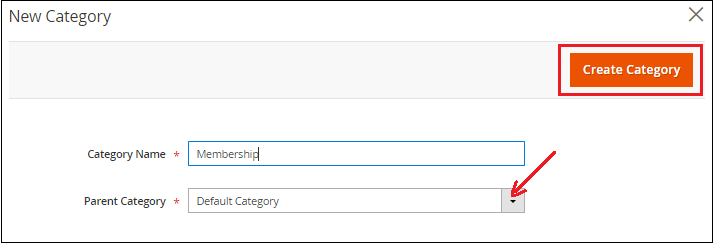
Step 5: Add the description of the virtual product. Expand the Content section and provide the description and short description of the product. 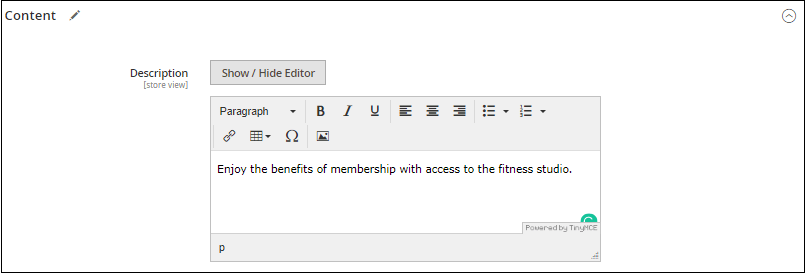
Step 6: Expand the image and video section and insert the image of the product. Click on Save and continue. 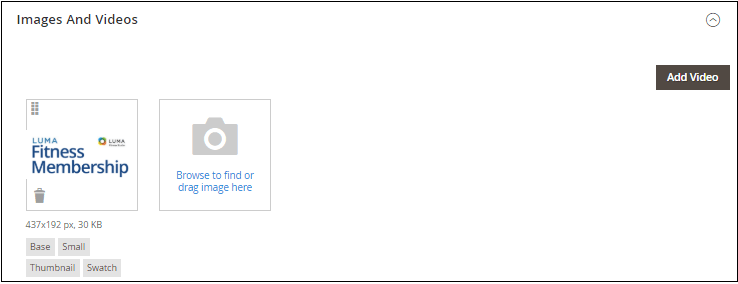
Things to remember
Note: The process of creating a simple product and virtual product is the same.Create a Bundled ProductThe selection of the options appears when the customer clicks either the Customize or Add to Cart button. Because the products that are included in bundle vary. The SKU, Weight, and Price can be set to either a fixed or dynamic value. The below instructions take us through the process of creating a bundle product using required fields and basic settings. Each required field while creating any product is marked with a red asterisk (*). After finishing the basics, we can complete the advanced setting and other settings. To create the Bundle Product, follow the below steps: Follow Step 1 to Step 6, which is similar to the Simple product. Firstly add the product in the store database as a simple product, and then the bundle product will be created. Step 2: Click on the Add Product drop-down list and select the Bundle Product. 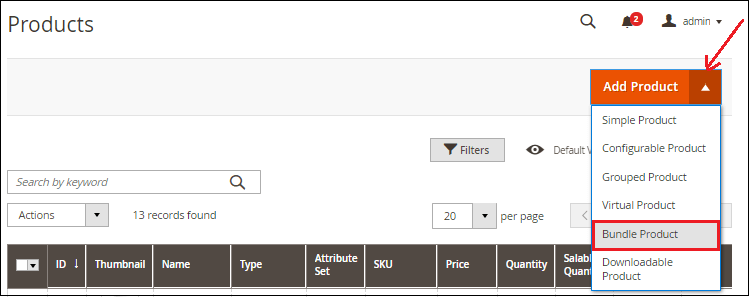
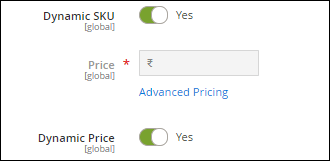
Note that there are some changes in the given fields to add bundle products, such as - SKU, Weight, Price, ?between fixed, and dynamic.
Step 3: Enter the required information in the given input fields and click on the Save. 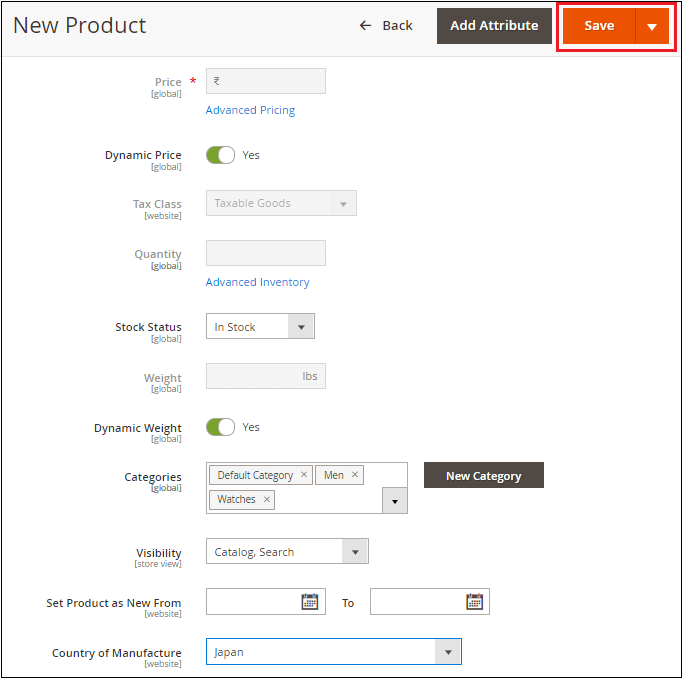
Step 4: Now, scroll down to the Bundle item section and set the Ship Bundle Items to one of the following.
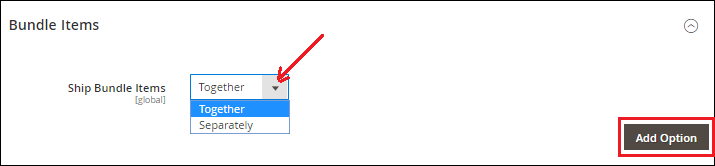
Click on the Add Option and expand the fields to add options as given inside the Bundle Items at the right down corner, and do the following: 1. Enter the option title and set the input type from one of the given options:
2. Mark the Required checkbox to make the field a required entry. 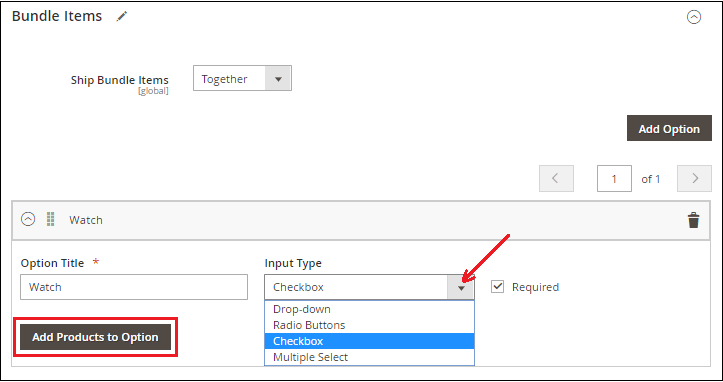
3. Click on the Add Product to option and select the products which you want to include in this option by marking the checkbox. If there are so many products, then we can use the filter and pagination control to find the product easily and quickly. 4. After selecting the product, click on Add Selected Products. 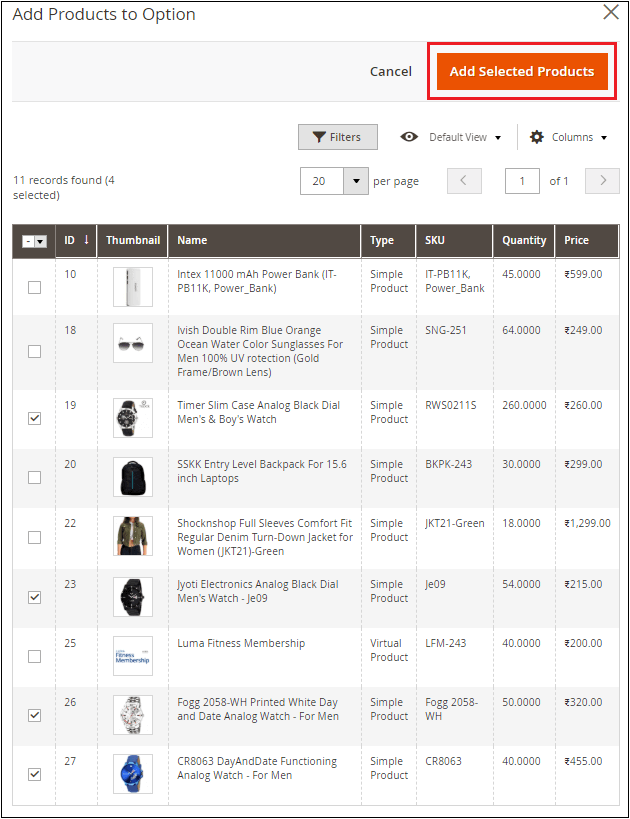
5. The selected products will appear inside the Option section. Enter the quantity of each product that is added to the bundle and save. 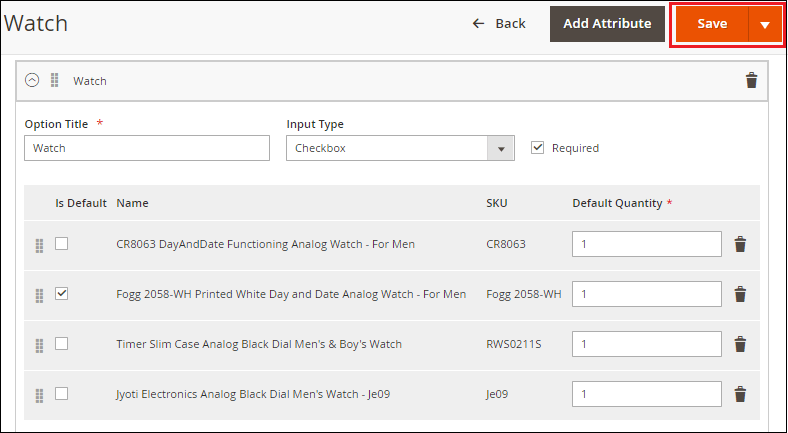
Step 5: In the image and video section, insert the image or video of the bundle product. Expand the Image and Video section and click on Browse to find or drag the image here to add the image of the product. Select the images from your system and Save. 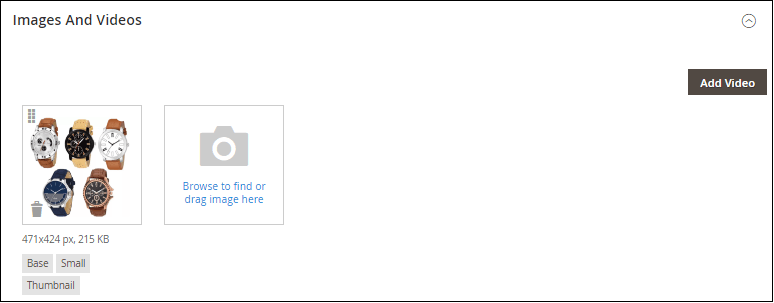
Step 6: On the frontend, the customer can select the item by marking the checkbox of the product. The price of the items will be added accordingly. Click on the Customize and Add to Cart at the frontend. 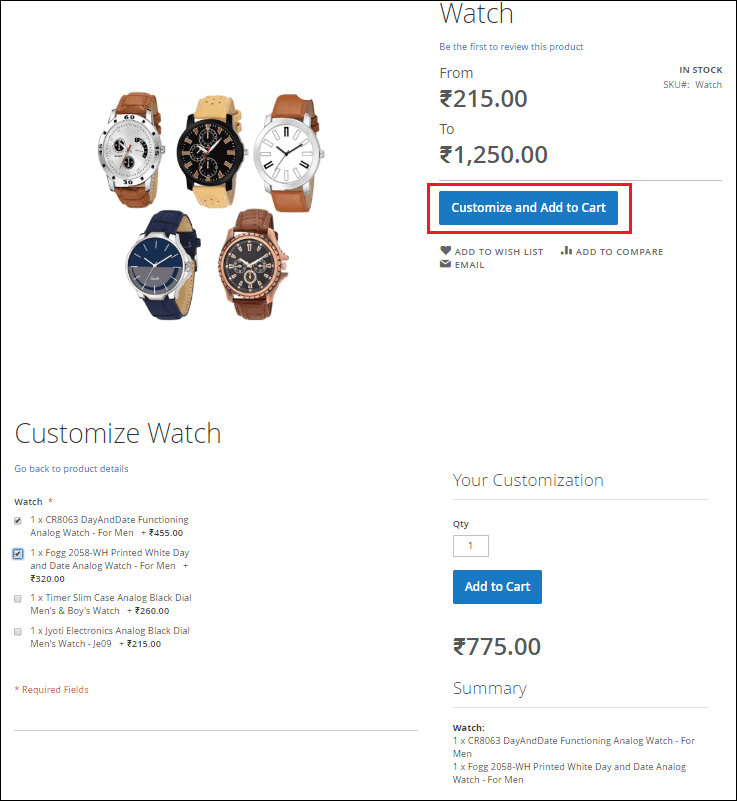
Things to remember
Create a Downloadable ProductTo create the Downloadable Product, follow the below steps: Step 1: At the left of the Admin Panel, Go to Catalog >> Product, similar to the other product. 
Step 2: Click on the Add Product drop-down list and select the Downloadable Product. 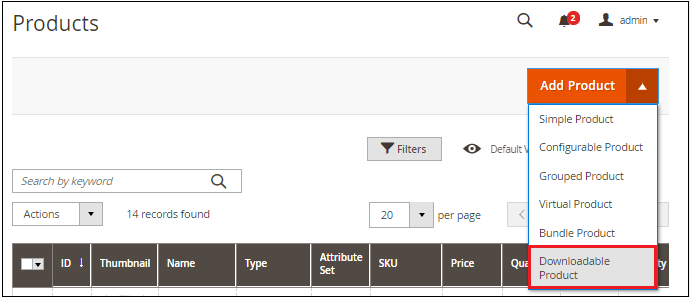
Step 3: Fill the product details which are required in the given fields such as product name, SKU, Quantity, etc. Click on the Save button and continue. 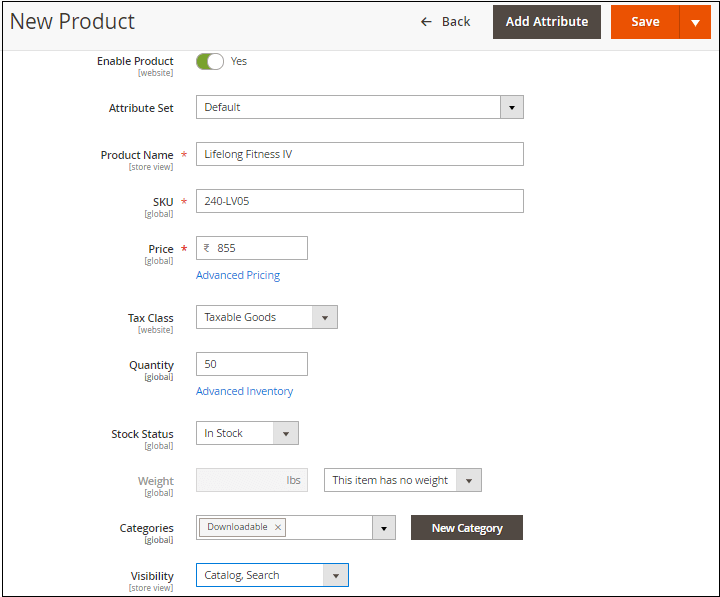
Note that this item has no weight because the downloadable product is not shipped. So, the Weight field is not enabled. Step 4: Add the product in a category by clicking on the category drop-down list. If the category does not exist, then create a new category. Follow the below steps to create a new category. Create a new category
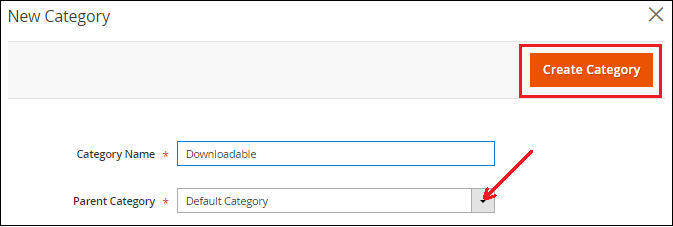
Note: To create the categories of the product before adding the product to the website, see the previous tutorial for Product Category Creation.Step 5: Add the description of the downloadable product which you are going to add in your store. Explore the Content section and provide the description and short description of the product. 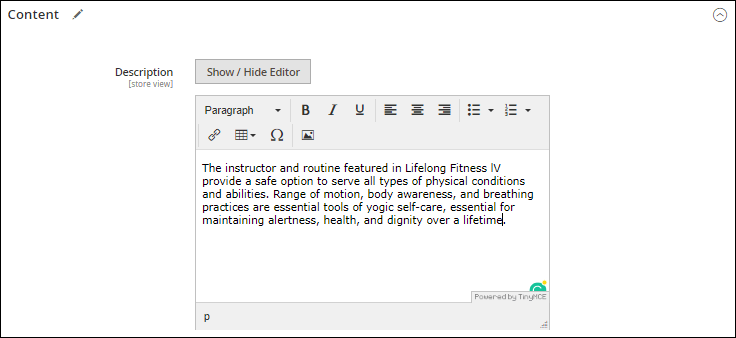
Step 6: Expand the image and video section and insert the image of the product. Click on Save and continue. 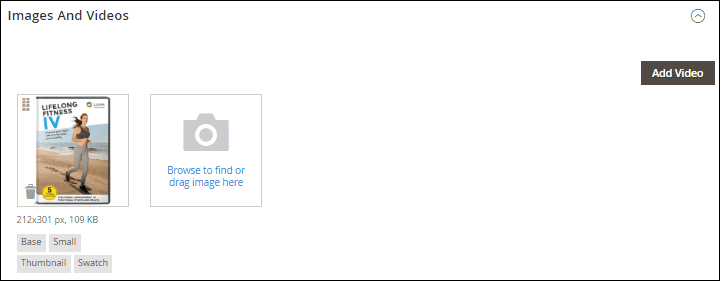
The process of creating a downloadable product till the Image and Video section is much similar to the virtual product. Step 7: Now, scroll down to the Downloadable Information section and expand it. Mark the "Is this downloadable product?" Checkbox. 
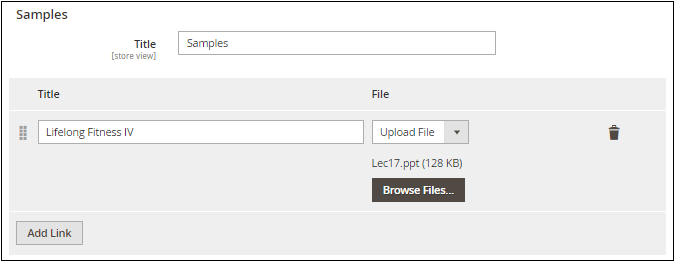
The downloadable information section has two parts. The first part of the downloadable information section describes each download link, and the second part describes each sample file. Complete Link
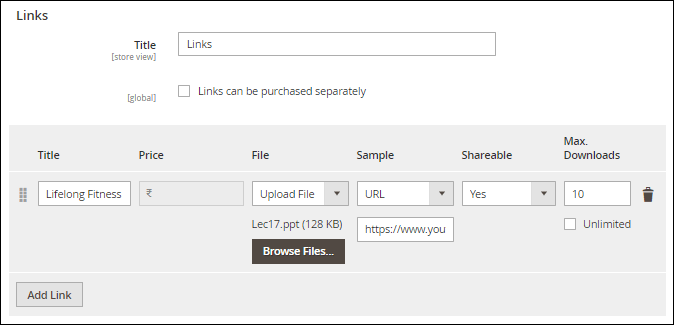
To add another link again, click on Add Link and repeat these steps. Complete Sample
Things to remember
Next TopicCreate Product Attributes in Magento 2
|
 For Videos Join Our Youtube Channel: Join Now
Feedback
- Send your Feedback to [email protected]
Help Others, Please Share


