| |

Splash screen in GodotWe already set up LifeBar's design with the main bar scene. Now we need the EnergyBar.Let's create a new inherited view, and once again select the Bar.tscn view and open it. Double-click the bar root node and rename it EnergyBar. Save the original view as EnergyBar.tscn. We need to replace the HP texture with the EP one and replace the texture on the gauge. Go to the file system dock on the left, select the title node in the scene tree, and drag and drop the label_EP.png file to the texture slot. Select the number node and change the text property to a different value such as 14. Note To change the font size on this node only, we need to make a copy of the font resource. Select the number node again and click the wrench and screwdriver icon on the top right of the inspector. In the drop-down menu, choose the Sub-Resource Unique option. Godot will search all the resources that use this node and make separate copies for us. 
If we change the font resource, all nodes using it are affected To change the font size on this node only, we need to make a copy of the font resource. Select the number node again and click the wrench and screwdriver icon on the top right of the inspector. In the drop-down menu, choose the Sub-Resource Unique option. Godot will search all the resources that use this node and 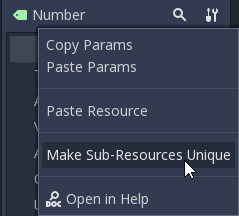
Make separate copies for us. Note When we duplicate a node from the view tree with Meta + D, it shares its resources with the parent node. You need to make the sub-resource unique before tweaking the resources without affecting the source node. Scroll to the Custom Font section and open the font. Reduce the size to a smaller value like 20 or 22. You may have to adjust the value of the bottom space to align the baseline of the text with the EP label on the left. 
EP Count Widget is a smaller font than its HP counterpart Now, choose the TextureProgress node. Drag the energy_bar_bg.png file to the under slot and do the same for Energy_bar_fill.png and leave it on the progress texture slot. You can resize the node vertically so that its bounding rectangle fits on the gauge. Do the calculation with the node itself until its size aligns with the bar. You can resize the node vertically so that its bounding rectangle fits on the gauge. Do the calculation with the node itself until its size aligns with the bar. Because the minimum amount of TextureProgress is determined by its texture, you will not be able to reduce the count node below. That too will be the size of a bar container. You can also write it down. Last but not least, the background container has a minimal size that makes it slightly larger. Select it, and in the Rect section, change the Min Size property to 80 pixels. It should resize automatically, and also reproduce the title and number nodes 
The Count looks better now it's a bit smaller Note The size of the count node affects the state of the TextureProgress. As we align our bars vertically in a moment, we'd better understand using the left margin of the counter to resize our EP label. In this way, both Energybar's calculation and Lifebar's count nodes are one hundred pixels wide so that both gauges align perfectly. Prepare bomb and rupee counter Let us now look after the counters. Go to View -> New Inherited View and select Counter.tscn as a base. Also rename the root node as bombekron. Save the new view as BombCounter.tscn. That's all for this scene. 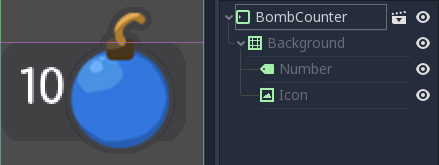
Bomb counter is similar to the original counter view Go to View -> Select New Inherited View again and once again choose Counter.TSCN. Rename the root node interrupt and save the view as a transform. For this one, we have to replace the bomb icon mainly with the rupee icon. In the FileSystem tab, drag Rs_icon.png to the texture slot of the icon node. The icon already anchors the right edge of the background node so that we can change its position, and it will scale and reposition with the converted container. Move the rupee icon to the right and down a bit. Use the arrow keys on the keyboard to clear your position. Save, and we're done with all the UI elements. 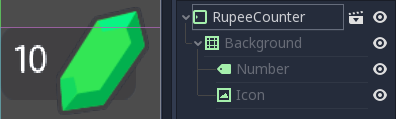
Rupee counter should look like this Add UI component to final GUI Time to add all UI elements to the main GUI view. Reopen the GUI.tscn view, and remove the bars and counter nodes. In the FileSystem dock, find LifeBar.tscn and drag and drop it onto the Bars container in the dress tree. Do the same for EnergyBar. You should align them vertically. 
The life bar and the EnergyBar align automatically Now, drag and drop the BombCounter.tscn and RupeeCounter.tscn scenes onto the Counters node. It will resize automatically. 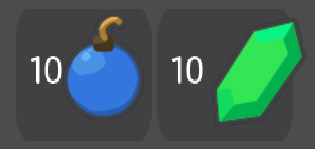
Nodes resize to take all available vertical Positions To allow RsCounter and BombeCore to use size, we defined in Counter.TSCN, we need to change the size flag on the counters container. Select the counters node and reveal the size flags section in the inspector. Uncheck the fill tag for the vertical property, and check the shrink center so that the containers inside the HBoxContainer are centered. 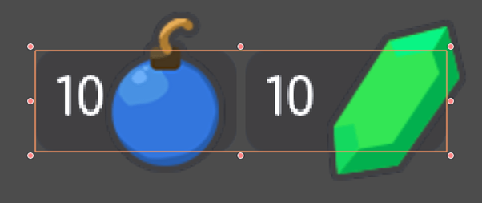
Now both counters have a decent size Note Change the minimum size property of the counters container to control the background height of the counters. We have a small problem with the EP label on EnergyBar: the 2 bars should align vertically. Click the icon next to the EnergyBar node to open its view. Select the count node and scroll to the Custom Constant section. Add a margin left of 20. In rect, a part sets the node's Min Size to 100, the same value as on LifeBar. The calculation should have some margin on the left side. If you save and return to the GUI view, it will be aligned vertically with LifeBar. 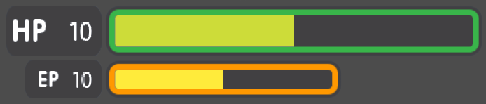
The 2 bars align perfectly Note We could have set up EnergyBar this way a few moments ago. But it lets you know that you can go back to any scene at any time, tweak it, and see the changes happening through the project! Put GUI on game mockup To wrap the tutorial, we are going to insert the GUI in the mockup scene of the game. Go to the FileSystem dock and open LevelMockup.tscn. Drag and drop the GUI.tscn view just below the bg node and above the characters. The GUI will be the scale to fit the entire viewport. Go to the layout menu and select the centre top option, so that it anchors the top edge of the game window. Then size the GUI so that it can be vertically truncated. Now you can see what the interface looks like in the context of the game. 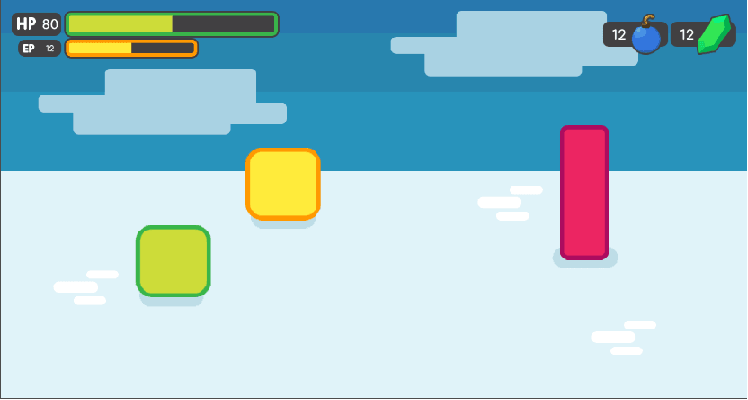
The final result Note One final note about responsive design. If you resize the GUI, you will see the nodes move, but the texture and text will not scale. The GUI also has a minimal size depending on the surfaces inside. In games, we do not need the interface to be flexible like a website. You almost never want to support both landscape and portrait screen orientation. It is one or the other. In landscape orientation, the most common ratio is from 4: 3 to 16: 9. They are close to one tanother. That's why it's enough for the GUI elements only to move horizontally when we change the window size.
Next TopicSplash screen in Godot
|
 For Videos Join Our Youtube Channel: Join Now
Feedback
- Send your Feedback to [email protected]
Help Others, Please Share


