| |

Elasticsearch SnapshotEvery time when we work with the technology, several things associated with our data always come to our mind. Data backup and restore is one of them. As the data increases, users start worrying about it. They always want their data to be safe and space to be free as well. The Elasticsearch community concerns this problem of users and offers data backup and restore facility. So, in this chapter, we will discuss it. First, it is important to know what is Elasticsearch Snapshots. Elasticsearch offers a snapshot facility to its users to take the backup of their data. With the help of this, the users can create a snapshot of the cluster's indices and documents. Whenever users need their data, they can restore them as well with the help of restore module. Following topics are discussed below in detail in this chapter -
Let's understand what is snapshot and where the data is stored? What is Snapshot?In Elasticsearch, snapshots are used to take the backup of indices or the entire cluster. These snapshots are stored by repositories, which can be either local or remote. So, first of all, you have to register a repository to create a snapshot, and Elasticsearch should also be able to write to this location. In simple words, we can say that Elasticsearch snapshot is a process of taking the backup of running Elasticsearch cluster, which is stored in a repository. So, the memory released by the data can be used for any other task. In case the user needs his data back, he can also restore it back to the system. The snapshot and restore module allow the users to create a snapshot of their indices or an entire cluster, which can be stored in a remote repository on a shared file system. Elasticsearch supports several types of repositories, e.g., NFS filesystem. Repositories supported by ElasticsearchAll the snapshots in Elasticsearch are organized into a container, which is called as repositories. Elasticsearch supports various repositories which are used to store the snapshots. In a single repository, you can store one or more snapshots. You can create any number of repositories in Elasticsearch in which you can choose one of them to save your data. 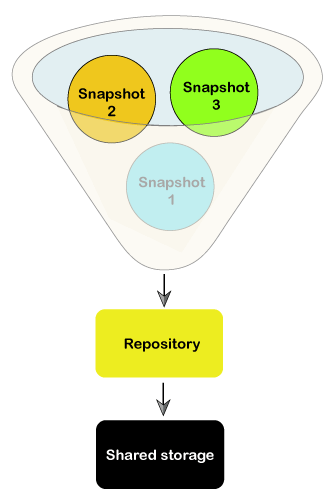
Remember that - if you want to delete the snapshot of your data, you have to delete it from the repository in which your stored it. In case the snapshot is stored in one or more repositories, you have to delete it from all those repositories to delete it completely. There are a number of repositories supported by Elasticsearch are as follows:
Here, the first three repositories are cloud repositories. Elasticsearch can run in different environments and it works well and very efficiently in cloud environment. Therefore, various cloud repositories are supported by the snapshot/restore module in Elasticsearch. Let's discuss each environment separately In case you are not working with the cloud, you can use NFS share to take the backup of your data on a multi-node cluster. Remember that you have to make the share accessible on the same mounting point on all the nodes. On the other hand, if you are working with Windows or on a Windows network, you can take a backup of your data using Microsoft share. Elasticsearch allows the users to use Microsoft UNC path in your path.repo config. It is also possible to take the backup of a normal directory in case you are on a single cluster. Below are a few steps in which we will show you how to do it -
Use the below command to check if any repository is already setup with: Copy Code Response If you get nothing in the response body like the below screenshot, it indicates that no repository has been set up yet. 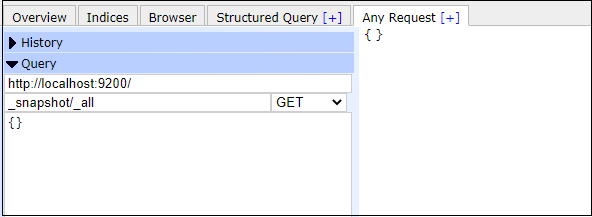
Note: A repository is just a memory location, which is registered or created by the user to store a snapshot.Now, let's move to the Elasticsearch snapshot storage system. Elasticsearch Snapshot Storage SystemTo work with Elasticsearch snapshot facility, first of all you have to set up a shared storage node so that Elasticsearch snapshot can work. This shared storage node is accessible by all the nodes present in your cluster. It connects all the systems over a common network. The shared storage can be a computer system. So, register a shared file system repository and store the snapshots in it. 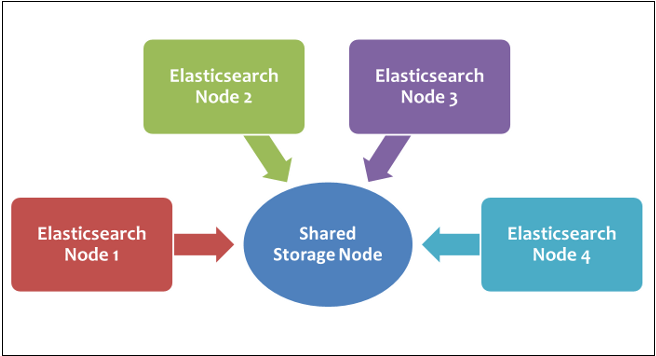
Before you beginFollow the below steps before you begin to take snapshots: Step 1: Navigate to elasticsearch/config and open the elasticsearch.yml file into notepad exists inside the config folder to include the path.repo setting. 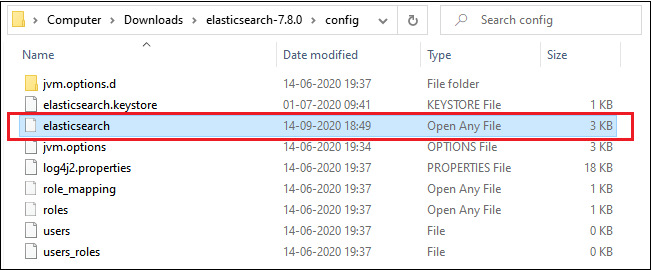
Step 2: In this step, you need to pass the path.repo location to use a shared file system. For this, add the following line at the end of the document in the elastisearchsearch.yml file and close it. path.repo: ["/my_backup_location"] 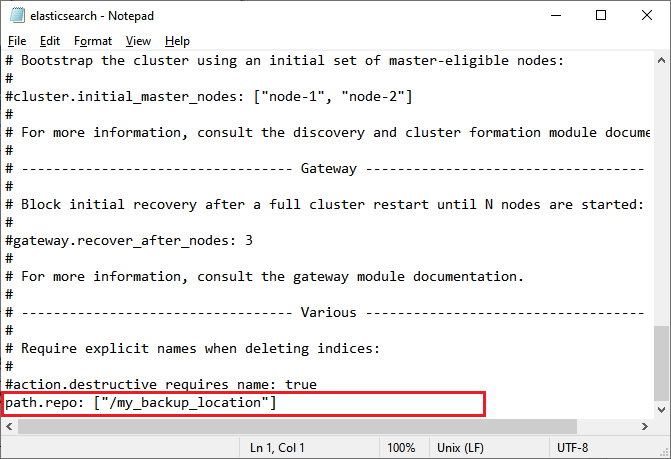
Step 3: Save it and close the file. Step 4: After set up this setting, you have to restart the Elasticsearch to see the effect. Click on the elasticsearch.exe file to run the Elasticsearch. Step 5: Now, you are allowed to create repositories and snapshots in Elasticsearch. So, let's move forward: Create a RepositoryWhile creating a snapshot, it is necessary to pass the repository location where a snapshot will be stored. That is why we have to create a repository before the snapshot to pass its location inside the snapshot query. In the example below, we will create a repository named my_backup. Copy the following code and execute it in your Elasticsearch plugin: Copy Code
Response By executing the above command, my_backup repository will be created, and you will get the response "acknowledged": true like the below screenshot. 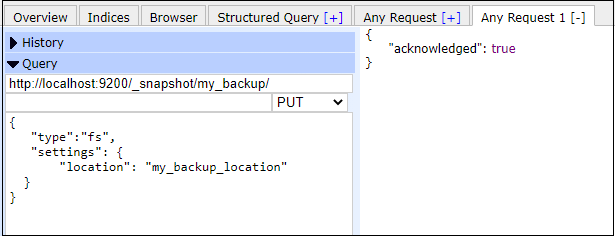
Note: Do not forget to add path.repo location in the elasticsearch.yml file.Get a RepositorySometimes we require the information of a registered repository, which can be obtained by executing a query in Elasticsearch. Once a repository is created or registered successfully, we can get information about it. In the example below, we will get the information about the my_backup repository that we have created in the previous example. Copy the following code and execute it in your Elasticsearch plugin: Copy Code Response This will return all the information about the my_backup repository. The response will be like the below output. Screenshot 
A repository named my_backup has been created successfully. Now we can create a snapshot that will add to this repository. Create a Snapshot to the repositoryAfter successfully creating a repository, our next step is to create a snapshot to take the backup of data. Remember that each snapshot is identified by a unique name. Provide a unique name while creating a snapshot. Elasticsearch provides a parameter wait_for_completion. It indicates whether the request will wait for snapshot completion or return immediately after the snapshot initialization. If you use this parameter in your snapshot query, the process will run in the background. We will discuss both examples with or without the wait_for_completion parameter. Example without wait_for_completion parameterIn this below example, we will create a snapshot by the name snapshot1 in my_backup repository (created earlier). It is a simple example of snapshot creation in which we have not used wait_for_completion parameter. Copy and execute the following command to create a snapshot - Copy Code Response A snapshot will be created named snapshot1 that will be stored in my_backup repository by executing the above code. The response will be returned immediately, like the below output. Screenshot 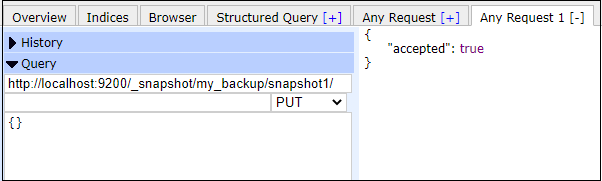
Example with wait_for_completion parameterIn the below example, we will use wait_for_completion=true that will wait for the snapshot completion. The response of this query will be different than the above query. In this example, we will create a snapshot by name 2020-06-24_snapshot. Copy and execute the below code in your Elasticsearch plugin: Copy Code Response By executing the above code, you will get the response like the below output. The above query does not respond immediately. It waits for the completion of the snapshot. Screenshot See the below screenshot; a snapshot has been created named 2020-06-24_snapshot that will store in my_backup repository. 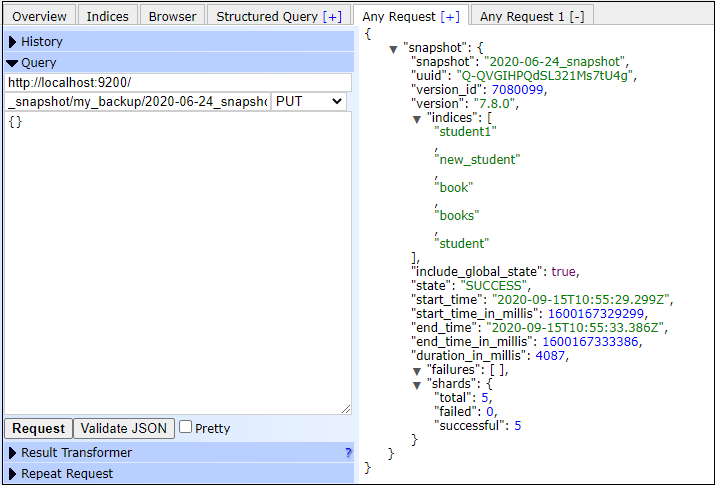
Get a snapshotOnce the snapshot has been created successfully, we can get the information about it. This information includes snapshot name, id, version, name of indices, time of creation (start and end time), etc. Execute the following code to get the information of snapshot1 stored in my_backup repository. Copy Code Response Screenshot See the below screenshot on how command executes and responds back. 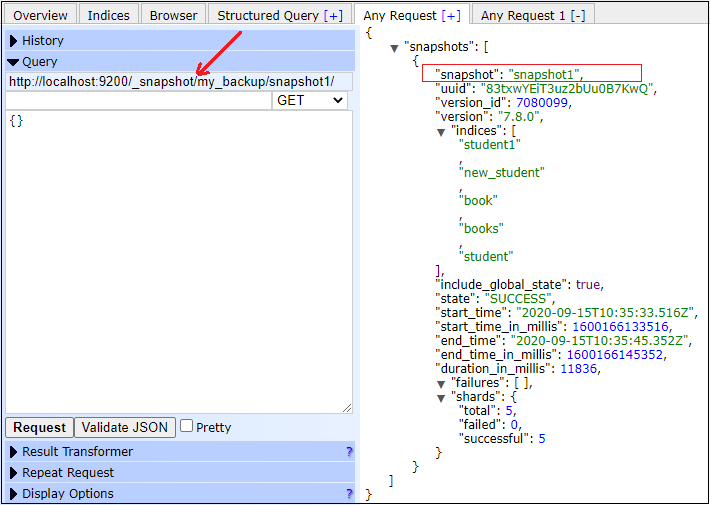
Delete a snapshotElasticsearch allows the users to delete a snapshot if needed. They can delete a snapshot by executing a simple delete command. The below code is used to delete a snapshot that exists inside a repository. In this example, we will delete 2020-06-24_snapshot from my_backup repository. Copy the code and execute it into your Elasticsearch plugin: Copy Code Response If your output is same as the below response, the 2020-06-24 has been deleted successfully. Screenshot Look at the screenshot below of the snapshot delete query. 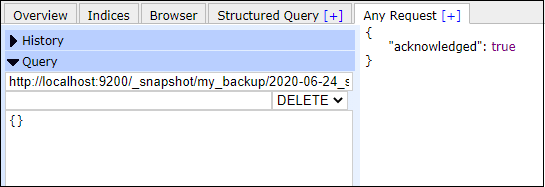
Delete a repositoryLike the snapshot, we can also delete/unregister a repository whenever needed by just executing a command. Deleting a repository is as simple as deleting a snapshot from the Elasticsearch database. In this below example, we will delete the my_backup repository. Copy Code Response If your output is same as the below response, the my_backup repository has been deleted successfully. Screenshot Look at the screenshot below in which we have deleted my_backup repository. 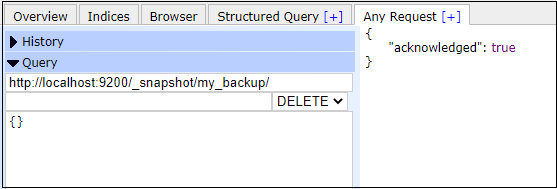
Note: Elasticsearch allows the users only to remove the reference of the location after a repository gets unregistered. The reference of the location is a place where the repository stores the snapshots.Snapshot statesThere are some states in Elasticsearch which a snapshot has. These snapshot states are as follows:
Note that when a snapshot is currently in progress, it is not allowed to take another snapshot.Status of SnapshotExecute the following query and check the status of the snapshot. Copy Code Response This will return the status of the snapshot. Screenshot 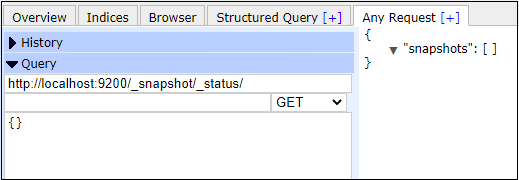
All repositoriesExecute the following query to see all the repositories present in Elasticsearch. Copy Code Response This will return all the repositories information present in Elasticsearch. Screenshot In the below screenshot, you can see that two repositories named my_backup and repository2 are present in Elasticsearch data at my_backup_location. 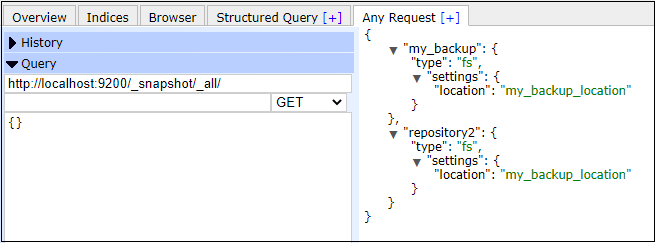
All SnapshotsExecute the following query to see all the snapshots present in a repository. Pass the repository name in which you want to search the snapshots. Copy Code Response This will return all the snapshots present in my_backup repository. You will notice that two snapshots have returned in which snapshot1 has backup of 5 indices while snapshot2 has backup of 3 indices. Screenshot Two repositories snapshot1 and snapshot2 has been returned. Look at the screenshot below. 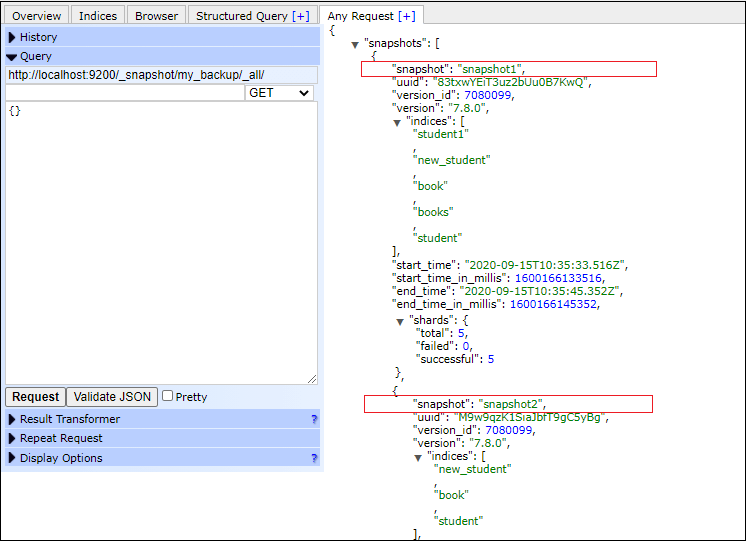
Now, you can restore a snapshot. Restore data using snapshotsElasticsearch provides a restore API, which helps the users to restore the snapshots into a running cluster. While restoring the snapshots, version compatibility has an important role. Means that we can restore a snapshot only to the version of Elasticsearch that can read the indices. So, before restoring a snapshot, check the version compatibility of it. Remember that an index cannot be restored to a cluster having more than one higher version of the index version. Example In the following example, we will restore the indices from the snapshot2 that exists in my_backup repository. For this, we have used function and APIs, which are -
Execute the following query to restore the data back to Elasticsearch from the snapshot. Copy Code Response If your response is same as the below output, this means that your indices have been restored back to Elasticsearch. Screenshot 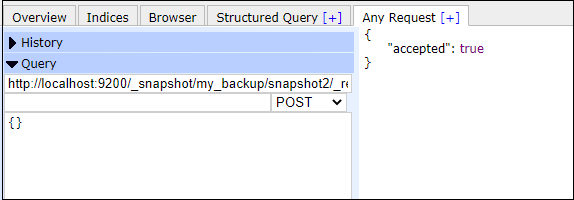
Elasticsearch UI before and after restoring the dataOnce the snapshot has been created and data is not in used, users can delete the indices to release the memory so that the space released by them can be used for another purpose. So, we delete indices to release the memory after taking backup. With the help of screenshot, we will understand how UI will look before and after restoring the data back to Elasticsearch. In the below screenshot, you can see that how Elasticsearch user interface look like when the user deletes the indices from Elasticsearch database. Look at the below screenshots - Before Restore 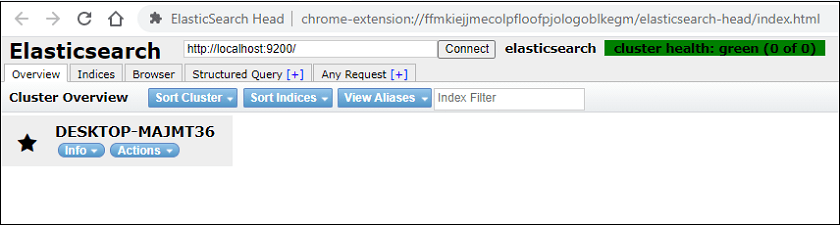
When we restore the data back to the Elasticsearch with the help of snapshot that we have created, it will look like the below screenshot on Elasticsearch plugin UI. After Restore 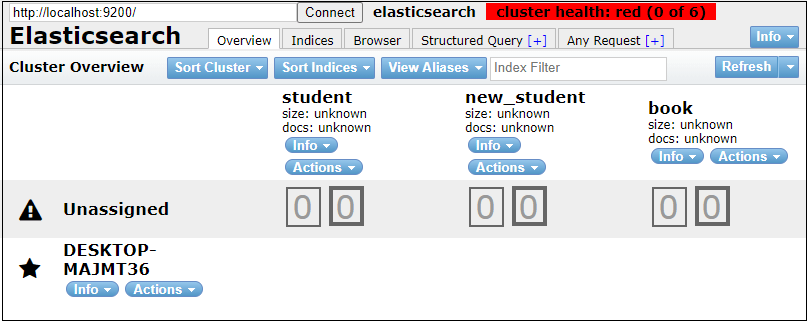
Version CompatibilityA snapshot consists of a copy of on-disk data structure and it can restore to the versions of Elasticsearch only, which can read the indices. Below is a list of different versions of Elasticsearch supported for snapshot and restore the indices:
Elasticsearch does not allow the users to restore the snapshot of indices created in 1.x to 5.x or 6.x. Similarly, a snapshot of indices created in 2.x cannot be restored to 6.x.
Next Topic#
|
 For Videos Join Our Youtube Channel: Join Now
Feedback
- Send your Feedback to [email protected]
Help Others, Please Share


