| |

Excel AutofitMicrosoft Excel is not only a platform limited to storing and manipulating your data but also provides a handful of different ways to present your data in a more synchronised pattern. Sometimes, other cells contain different sizes of data. Therefore, we need to adjust the default column width and row height to make it look standard. But excel didn't stop here. It introduced another feature that could automatically determine how much to broaden or contract the column and expand or collapse the row to fit the given data. This exclusive feature is known as Excel AutoFit, and down the lane, we will cover the different ways to use this magical feature.
What is Excel Autofit?"As the name suggests, AutoFit is an important feature designed to fit different-sized data values automatically by the active cells in the worksheet. It prevents the manual labour of adjusting the column width and row height to accommodate the data." Excel Autofit is further split into two parts:
Most commonly, we export data from different sources to Excel. In such situations, the data does not fit in one particular cell, only half of the value is shown, and the other half gets hidden or sometimes the values exceed current cell (refer to the below image). 
In the above example, Microsoft Excel automatically adjusts the row height based on the text height. Therefore, the auto-fit row concept is not often used as the autofit columns option. Though sometimes, while importing text, the row heights may not change automatically, and in these circumstances, the AutoFit Row Height feature becomes very helpful. Though resizing (automatically or manually) seems easy and seamless, one should consider the following limits to how large or small the column's width, and row height can be made:
NOTE: If you set the column width or row's height to 0, the respective column or row is hidden from the Excel worksheet.3 Ways to AutoFit in ExcelOne of the best parts of Microsoft Excel is it offers different ways to do most things, and you can choose any of the methods depending on your preferred work style. AutoFit columns and rows using double-clickThe most commonly preferred method to auto-fit in Excel is simply double-clicking the border of a column or row:
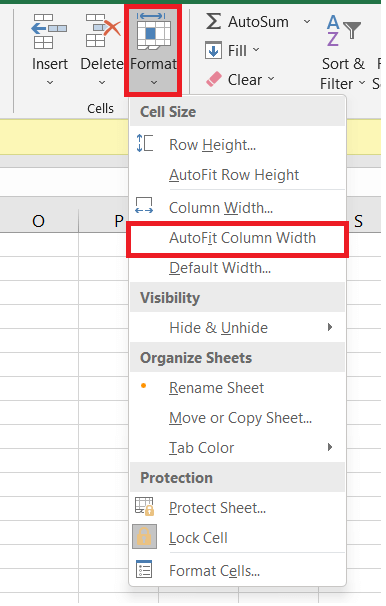
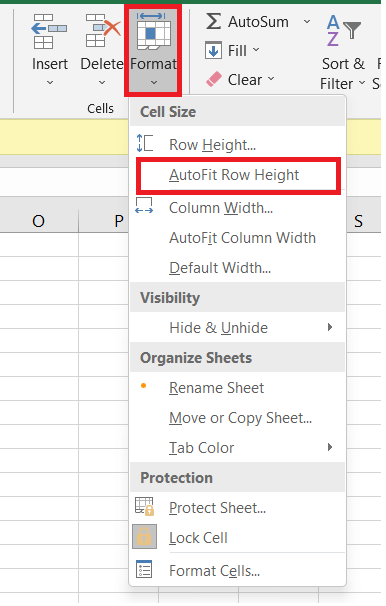
AutoFit column width and row height using the Excel ribbonExcel ribbon is an interesting tool that contains many features, including the Auto fit:
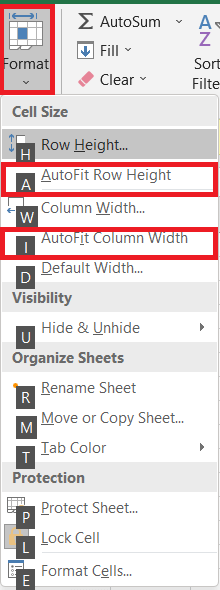
AutoFit using a keyboard shortcutExcel expert usually prefers to work with keyboard shortcuts rather than hovering with the mouse. Following are steps to autofit text in Excel using a keyboard shortcut:
The above keys are also known as hotkeys. Please note that the concept of hotkeys is different from shortcut keys. You should not hit all the keys together instead, each should key should be pressed and released in steps:
It is not possible to remember the whole sequence of the hotkeys. But don't worry, hotkeys don't work like that because as soon as you hit 'Alt + H', Excel will quickly display all the keys on the top of the ribbon bar. Once you select the Format menu, Excel will further show you the keys to choose its items: 
AutoFit feature is not workingThough the Excel AutoFit feature works perfectly almost in every scenario. But at times, it doesn't work up to your expectations and fails to auto-fit columns or rows, primarily when it is used in combination with other Excel features, unlike the Wrap Text feature. Consider the following example: You entered a text in a cell and set the desired column width to accommodate the data correctly. After that, you turned on the Text Wrap feature, selected different cells and double-clicked the boundary to adjust the row height. In most cases, it works fine, and the rows are autofitted accurately. But sometimes (it mainly occurs in any version of Excel 2007 to Excel 2016), some extra space arises towards the last line of text. Moreover, it may seem fine on the screen visually, but when you print it, it gets cut off. The above problem can be corrected. By trial and error, the following solution has been found:
This will resolve your problem and you can autofit any text without any hassle! Alternatives to AutoFit in ExcelAlthough the Excel AutoFit feature is very handy and effortless when it comes to accommodating the data of your Excel in the cell of your columns or rows, it may be quick and saves a lot of time. Still, it's not an option for large text strings that contain tens or hundreds of characters since so many characters on one long line would look odd! For such cases, the best solution would be wrapping text so it will accommodate the text on multiple lines rather than autofitting it on one line. Another possible method to adjust long text is to merge multiple cells into one single cell. To carry this method, select any two or more adjacent cells, and from the Excel Home tab, click on the Merge & Centre option in the Alignment group.
Next Topic#N/A error in Excel
|
 For Videos Join Our Youtube Channel: Join Now
Feedback
- Send your Feedback to [email protected]
Help Others, Please Share


