| |

Flask-Mail ExtensionConsidering the fact that flask is a micro framework, it has its limitations in providing the facilities to the developer. Although, there are several extensions to the flask like Mail, WTF, SQLite, SQLAlchemy, etc. which facilitates the developer to provide some basic facilities to the user. In this section of the tutorial, we will study one of the most common extensions to the flask, i.e., Flask-Mail. A web application must be capable of sending emails to users. The flask-mail extension provides the simple interface for the developer and the email server to send the email through the web application. For this purpose, we must install the flask-mail extension using the pip installer. pip install Flask-MailThe application must configure the flask-mail for the following parameters.
Flask-Mail Module ClassesThere are several classes which are important to send emails using the python flask web application. Message classThe Message class binds the email message into the one simple Message class instance so that the important methods like attach() can be called on this instance. The syntax to instantiate the Message class is given below. There are the following methods that can be called on the Message class object.
Mail ClassMail class object is used to send the email. The Mail class is instantiated by passing the application object to the Mail class constructor as given below. The Mail class contains the following methods.
Process of sending email using flask web applicationThere are the following steps involved in sending an email using the flask web application. Step 1: import the required module like flask-mail, flask using from-import statement. Step 2: Configure the Flask Mail. Step 3: Instantiate the Mail class. Step 4: Instantiate the Message class with the desired attributes in the function mapped by some URL rule. ExampleThe following example contains a python script where we send the email to the given email id. Mailer.py Our Python web application attempts to log in to the email_id mentioned in the script. This attempt can be blocked if you have not allowed access to the less secure application to your Google account. In this case, visit the link https://www.google.com/settings/security/lesssecureapps and allow access for the less secure app. Email verification in flask using OTPIn the modern web applications, sometimes the email is verified using the one time password generated randomly by the program. In this example, we will create a python script that accepts the user's email id as the input from the user and send an email containing the automatically (randomly) generated (4-digit) one-time password. For the successful verification of the email-id, the user is required to enter the otp sent to the mentioned email id. If the OTP entered by the user is matched with the randomly generated OTP, then the email-id is successfully verified, and the success message is shown to the user otherwise the verification is failed, and the failure message is shown to the user. In the below example, A flask script Mailer.py acts as a controller with the functions verify() and validate() associated with the URL /verify and /validate respectively. These functions also render the HTML templates to accept the input from the user and show the result depending upon the email verification. Mailer.py index.html verify.html The following template prompts the user to enter the email_id and password. The script Mailer.py will send an email containing the one-time password to the email id entered by the user. 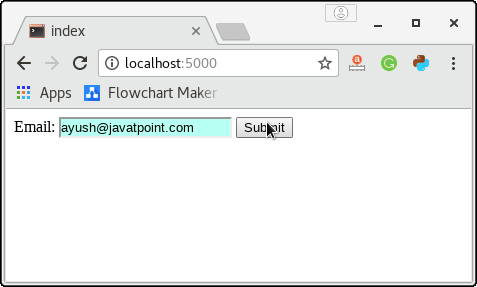
Now, the user is prompted to enter the OTP sent to the specified email. 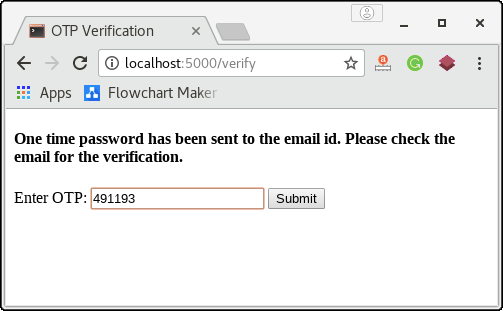
The function validate() matches the OTP entered by the user with the one which was randomly generated and mailed to the user's email id. In this case, OTP is matched; therefore the user will get the success message as shown in the below image. 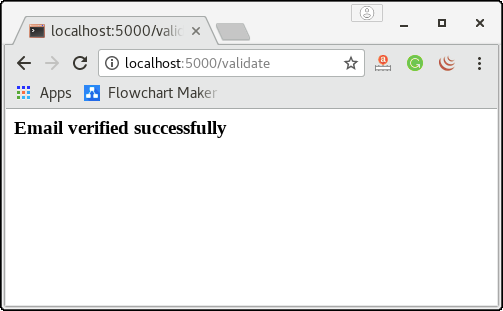
Bulk EmailsIn the above example, the script sends only one email to the user for the email verification. In web applications, there are cases where we need to send multiple emails or the bulk of emails in a single connection. In that case, we can make use of the python with the statement which closes the connection object automatically once all the emails are sent. ExampleAdding attachments with the mailFlask facilitates us to send the attachment with the mail. For this purpose, we need to open the resource using the open_resource() method of Flask class. Then, we can use the python-with statement to attach the resource with the message. The with statement closes the resource automatically when the work is done. The following syntax is used to send the attachments with the mail. The flask script which sends the attachment with the mail is given below. mailer_attach.py
Next TopicFlask SQLite
|
 For Videos Join Our Youtube Channel: Join Now
Feedback
- Send your Feedback to [email protected]
Help Others, Please Share


