| |

Flutter State ManagementIn this section, we are going to discuss state management and how we can handle it in the Flutter. We know that in Flutter, everything is a widget. The widget can be classified into two categories, one is a Stateless widget, and another is a Stateful widget. The Stateless widget does not have any internal state. It means once it is built, we cannot change or modify it until they are initialized again. On the other hand, a Stateful widget is dynamic and has a state. It means we can modify it easily throughout its lifecycle without reinitialized it again. What is State?A state is information that can be read when the widget is built and might change or modified over a lifetime of the app. If you want to change your widget, you need to update the state object, which can be done by using the setState() function available for Stateful widgets. The setState() function allows us to set the properties of the state object that triggers a redraw of the UI. The state management is one of the most popular and necessary processes in the lifecycle of an application. According to official documentation, Flutter is declarative. It means Flutter builds its UI by reflecting the current state of your app. The following figure explains it more clearly where you can build a UI from the application state. 
Let us take a simple example to understand the concept of state management. Suppose you have created a list of customers or products in your app. Now, assume you have added a new customer or product dynamically in that list. Then, there is a need to refresh the list to view the newly added item into the record. Thus, whenever you add a new item, you need to refresh the list. This type of programming requires state management to handle such a situation to improve performance. It is because every time you make a change or update the same, the state gets refreshed. In Flutter, the state management categorizes into two conceptual types, which are given below:
Ephemeral StateThis state is also known as UI State or local state. It is a type of state which is related to the specific widget, or you can say that it is a state that contains in a single widget. In this kind of state, you do not need to use state management techniques. The common example of this state is Text Field. Example In the above example, the _name is an ephemeral state. Here, only the setState() function inside the StatefulWidget's class can access the _name. The build method calls a setState() function, which does the modification in the state variables. When this method is executed, the widget object is replaced with the new one, which gives the modified variable value. App StateIt is different from the ephemeral state. It is a type of state that we want to share across various parts of our app and want to keep between user sessions. Thus, this type of state can be used globally. Sometimes it is also known as application state or shared state. Some of the examples of this state are User preferences, Login info, notifications in a social networking app, the shopping cart in an e-commerce app, read/unread state of articles in a news app, etc. The following diagram explains the difference between the ephemeral state and the app state more appropriately. 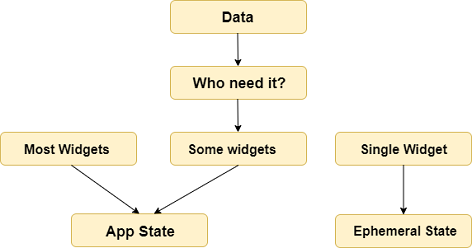
The simplest example of app state management can be learned by using the provider package. The state management with the provider is easy to understand and requires less coding. A provider is a third-party library. Here, we need to understand three main concepts to use this library.
ChangeNotifierChangeNotifier is a simple class, which provides change notification to its listeners. It is easy to understand, implement, and optimized for a small number of listeners. It is used for the listener to observe a model for changes. In this, we only use the notifyListener() method to inform the listeners. For example, let us define a model based on ChangeNotifier. In this model, the Counter is extended with ChangeNotifier, which is used to notify its listeners when we call notifyListeners(). It is the only method that needs to implement in a ChangeNotifier model. In this example, we declared two functions the increment and decrement, which are used to increase and decrease the value. We can call notifyListeners() method any time the model changes in a way that might change your app's UI. ChangeNotifierProviderChangeNotifierProvider is the widget that provides an instance of a ChangeNotifier to its descendants. It comes from the provider package. The following code snippets help to understand the concept of ChangeNotifierProvider. Here, we have defined a builder who will create a new instance of the Counter model. ChangeNotifierProvider does not rebuild Counter unless there is a need for this. It will also automatically call the dispose() method on the Counter model when the instance is no longer needed. If there is a need to provide more than one class, you can use MultiProvider. The MultiProvider is a list of all the different Providers being used within its scope. Without using this, we would have to nest our Providers with one being the child of another and another. We can understand this from the below code. ConsumerIt is a type of provider that does not do any fancy work. It just calls the provider in a new widget and delegates its build implementation to the builder. The following code explains it more clearly./p> In the above example, you can see that the consumer widget only requires a builder function, which is called whenever the ChangeNotifier changes. The builder function contains three arguments, which are context, count, and child. The first argument, context, contain in every build() method. The second argument is the instance of the ChangeNotifier, and the third argument is the child that is used for optimization. It is the best idea to put the consumer widget as deep as in the tree as possible.
Next TopicFlutter IDE
|
 For Videos Join Our Youtube Channel: Join Now
Feedback
- Send your Feedback to [email protected]
Help Others, Please Share


