| |

Flutter TabbarIn this section, we are going to learn how the tab bar works in Flutter. The tabs are mainly used for mobile navigation. The styling of tabs is different for different operating systems. For example, it is placed at the top of the screen in android devices while it is placed at the bottom in iOS devices. Working with tabs is a common pattern in Android and iOS apps that follow the Material Design guidelines. Flutter provides a convenient way to create a tab layout. To add tabs to the app, we need to create a TabBar and TabBarView and attach them with the TabController. The controller will sync both so that we can have the behavior which we need. Let us see step by step to create a tab bar in Flutter application. Step 1: First, you need to create a Flutter project in your IDE. Here, I am going to use Android Studio. Step 2: Open the app in Android Studio and navigate to the lib folder. Inside the lib folder, create two dart files and named it FirstScreen and SecondScreen. Write the following code in the FirstScreen: Write the following code in the SecondScreen: Step 3: Next, we need to create a DefaultTabController. The DefaultTabController creates a TabController and makes it available to all widgets. In the above code, the length property tells about the number of tabs used in the app. Step 4: Create the tab. We can create tabs by using the TabBar widget as below code. Step 5: Create content for each tab so that when a tab is selected, it displays the content. For this purpose, we have to use the TabBarView widget as: Step 6: Finally, open the main.dart file and insert the following code Output Now, run the app in your Android Studio. It will give the following screen where you can see two tab icons. So when you click any of the tab icons, it will display the associated screen. 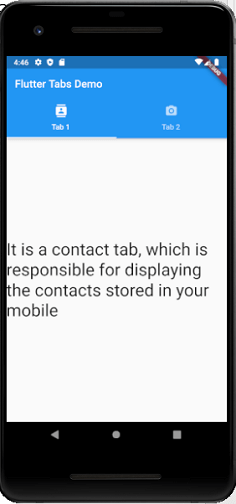 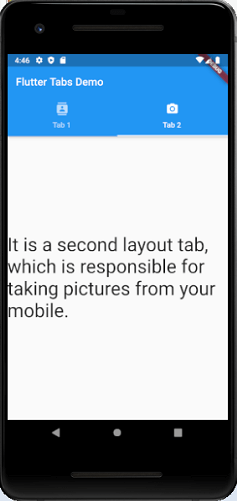
Display a SnackBar SnackBar gives a brief message at the bottom of the screen on mobile devices and lower-left on larger devices and gets confirmation from the user. The snack bar automatically disappears after a certain amount of time. Here, we are going to learn how we can implement a snack bar in Flutter. In Flutter, the snack bar only works with a scaffold widget context. Let us take an example where we show the list of records, and contains a delete icon corresponding to every list. When we delete any record, it shows a message at the bottom of your screen. This message gets confirmation from the user. If it does not receive any confirmation, the message goes disappear automatically. The following example helps to understand it more clearly. Create a Flutter project in Android Studio. Open the main.dart file and replace the following code. Output Now, run the app in Android Studio. You can see the following screen in the emulator. When you delete any list, it shows a message at the bottom of the screen. If you tap on the undo, it does not remove the list. 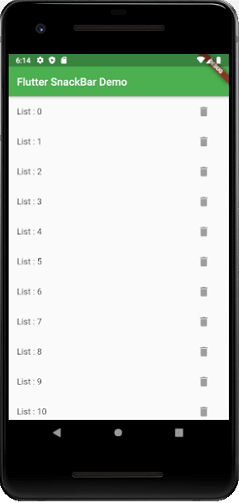 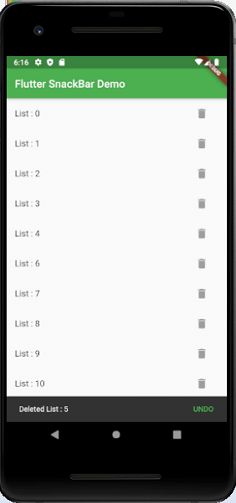
Next Topic#
|
 For Videos Join Our Youtube Channel: Join Now
Feedback
- Send your Feedback to [email protected]
Help Others, Please Share


