| |

GIMP View MenuThe view menu carries tools that manipulate the visibility or appearance of the image and other elements. The View menu contains the following tools:
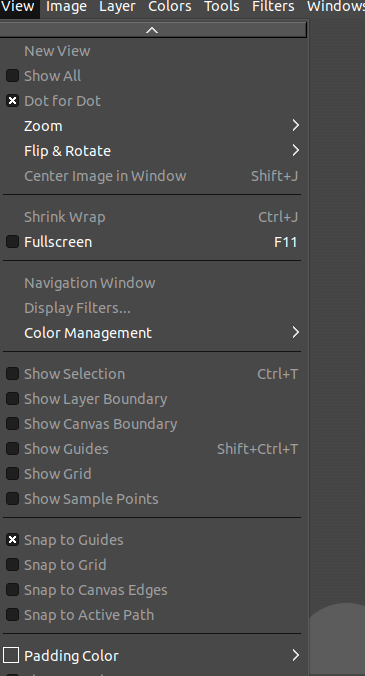
New ViewThe New View tool is used to create a new image window for the current image. GIMP provides the option to create many views of any image. The changes made in one window can be seen in the other except the changes in the view. The new views do not create separate image files; they are a different aspect of the same image. Instead, it is useful for analyzing the effects of the changes on the image. To create a new view. Select the new view option from the view menu. Show AllThe Show All option is utilized to make noticeable all pixels that are spilling off the canvas limit and typically remove the picture. It is useful for dragging the new layers, new pictures outside the canvas incidentally to work with them. Dot For DotIt is used to activate and deactivate the "Dot for Dot" mode. If this mode is activated and the zoom factor is 100%, it will display every pixel in the image as a single pixel on the window. If it is disabled, it will display the real size of the image. The dot for dot mode is useful if you are working on icons and web graphics. For the printable images, we should disable it. To activate the dot for dot mode, select the dot for dot option from the view menu. ZoomIt contains different options for manipulating the image's magnification in the image window. Enlarging an image is useful for high precision work, pixel-level image modifications, or other precise selections. Comparatively, reducing an image is useful for getting an overall changes of the image and analyzing the factors that may affect the entire image. Zooming does not affect the image data, so it is not undoable. The zoom menu contains the following sub-menu:
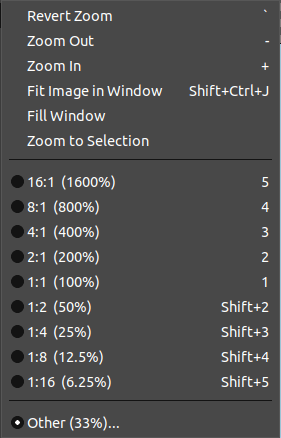
Revert Zoom: The revert zoom option is used to reset the zoom factor to the previous value. If there are no changes in the zoom factor, it will be insensitive and grayed out. Zoom Out: The zoom out option decreases the zoom factor by about 30 %. Zoom In: The zoom-in option increases the zoom factor by 30%. Fit Image in Window: It is used to zoom the image as possibly large, But keep adjusted it within the window. Fill Window: It is used to zoom possibly large the image without requiring any padding to be displayed. Zoom to Selection: It is used to zoom the picture so the selection can fit the smallest view of the window. Other Aspects: apart from all the above options, there are also some other zooming options are available, they will zoom the image accordingly. Flip & RotateThe flip and rotate tool is used to reposition an image according to the rotate and flip angle. It provides the following tools to flip and rotate.

It will rotate the image according to the specified option. Below is the example of 90-degree clockwise rotation: 
Center Image in WindowThe Center Image in Window tool is used to keep the current image in the center of the opening window. Shrink WrapIt is used to resize the window so that it can be adjusted to the same size as the current zoom factor. It is useful for enlarging the screen for viewing the most significant part of the image. To activate the shrink wrap tool, select it from the view menu or stroke the CTRL+J keys. Full ScreenThe Fullscreen tool is used to display the image window on the entire screen. We can exit from this mode as well by selecting this again. It will not manipulate the image size. The full-screen mode disables the menu bar, but we can access it by right-clicking on the image. To enable the full-screen mode, select the full-screen option from the view menu, or press the F11 key. Navigation WindowIt is used to open the navigation window. The navigation window provides quick navigation for the image, such as crop the image quickly, set zoom levels, and many more tasks. To activate the navigation window, select the navigation window option from the view menu. Display FiltersThe Display Filters tool displays a dialog window for managing the display filters and their options. The display filters and filters are two different things; It does not manipulate the image data. Usually, the display filter changes the perception of the image. It is useful for soft proofing prints, color management. 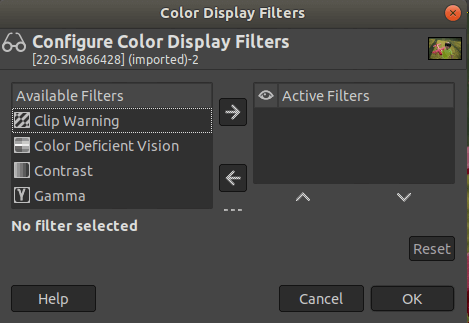
Color ManagementThe Color Management tool is used for managing the colors and soft-proofing. To activate this tool, select the color management option from the view menu. 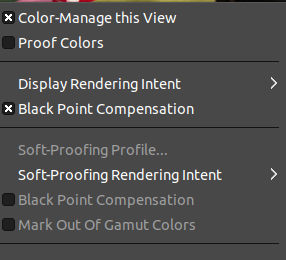
Show SelectionThe Show Selection tool is used to enable and disable the displaying of the selection in the current image. However, the selection will exist if displaying of the selection line is disabled. To enable or disable the view of the selection, select or deselect the show selection option from the view menu or stroke the CTRL+T keys. Show Layer BoundaryIt is used to activate and deactivate the display of the layer boundary that is surrounded by a yellow dotted line. Show GuidesThe Show Guides tool is used to enables and disables displaying of Guides in the image window. To display the guides, select the show guides option from the view menu or stroke the SHIFT+CTRL+T keys. Show GridThe Show Grid option is used to enable or disable the grid. At the point when the show Grid is activated, it will overlay the picture and makes it simpler for us to arrange chosen picture components. 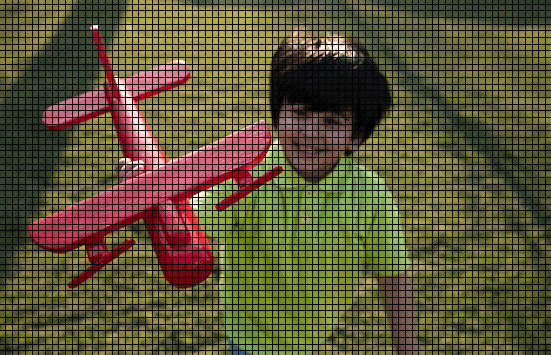
To enable the grid, select the show grid option from the view menu. Show Sample PointsThe Show Sample Points tool is used to turn on or off the display of the sample points in the image window. It is useful for displaying color information. Snap to Canvas EdgesThe snap to canvas edges tool is used to move a selection or layer. It is useful for appropriate placements of the image elements. Snap to Active PathIt is similar to the snap to canvas edge option. It is also used to move a selection or layer. Padding ColorsThe Padding Colors tool is used to change the canvas color, which surrounds the image. The canvas is the surface where the image lies. It is like a frame for an image. Show MenubarThe Show Menubar option is used to enable or disable the menubar. It is a handy tool while working on full-screen mode. Show RulersIt is used to enable or disable the rulers.
Next TopicGIMP Image Menu
|
 For Videos Join Our Youtube Channel: Join Now
Feedback
- Send your Feedback to [email protected]
Help Others, Please Share


