| |

Google Forms Tutorial
In this Google Forms Tutorial, we are going to discuss the following topics:
Google FormsGoogle Forms is a survey administration software included as part of the free, web-based Google Doc Editors suite, which Google offers. The service also comprises Google Sheets, Google Drawings, Google Sites. Google Docs, Google Keep, and Google Slides. Google Forms is only available as a web application. Using this app, users can create and edit surveys online while collaborating with other users in real-time. The information gathered can be entered into a spreadsheet automatically. In other words, Google Forms is a free online tool from Google via which we can create forms, quizzes, and surveys as well as to collaboratively edit and share the forms with others. It is a cloud-based questionnaire and survey software. This means we can design all of our forms online in our browser. It was first released in 2008 as simple integration with Google sheets. Teachers can use Google Forms to assess their students at the beginning of class and assess already existing knowledge. In addition to that, Google forms can also utilize to give and receive feedback from students and parents. In the same way, students can use Google Forms to evaluate their own learning and set learning goals, and collect data for their research projects. Features of Google Forms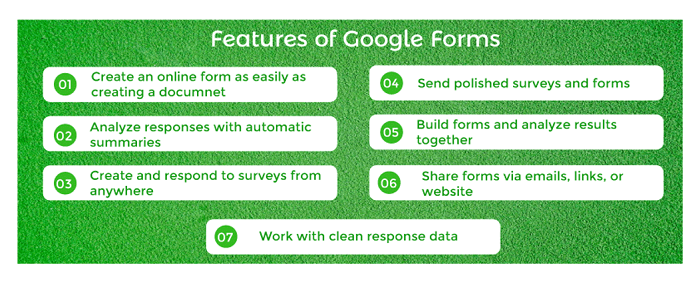
The following are the features of Google Forms: 1. Create an Online Form as Easily as Creating a Document Select from various question types, reorder questions with drag-and-drop, and customize values as simple as pasting a list. 2. Analyze Responses with Automatic Summaries Another interesting feature of Google form is it analyzes responses with automatic summaries. See charts with response data update in real-time. Alternatively, we can use Google Sheets to open the raw data for further analysis or automation. 3. Create and Respond to Surveys from Anywhere We can access, create and edit forms on the go, from screens big and small. Others can participate in our survey from any location, using a mobile device, computer, or tablet. 4. Send Polished Surveys from Anywhere Customize colors, images, and fonts in order to adjust the look and feel or reflect our organization's branding. And add custom logic that displays questions based on the replies for a more seamless experience. 5. Build Forms and Analyze Results Together Add collaborators- just like with Google Docs. Sheets and Slides- to build questions together in real-time. Then, without sharing various versions of the file, analyze the results together. 6. Share Forms Via Emails, Link, or Website Using Google Forms, we can easily share forms with specific people or a large audience by embedding forms on our website or sharing the links on social media. 7. Work with Clean Response Data Set response validation rules using the built-in intelligence. For example, make sure that email addresses are formatted accurately or the numbers are within a certain range. Advantages of Google FormsThe following are the advantages of Google Forms:
Disadvantages of Google FormsThe following are disadvantages of Google Forms:
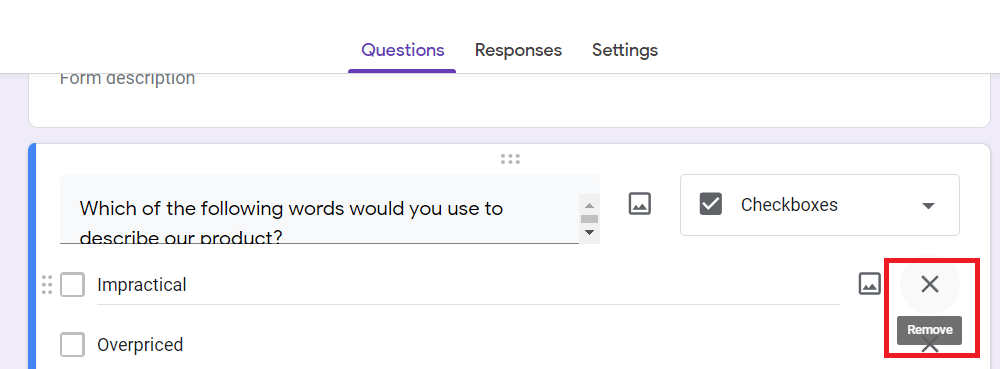
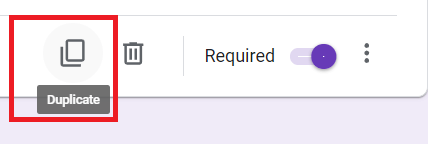
Google Forms Field OptionsGoogle Forms comprises 12 field types: 9 question types, along with text, photo, and video fields. We simply need to click on the +icon, which is present in the right sidebar, to add a new question, or we can click on the text, photo, or video icons to add media to our form. Each field has a copy button that may duplicate the field, making it easy to add identical questions to our form. There is a delete button, options to make the field required, and a menu with additional options on the right side. We can change the type of question at any moment, but switching from multiple choice, checkbox, or menu to any of the other question types will reset our field settings and questions. And, to speedily fill questions in fields, simply hit enter to begin adding a new one. Quick Tip: Accidentally remove a form element or add one to many? We only need to press CMD + Z or Ctrl + z to undo, just as we would in a document. The following is the list of Google Forms field options:
Useful Keyboard Shortcuts for Google FormsKeyboard shortcuts are great for speeding up and optimizing our everyday internet activity. When it comes to Forms, it would not be different. Here are a few shortcuts that will undeniably be helpful to us while creating the forms:
Getting Started with Google FormsWe may use Google Forms to create our own custom online forms and send them to others. These forms can comprise surveys, sign-ups, quizzes, etc. The responses to the form will be saved in a Google Sheets spreadsheet for us when someone fills it out. In this tutorial, we will learn about the Google Forms interface and its various uses. How to Get the Google FormsBefore we start using Google Forms, we have to make sure that we are signed in to our Google account. A convenient way to access Google Forms is via Google Drive. First, we have to click on the New button. 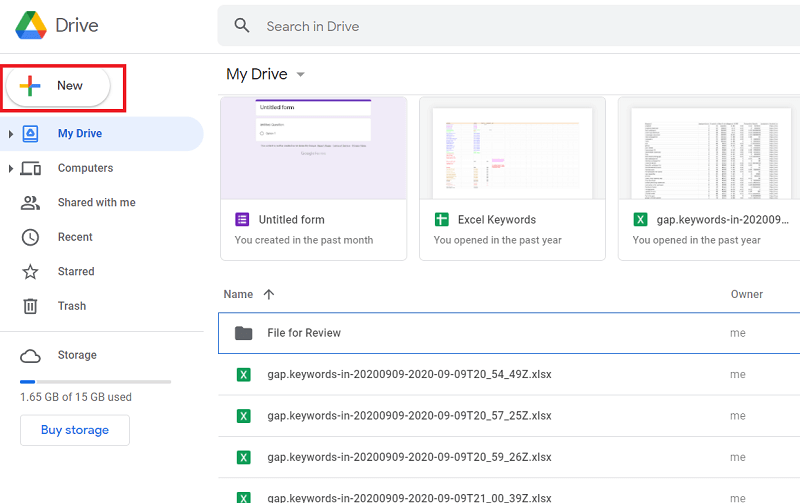
Then we have to click on the More>Google Forms. 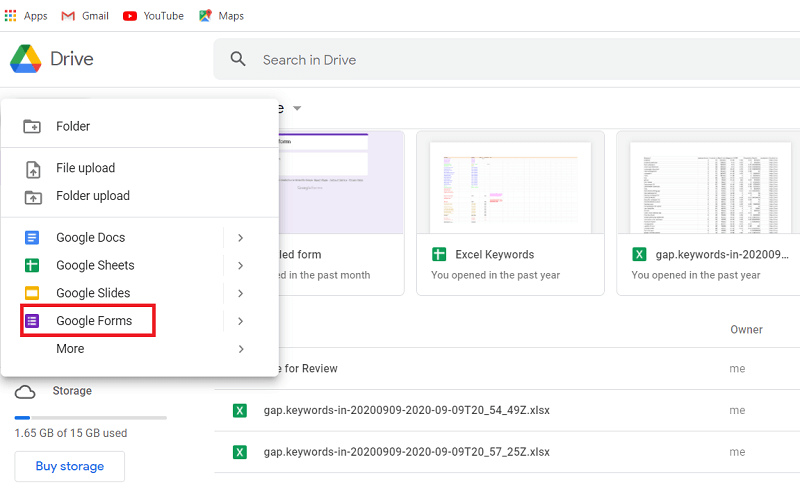
The Google Forms interface When we initially open Google Forms, it will appear to be somewhat empty, but that is just because we have not created or filled out any forms yet. The interface is simple to use and allows us to create new forms, open existing ones, and access a variety of templates, and more. If we want to be more familiar with the Google Forms interface, we have to click on the buttons in the interactive below. 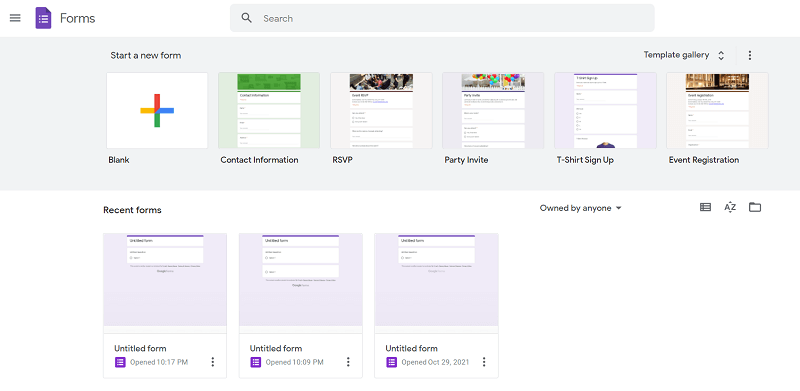
What Kinds of Things Can We Do with Google Forms?Google Forms can be used for a various purpose, both personal and professional. Let's have a look at some of its applications and possibilities.
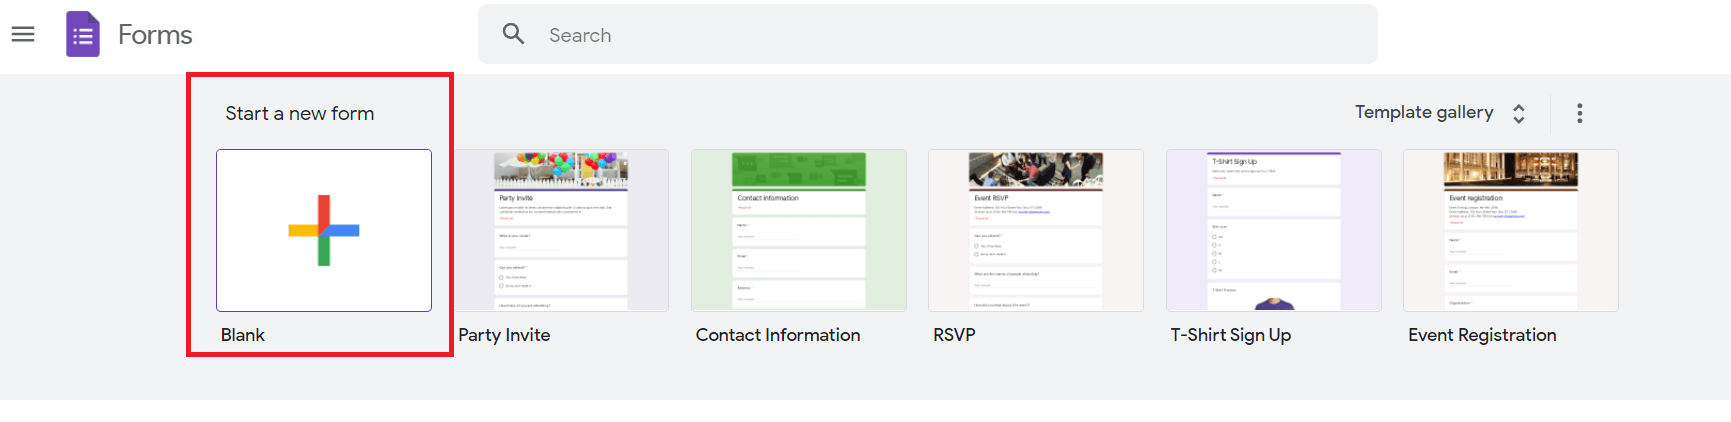
Creating Simple FormsWe may create and alter a variety of forms with Google Forms, either from scratch or by utilizing a template. We'll go through how to create our own forms, the different types of questions we can use, and how to store and access any feedback we may receive. We'll begin with creating a blank form. We have to click on the Blank form button on the Google Forms homepage. 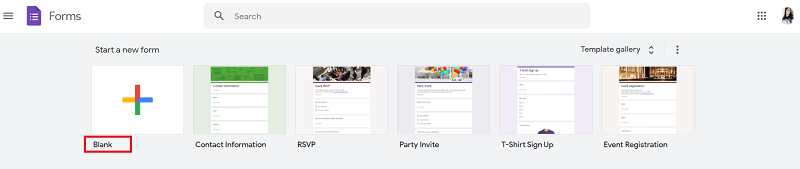
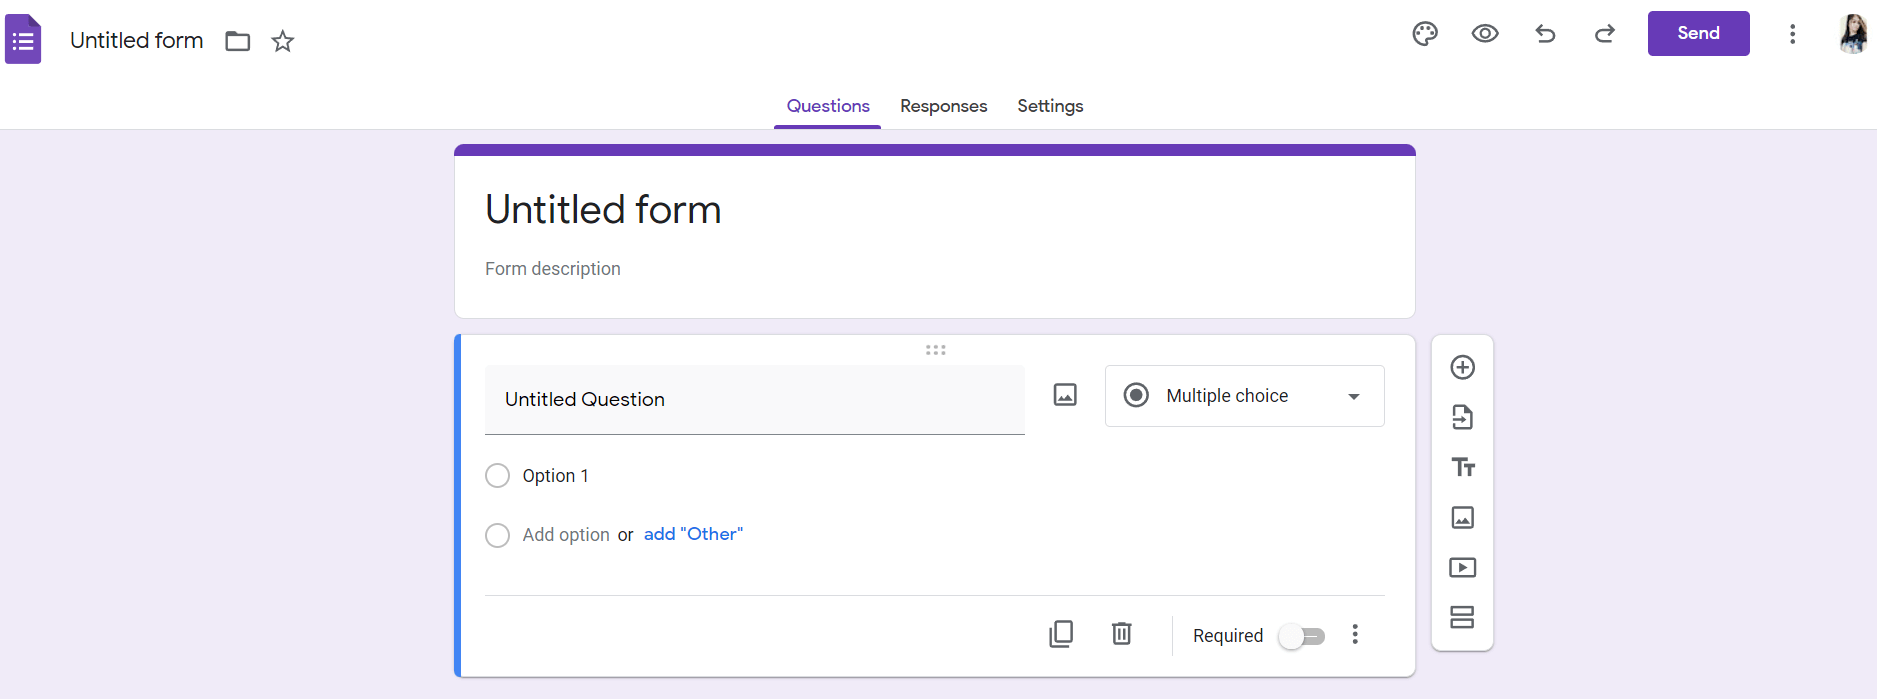
From here, we can create and edit our form. If we click on the untitled question, we will see a few options appear. Let's look at this interface in more detail.
Types of QuestionsWe can choose from a range of questions in Google Forms. The sort of question we use will be determined by the type of responses we want from our form. Here are a few types and how to use them:
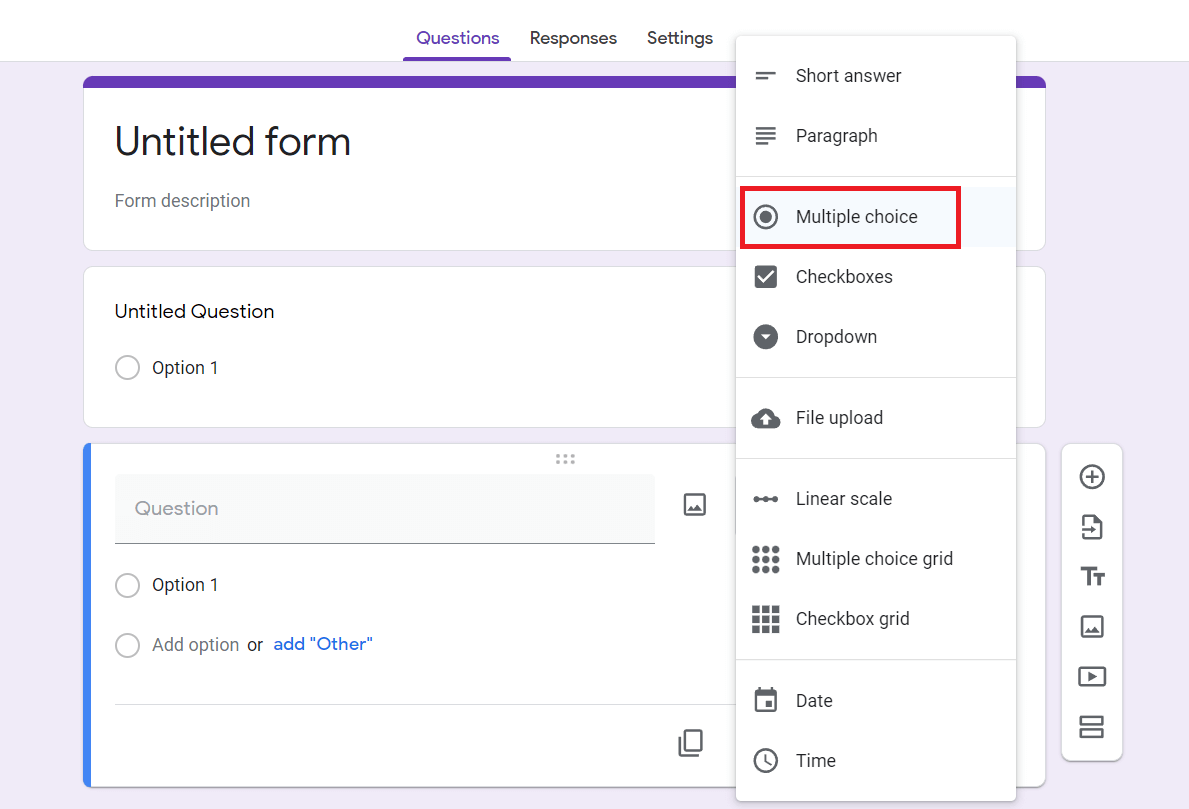
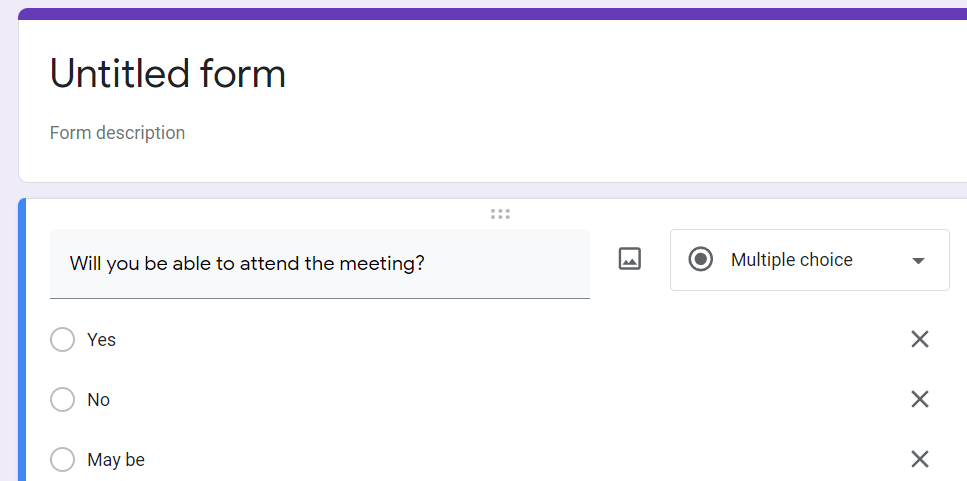
Creating a Multiple-Choice QuestionAs we can see from the examples above, Google Forms allows us to design a wide range of questions. We will make a multiple-choice question in this example. Other types of questions can be created similarly, and the general technique will work for most of them. The following steps are used to create a multiple-choice question.
Using a templateInstead of creating a form from scratch, Google Forms offers many templates for us to use as a starting point. On the Forms homepage, click Template Gallery. 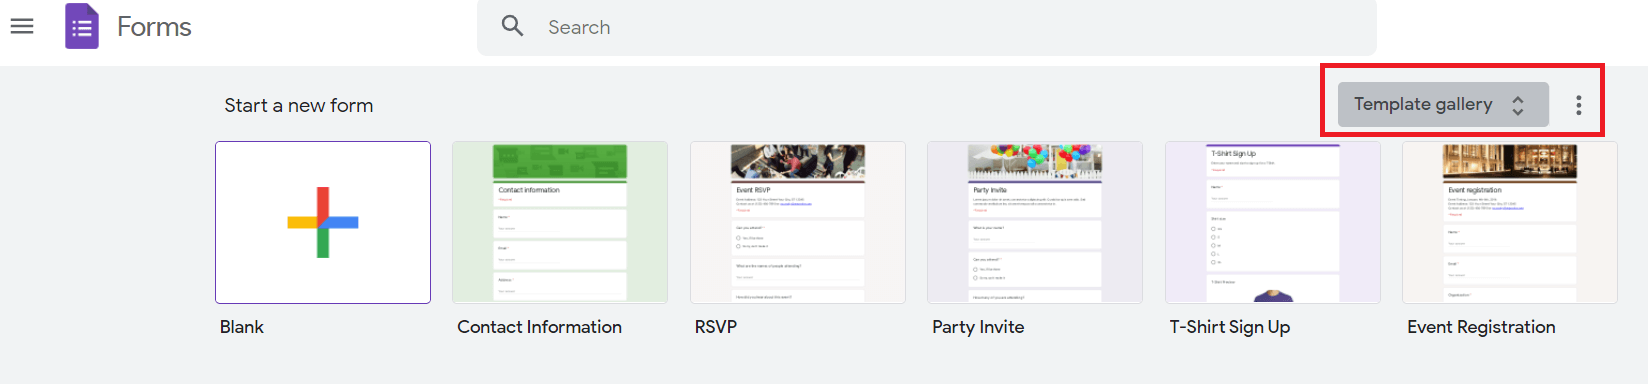
From here, we can select any of the available templates. They are divided into three categories; Personal, Work, and Education. From here, it's as simple as filling in the blanks. We have the option to add or delete questions as we see fit. 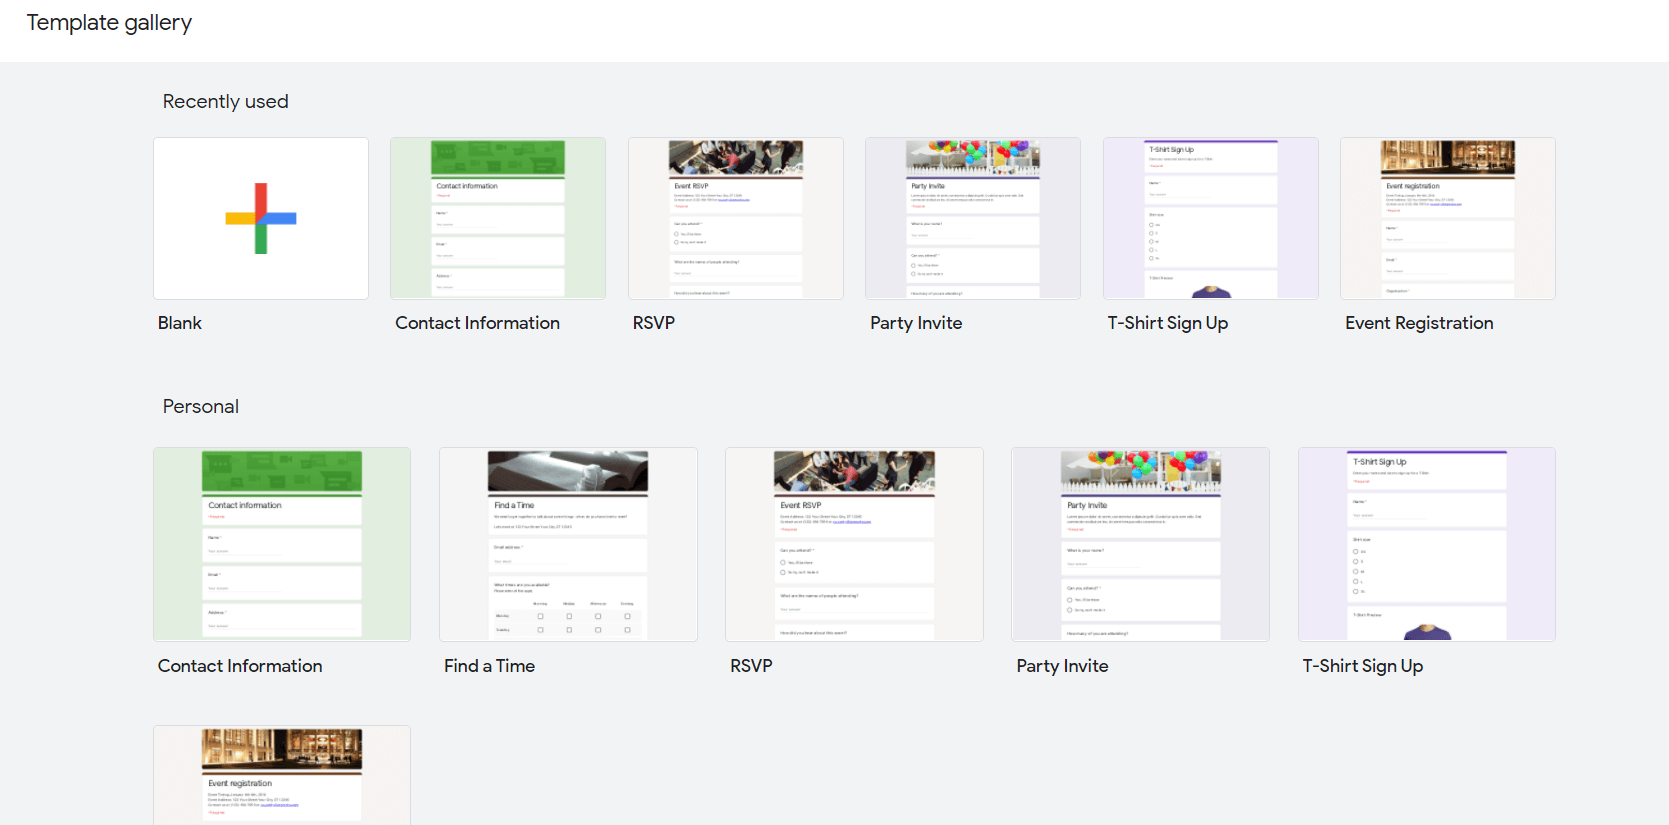
Choosing How to Save Our ResponsesOnce we are satisfied with the form we have generated, we will need to choose how to store responses we'll receive. For storing responses, google Forms provides two options:
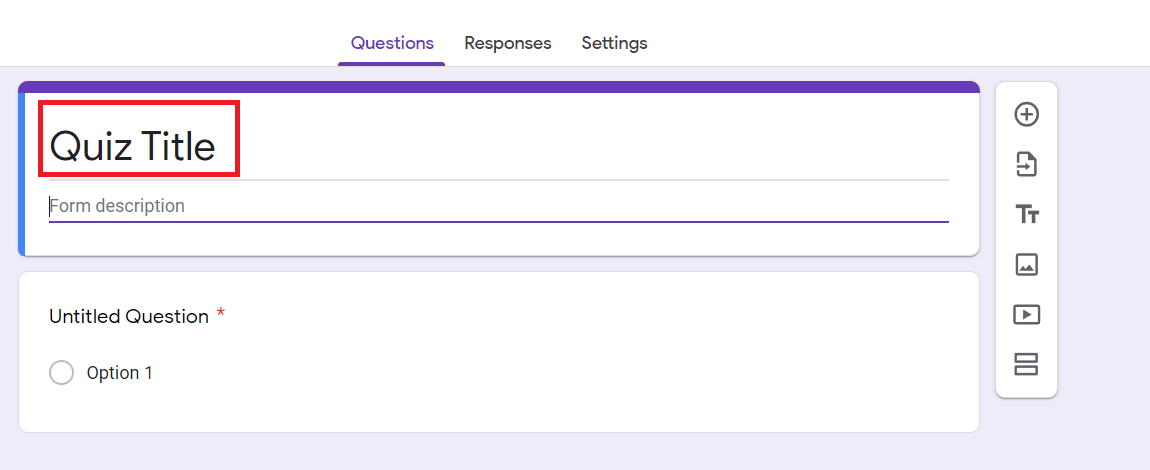
The method we use will be determined by the sort of data we are gathering and the number of people we intend to send the form to. We will cover this in detail on organizing and analyzing our responses. Learn How to Create Google Form with the Help of the ExampleLet's learn how to a create form with the help of the example. In this example, we will create a "Contact Information" form. The following are the steps that have to follow in order to create a form: Step 1: In order to create a form, we have to open the Google Forms homepage and simply click on the Blank form button. Step 2: Title Your Google Form- In order to add a title, we have to click on the Untitled Form and enter the Title of the form. In this example, the Form's Title is Student Contact Information. The title is what responders will see when they open the form. Below the title, we can enter the description of the form. 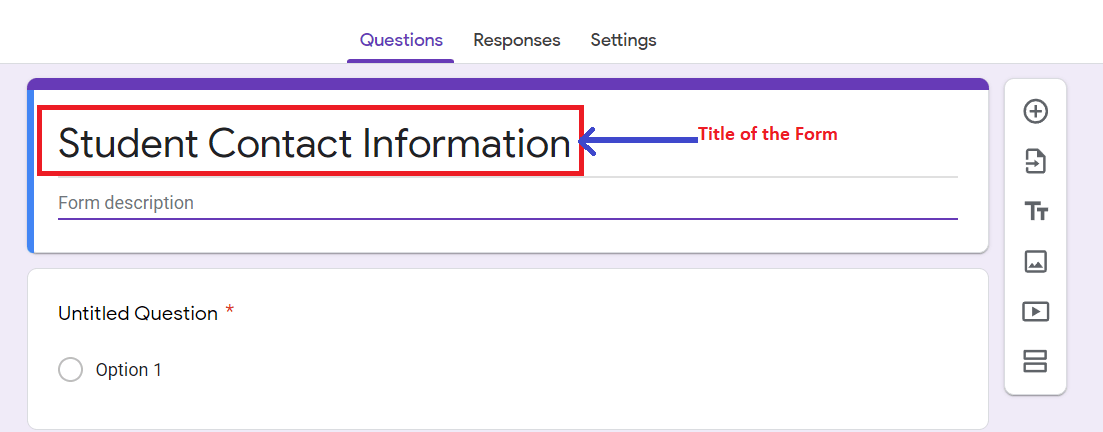
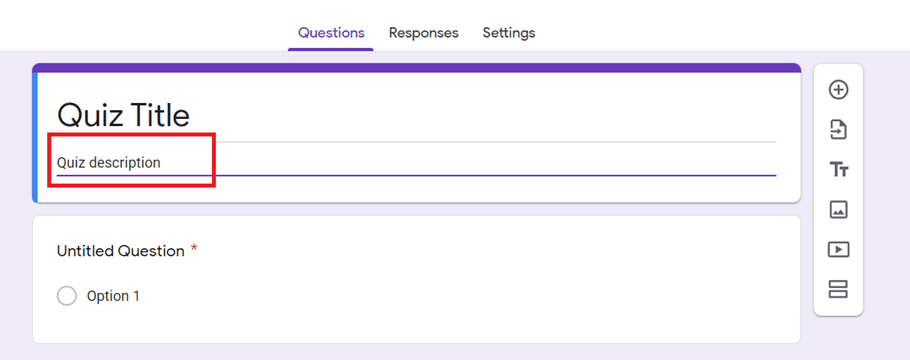
Step 3: Next, we have to enter a description below the title. In this example, the form description is "Student Contact Information Regarding Job". 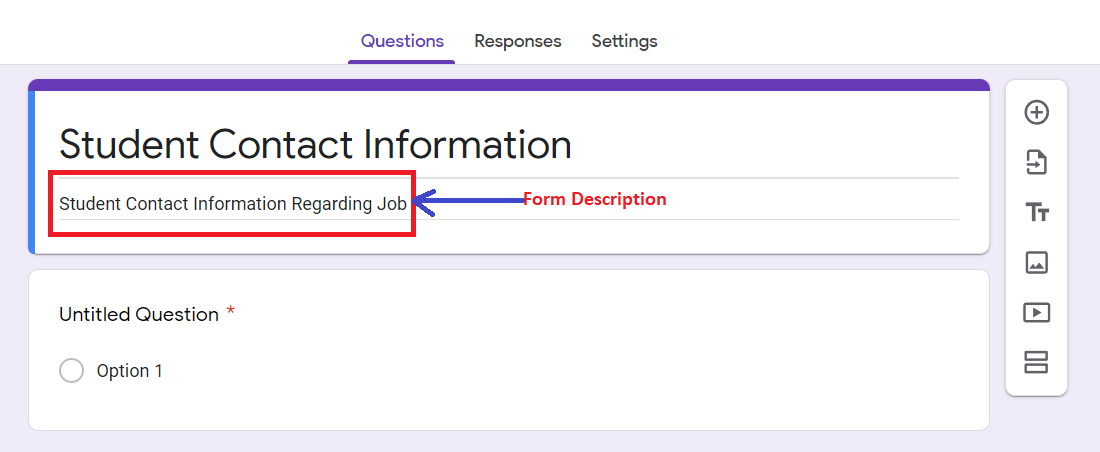
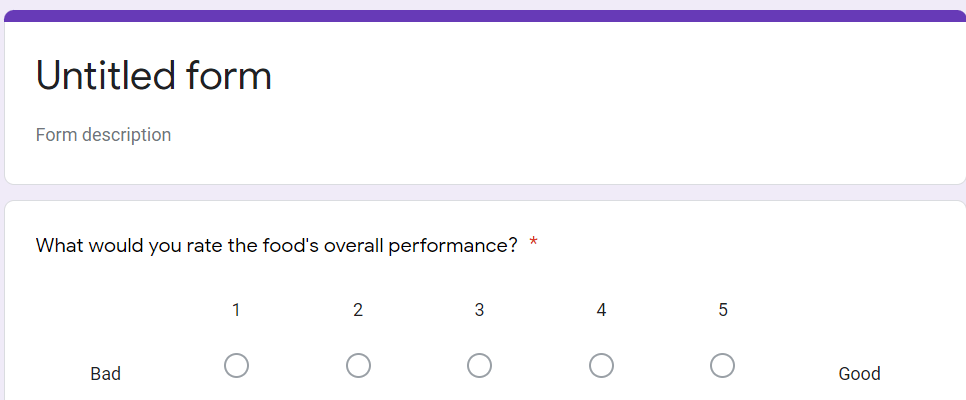
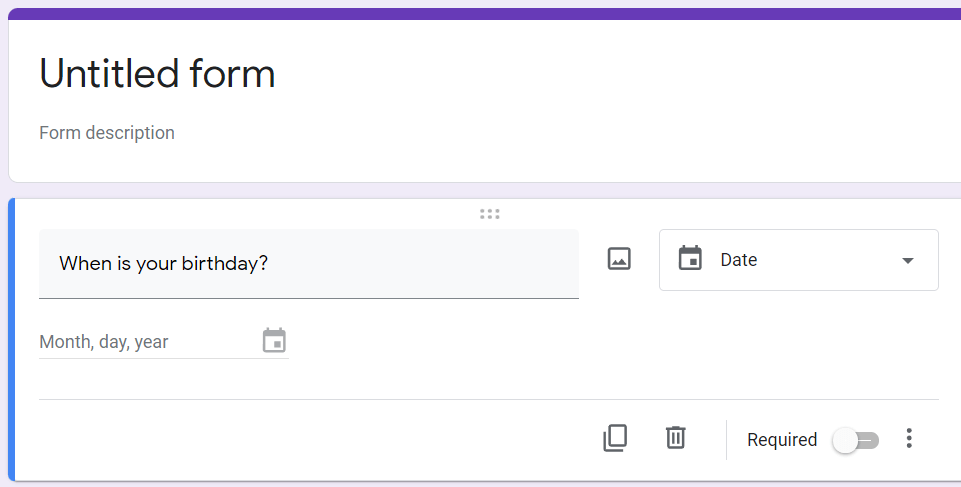
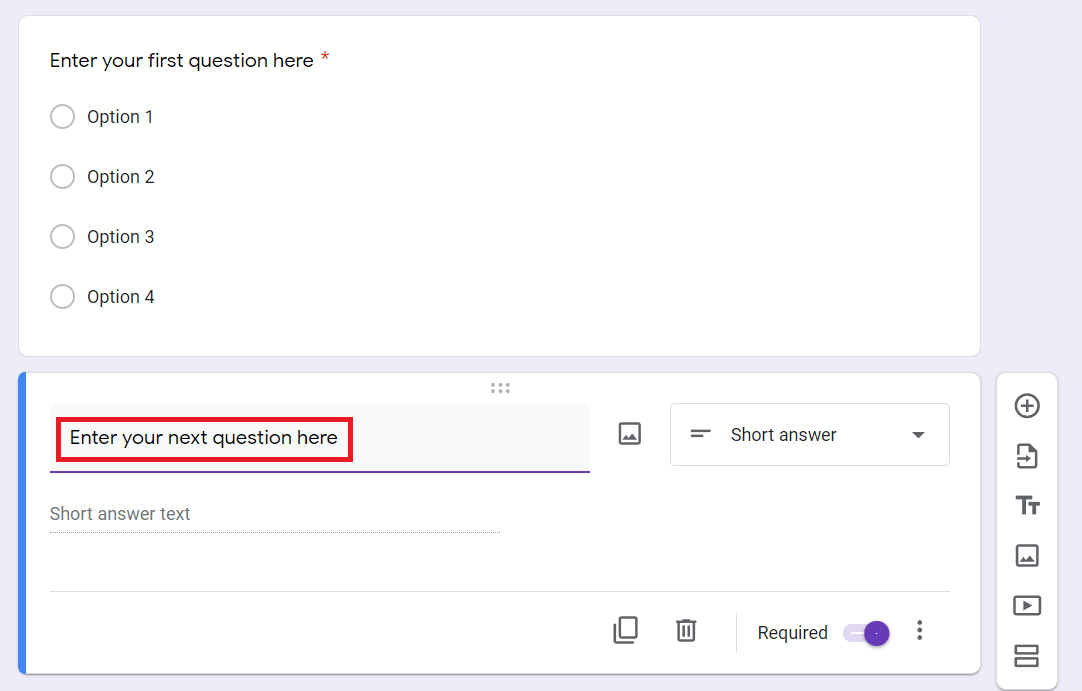
Step 4: Next, we have to add the questions which we need to ask in the form as per our requirement. In order to enter the question, we have to click on the Untitled Questions and enter the question we want to ask. When we start typing a question in Google Form, we have various types of question formats such as Short answer, Paragraph, Multiple choice, Checkboxes, Dropdown, File upload, Linear scale, Multiple choice grid, Date, and Time. We can select any format based on what type of question we want to ask. 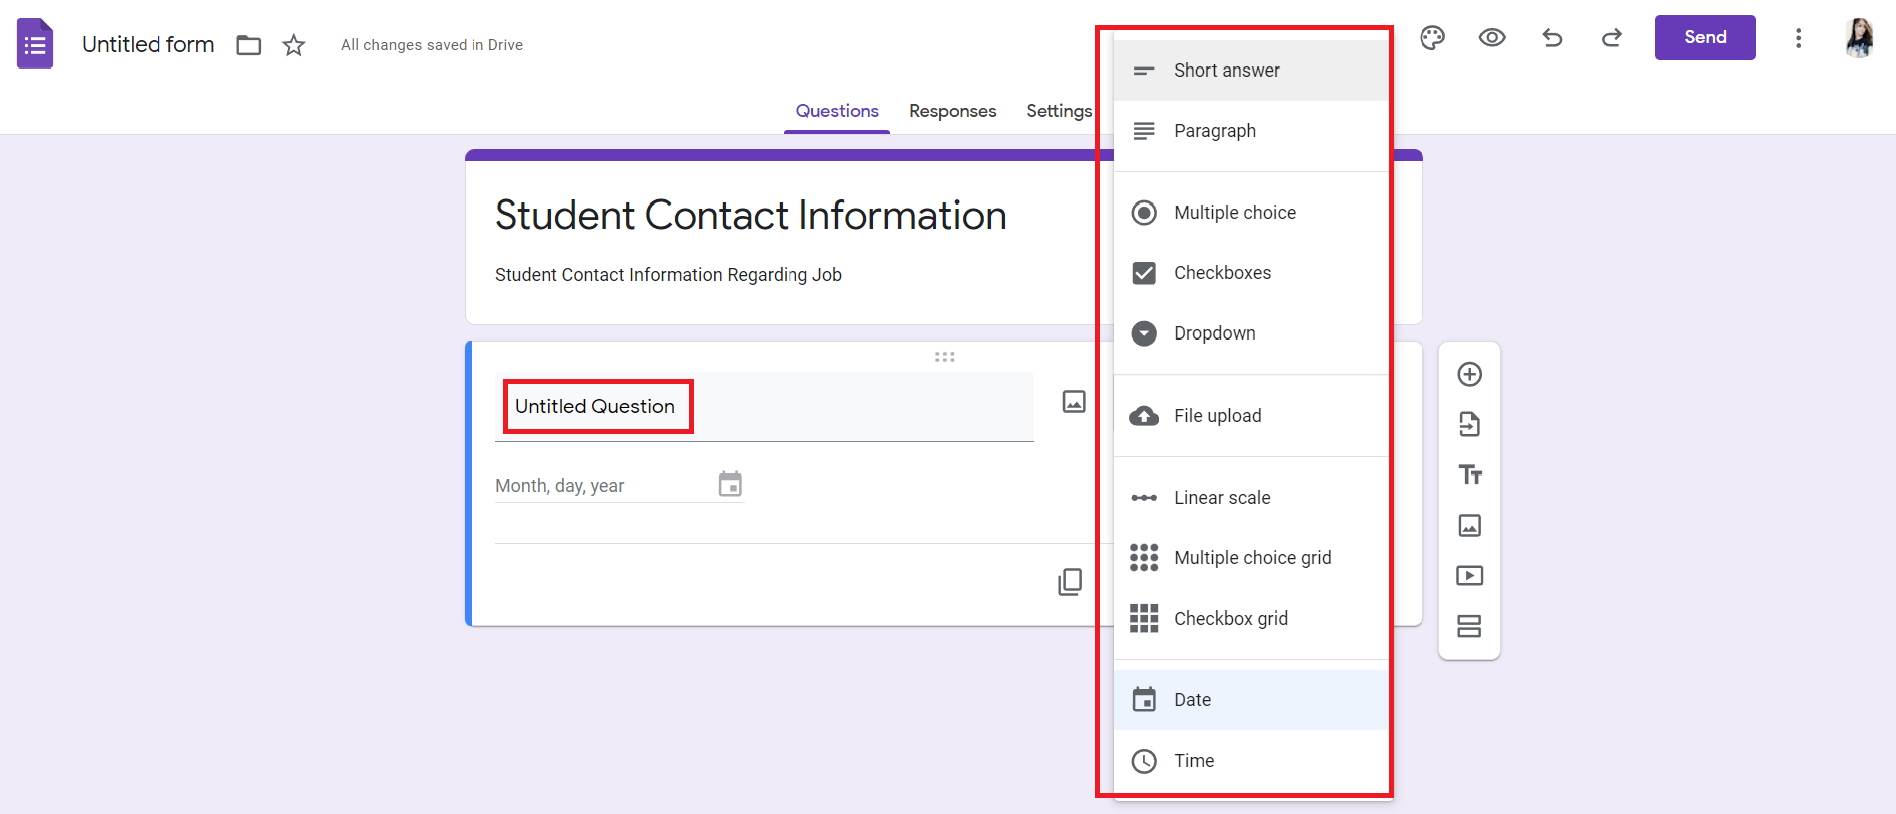
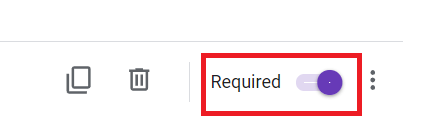
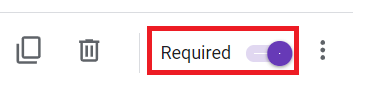
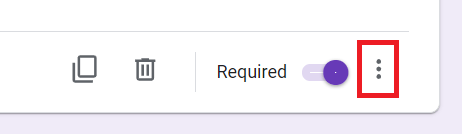
Step 5: Now, we will start entering questions. In this example of creating Google Form, our first question is "Name". In this, we can decide what type of answer we want means whether it is a short answer or a paragraph type. Note: There is an option named "Required", which is present in the lower-right side of the window; this option is used to make the field required. In other words, if we make the question required, the user of the form has to be enter the answer of that question compulsory otherwise, the form will not be submitted.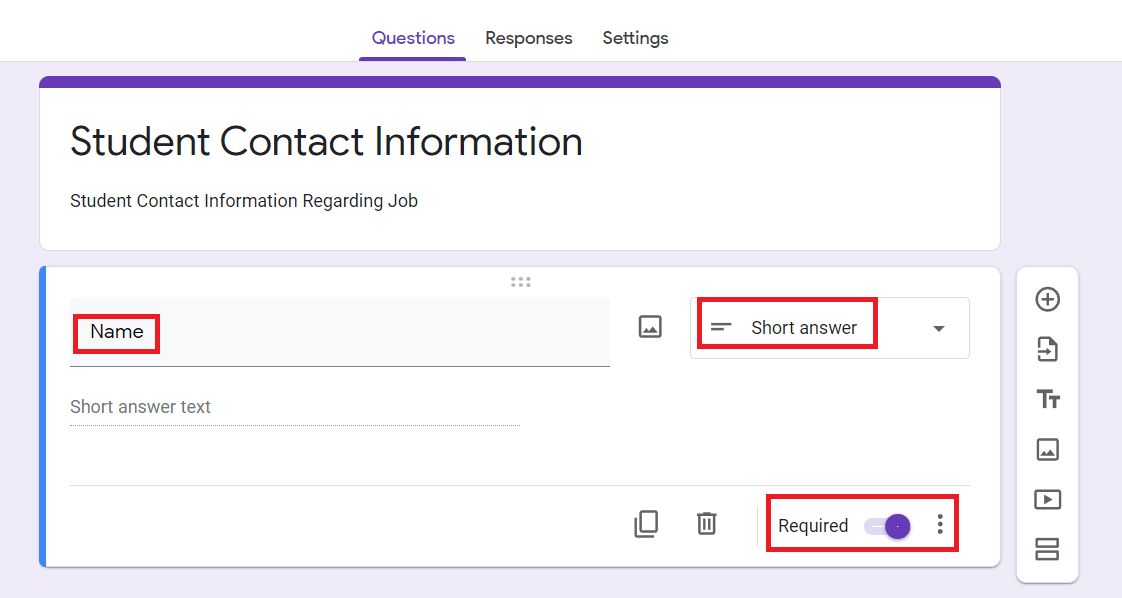
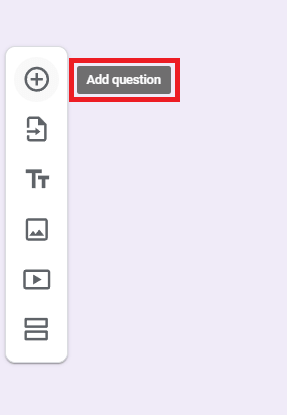
Step 6: Now, we will need to enter the second question. In order to add the second question, we have to first click on the icon + means add question, then we can add the second question. 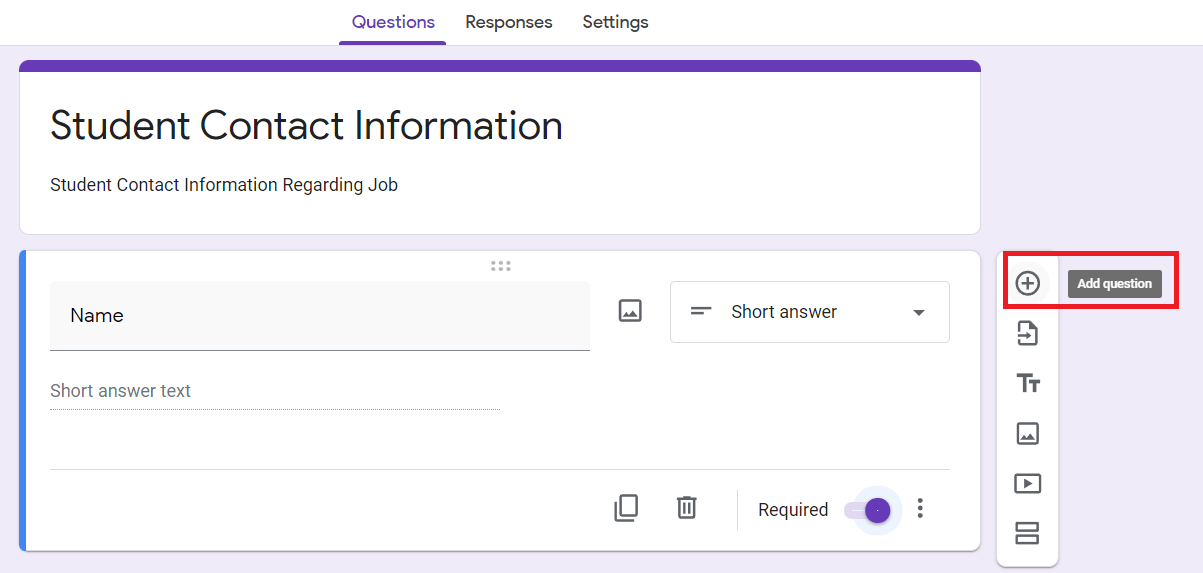
By clicking on the add question icon (+), we can now enter or add a second question. Our second question is Father's Name. We will again select the short answer type option and enable the Required option. 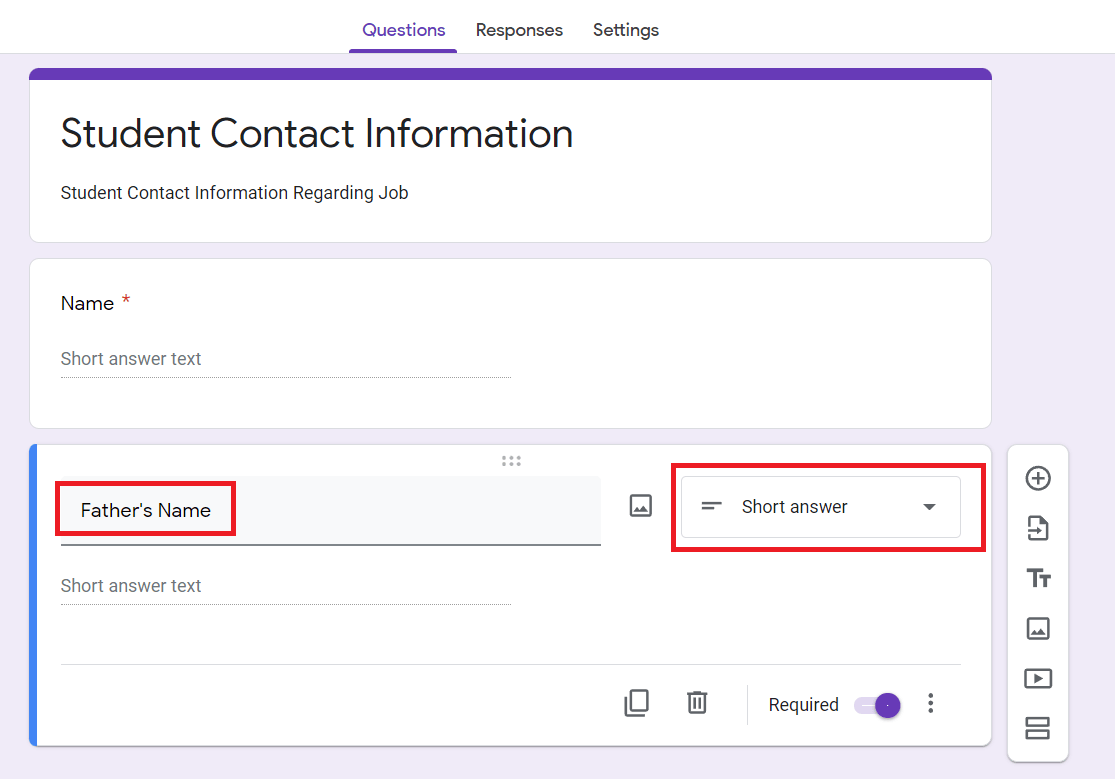
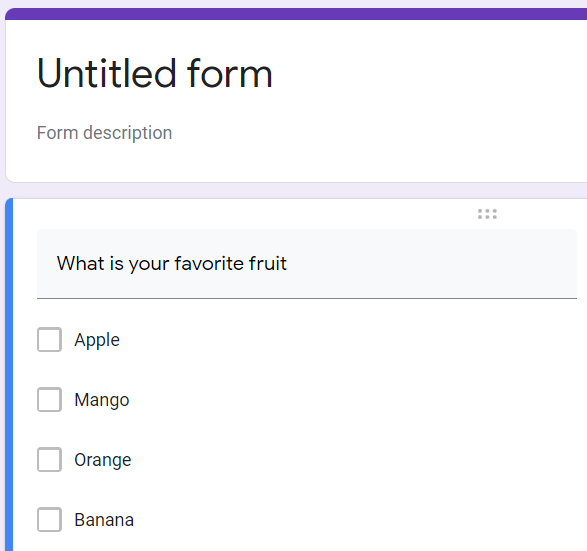
Step 7: Now, we will add our next question means question 3. It is related to Gender, so we will make it multiple choice. In this question, we will also have to give the options such as Male, Female, or Other. So, by again clicking on the + symbol (add question), we will add the question 3rd. We can make this question required based on our requirement. 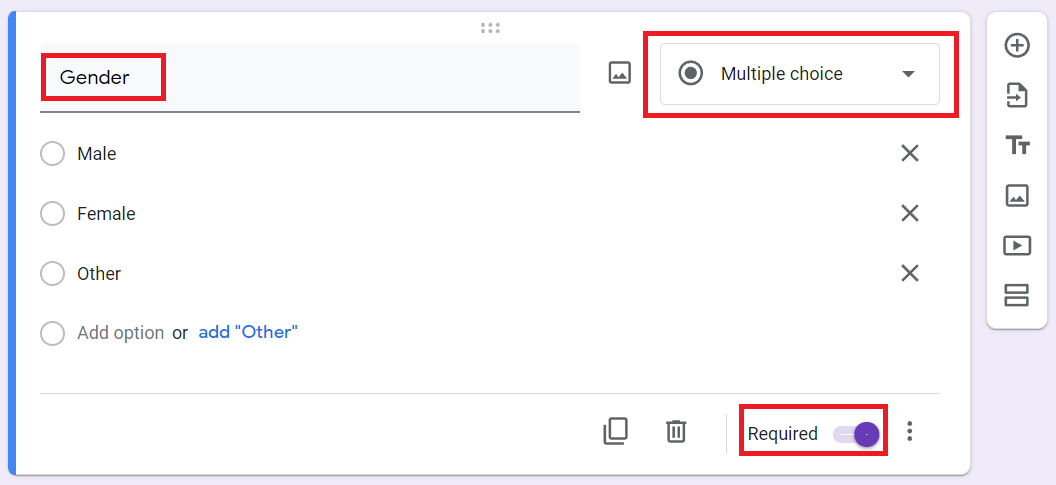
Step 8: Now, we will add another question means question 4, as we have added the previous question. The 4th question is Contact Number. In this question, we can also apply some constraints, such as the contact number must be in the form of a number not in text. Now we will again enable the Required option in order to make the question mandatory. 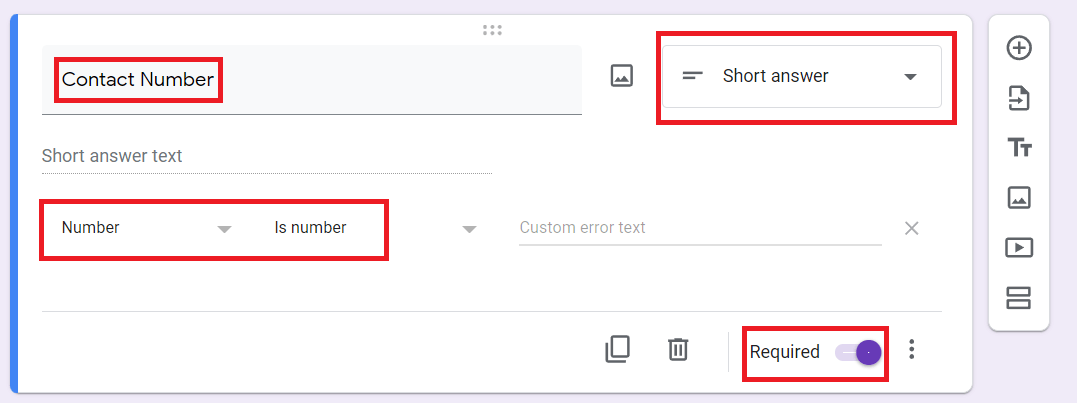
Step 9: Now, we will again click on the plus (+) symbol to add another question which is question 5th. The 5th question is Qualification. We can select the answer type option Multiple choice or Dropdown list. But we have selected a dropdown. This is a mandatory option, so it will again enable the Required option. 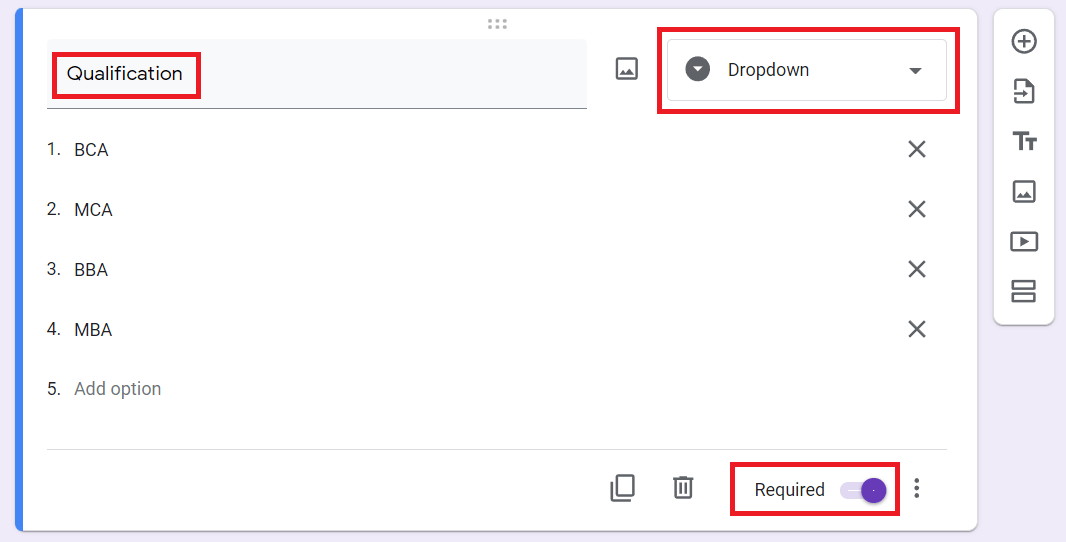
Step 10: Next, we will add the next question, which is question 6th. The 6th option is Language. In this, we will select the answer type option Checkbox because any student may know more than one language. 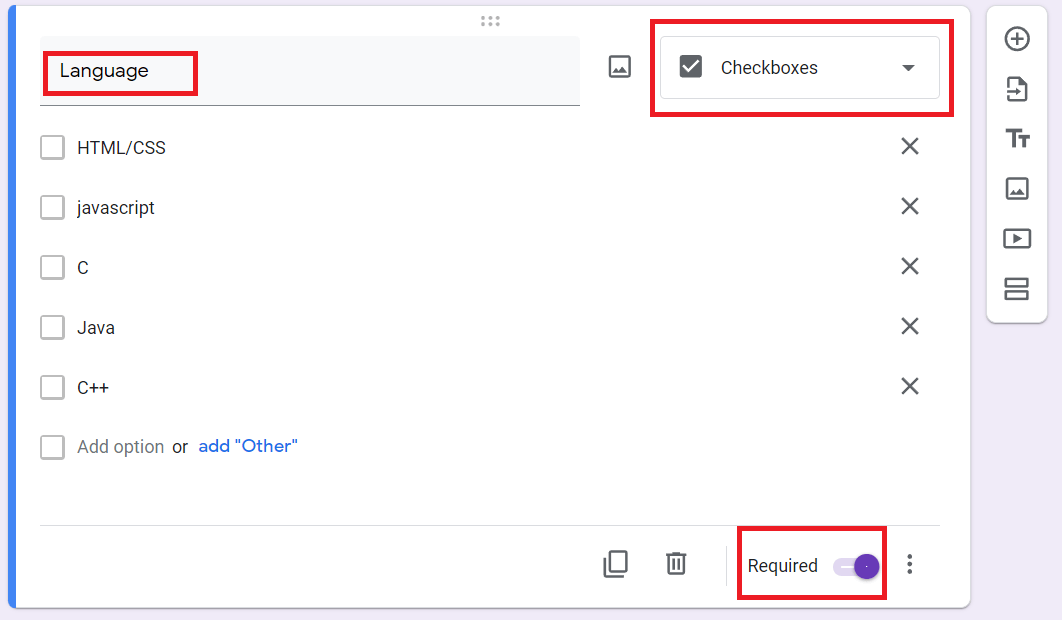
Step 11: Now, we will add our last question which is question 7th. The 7th question is "File Upload". In this question, we can also apply some constraints such as allowing only specific file types like PDF, Document, Spreadsheet, Videos, Presentation, Drawing, Image, and Audio. Maximum number of Files, Maximum file size. 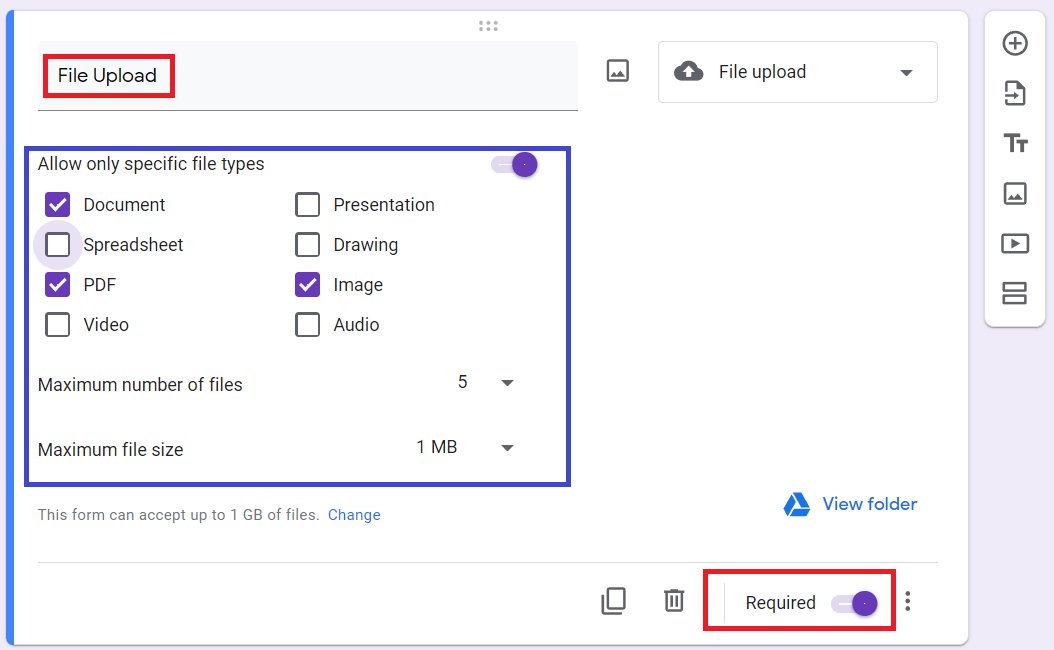
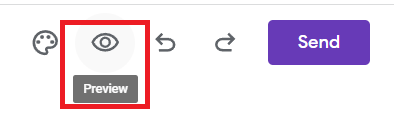
Step 12. Now, based on our requirement, we have added all the questions. Next, to see the entire form means how it will look when we send it to the student; we have to click on the Preview option. 
Step 13. The form will look like this: 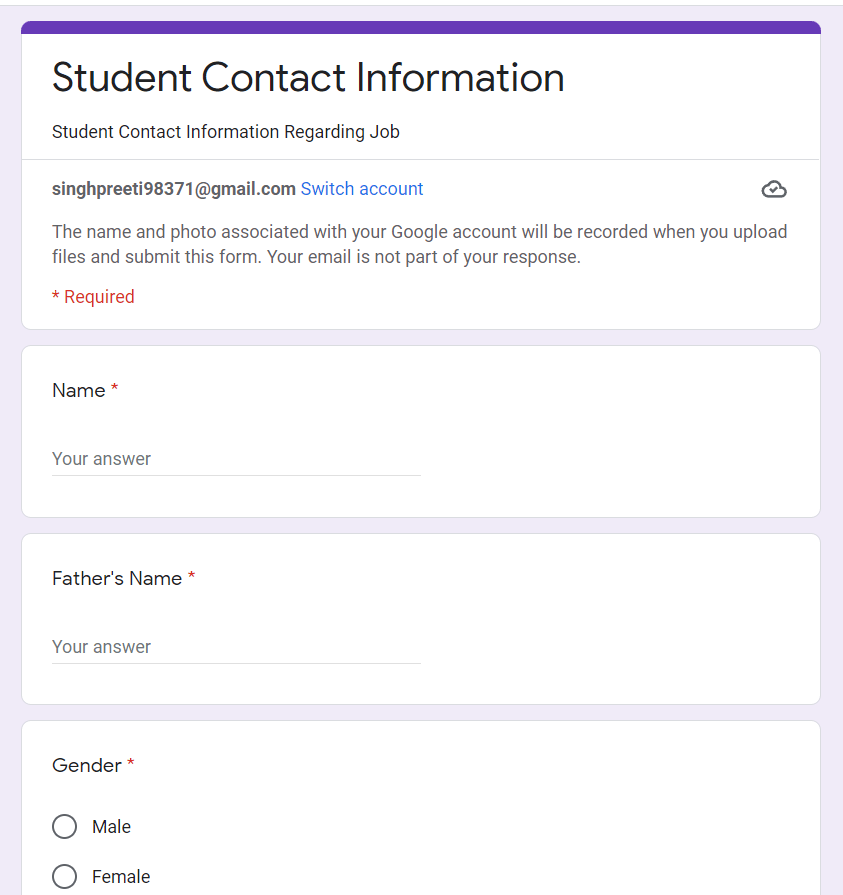
Step 14: Now, to check the form, whether it is submitted correctly or not. We will fill the form information and then click on the Submit button. 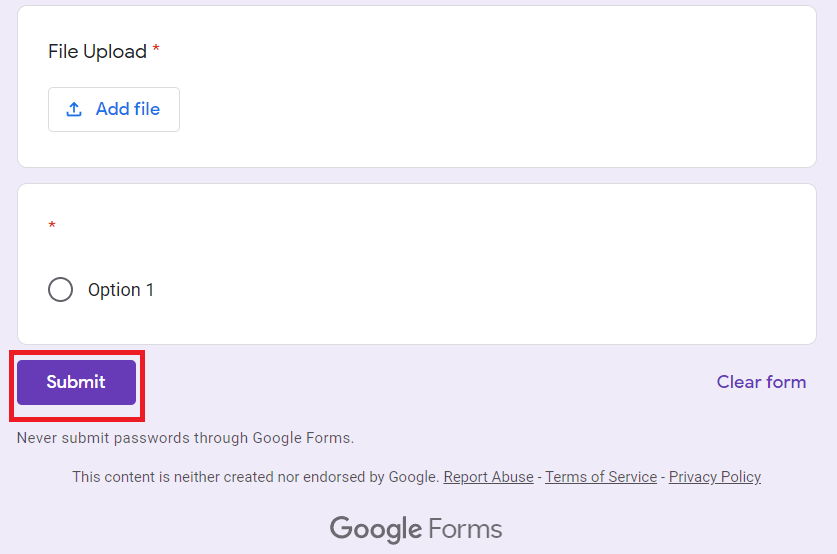
Step 15: Now, our form has been submitted appropriately. After clicking on the submit button, we will see the below pop-up window, which contains the message "Your response has been recorded. 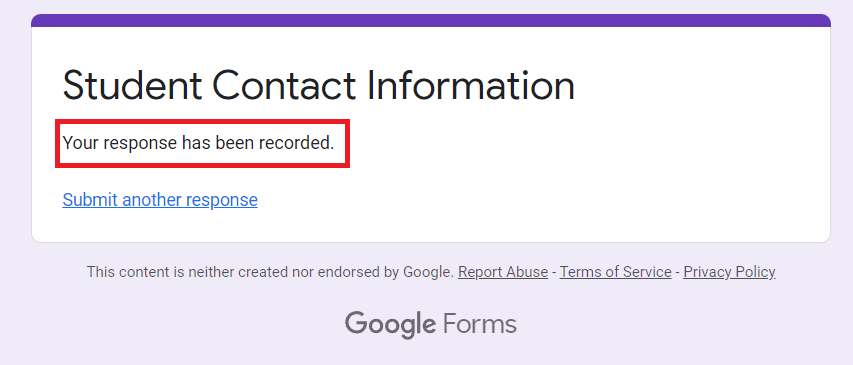
Step 16. Now, we can see that our responses contain 1, which means 1 record is added. 
Step 17: In order to see the record, we have to click on the spreadsheet icon. 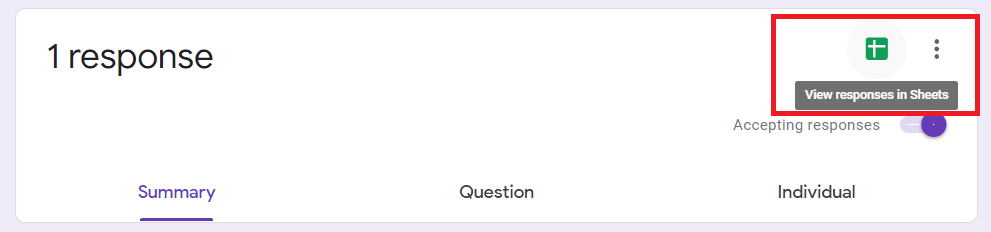
Step 18: Now, we can see the record, ensuring that we have created a Google Form correctly. 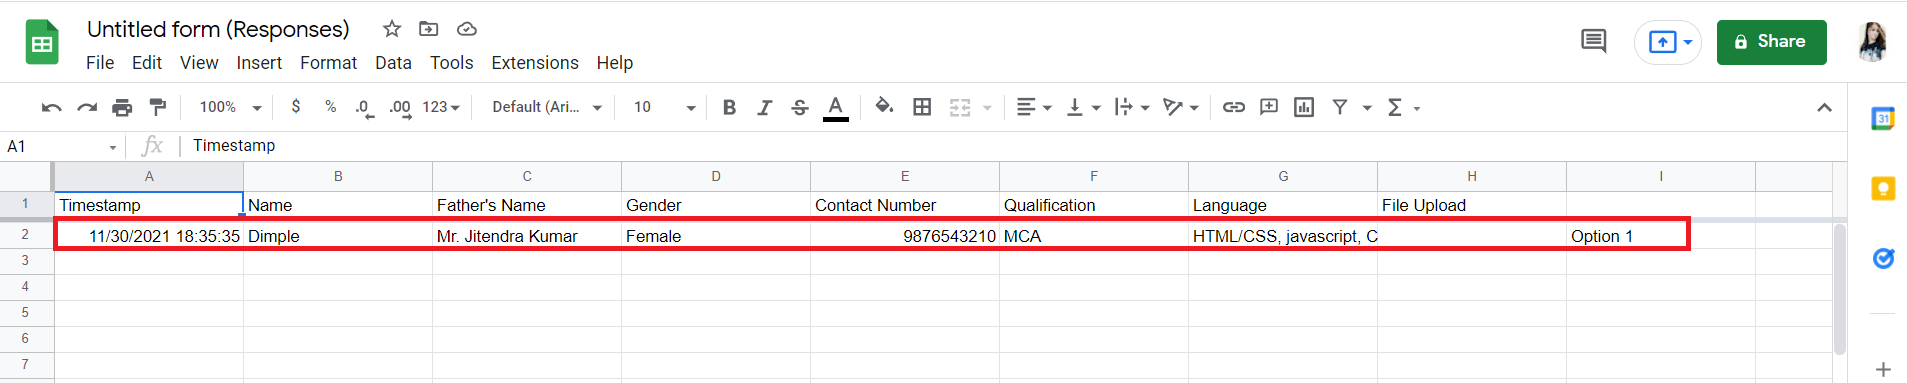
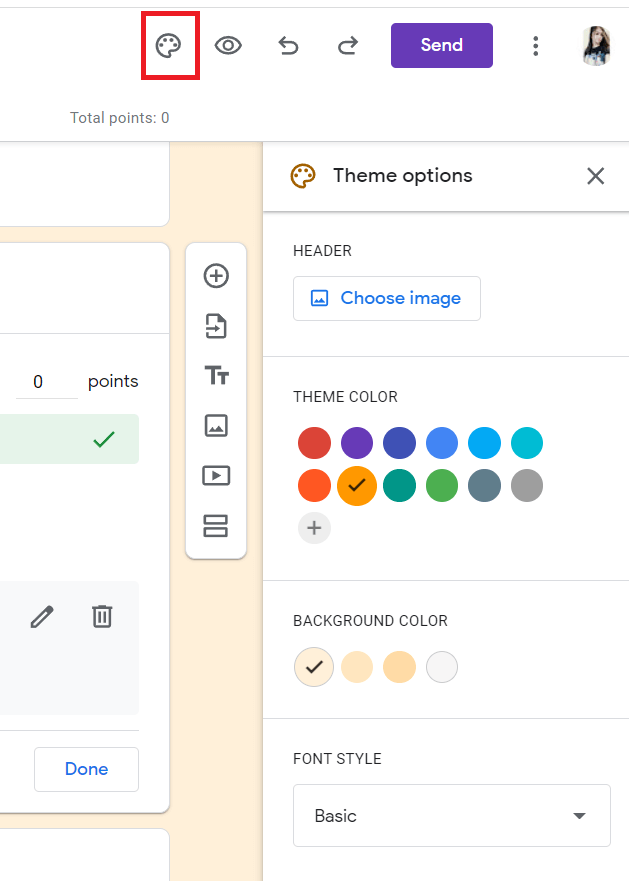
How to Customize Our FormAfter creating a new blank form, one of the first things we might need to do is add some personality. Google Forms allow us to customize the theme and help it stand out by adding an image, color, and font style. In order to customize the form, we have to simply click on the artist's palette at the top of the screen. From here, we can select the header image from among the many stocks photographs available (or upload our own), and the form's primary color, background color, and font style. 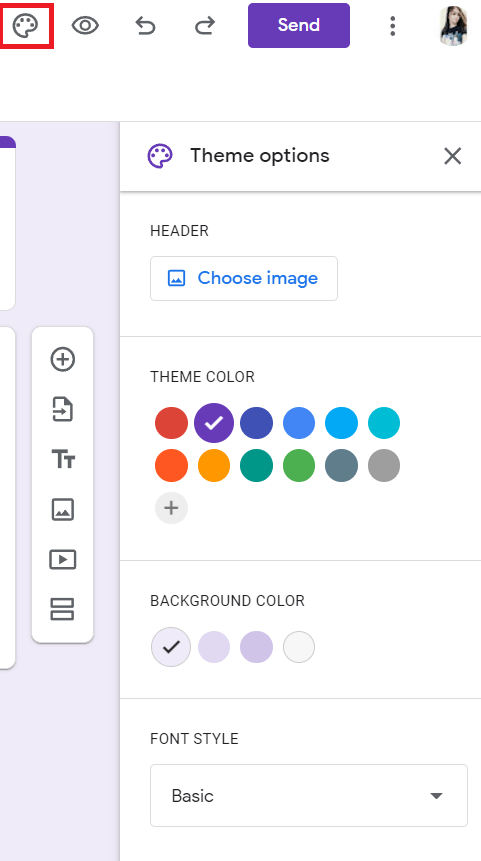
Customizing the Header ImageAnother way to customize our Google Form is by changing the header image which appears at the top of each page. This is a terrific approach to visually describe what our form is all about. 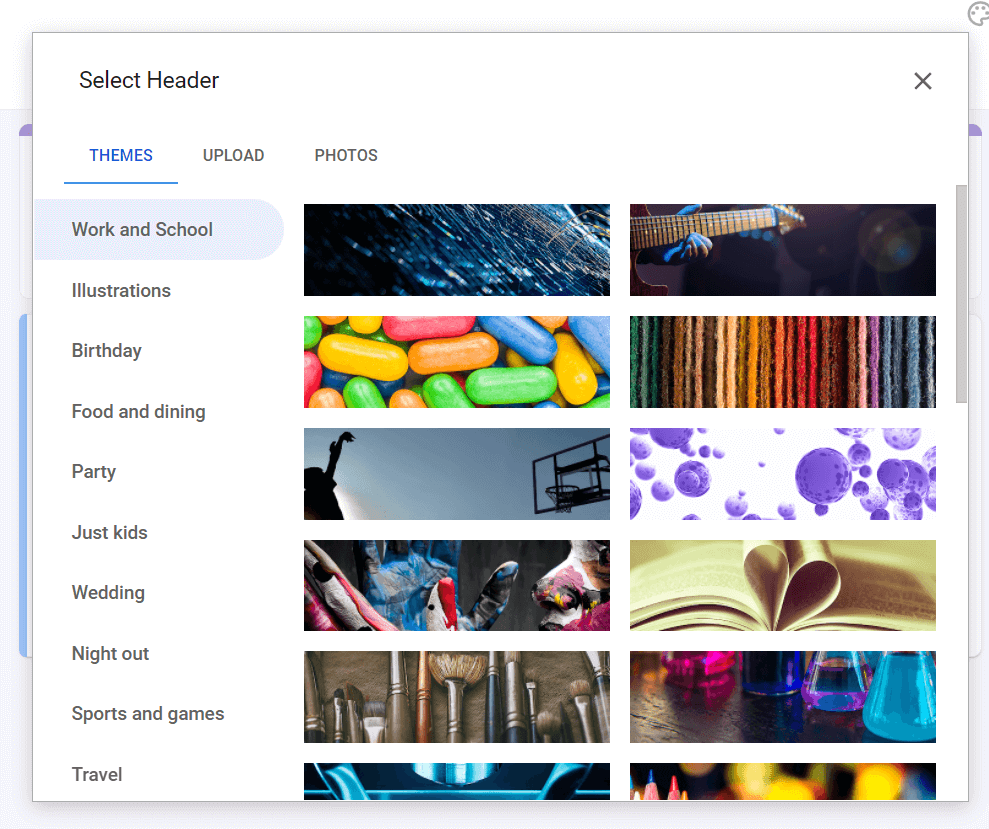
In our Google Form edit page, we have to go to "Theme Options" again and select "Choose Image." From here, we can select from a variety of stock options provided by Google, which are divided into numerous categories based on usages such as "Wedding" and "Birthday." We can also use our own pictures. Click Upload to add an image from our computer or Photos in order to select one of the images in our Google Photos library. Customizing the Background and Theme ColorAnother thing that we can do to customize our form is, we can change the background and theme color of the form. In order to do this, we have to click on the palette button, located at the top right of the page, to bring up the "Theme Options" sidebar. From here, we can choose one of the default themes colors available or use our own with the RGB color picker. This changes the entire form's color design, including accent colors and the default header color. We can also select one of four background colors for our forms. A neutral grey color as well as light, medium, and dark variants of our theme color are included. 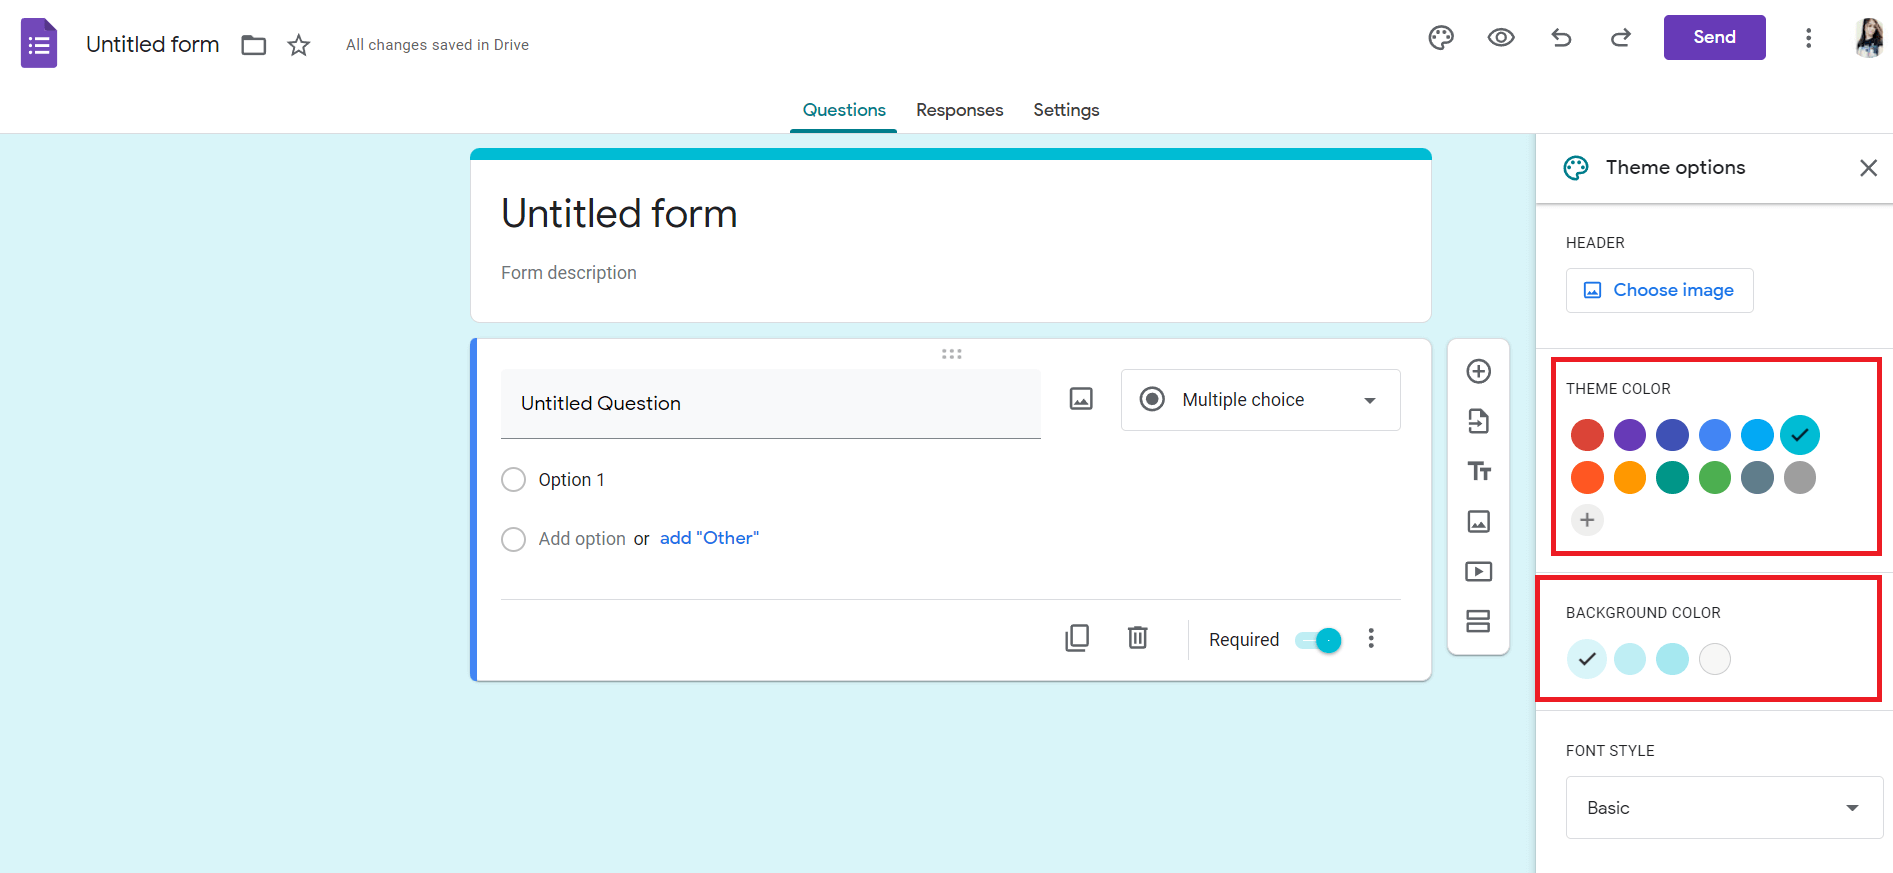
Changing the FontWe can also change the font of a Google Form, although there are just a few options. In order to do this, we have to go to Theme Options and scroll down to the "Font Style." The following are the font options available in Google Form:
Adjusting SettingsAfter we have created our form, we will need to adjust its settings. Google Forms provides a number of options for customizing how our receivers interact and use our forms. Now we will take a look at the different settings we can use. In order to access the settings of our form, we have to click on the Settings icon in the top-right corner. 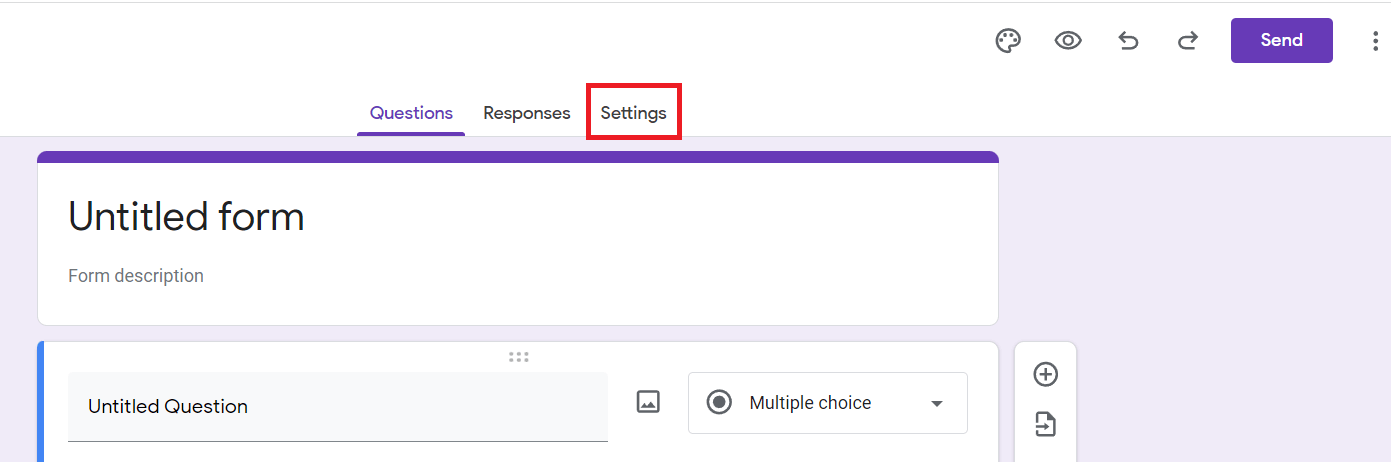
This will open the Settings menu, which contains a number of options. We can turn them on and off based on our preferences. Click the buttons in the interactive below in order to learn more about the different settings for Google Forms. 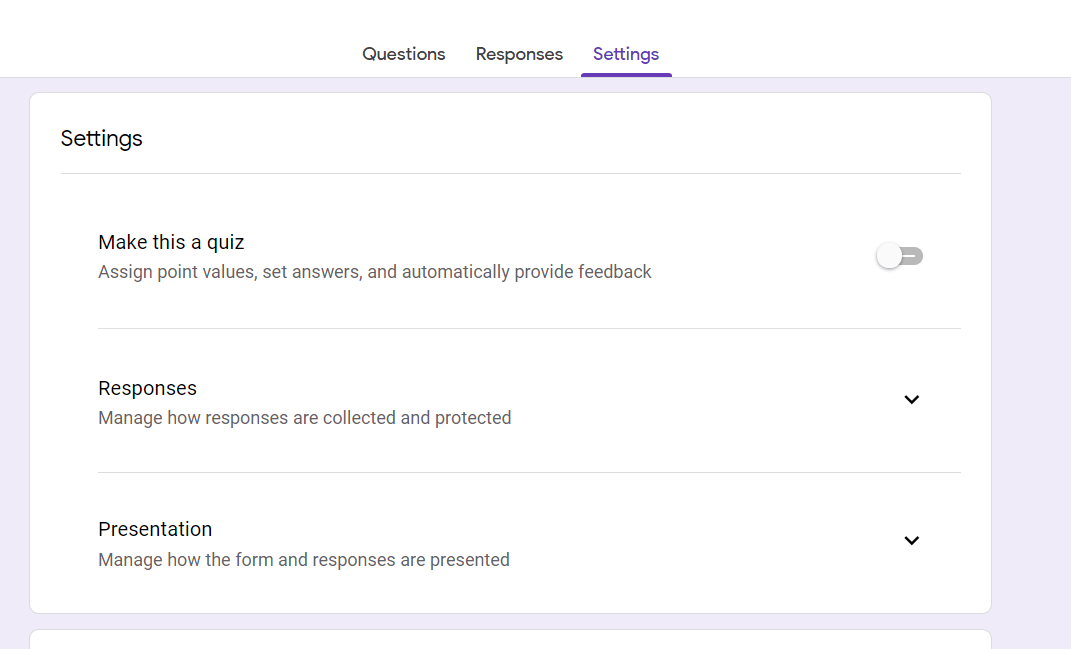
When to Use These SettingsLet's look at some real-world examples in order to understand when we might want to use some of these settings:
Once we are satisfied with the settings we have chosen, we are ready to send your form to its recipients! Sending FormsOnce we have created our form and selected the appropriate settings, we are ready to send it off! To begin the procedure, we have to click on the Send button in the screen's upper-right corner. 
The Send form menu will appear as a result of this action. Before sending a from, we have to decide how to send it out. Google Forms permit us to share our forms via email, direct link, embedding, and social media sites. 
Which one we choose is determined by a number of criteria, including our target audience and the purpose of the form. Let's have a look at the different options and how to use them. 
Note: No matter which method we select, there will be an option to collect email addresses at the top of the menu. If we enable this option, our respondents will be essential to provide their email addresses. This can be useful if we need to contact them in the future.Sharing Form with a LinkRather than using email, Google Forms may create a link to our form, which we can share anywhere. When somebody clicks the link, they will be taken directly to our form. This method is useful if we do not know the email addresses of a few people we'd like to send the form to. We might also use a text or messaging app to send it. 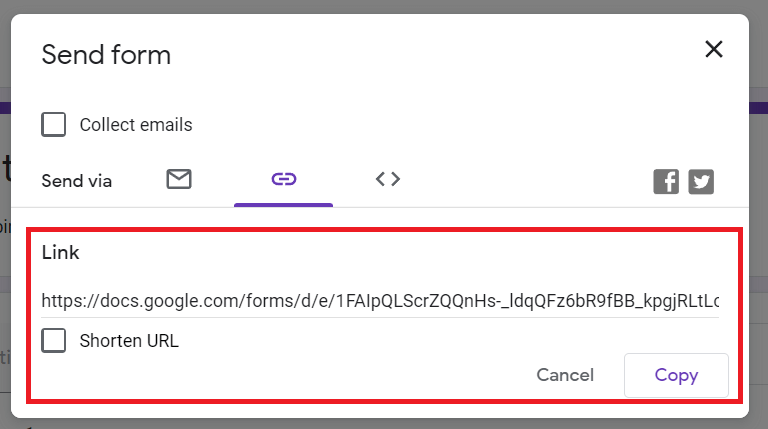
Sharing Form via EmbedWe can use the embed option, if we want to host the form on our website. This will provide some HTML code that we can copy and paste into a website editor such as WordPress. The form will appear on our website as a result of this action. This method allows our audience to quickly access our form without leaving our website. 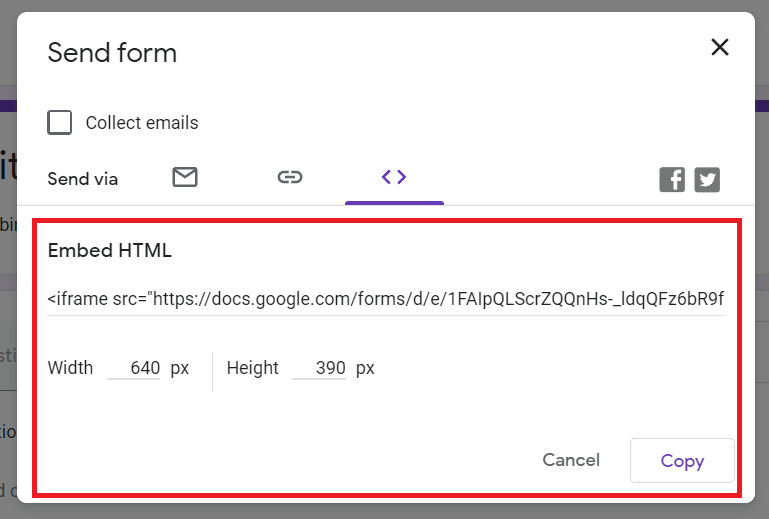
Sharing Form Via Social MediaWe can also share forms via social media sites such as Facebook and Twitter. If we if we need to share our form with a larger audience. We have to simply click the icon of the site we want to utilize. This will open the site we have selected and generate a post linked to our form. We can then edit the post and say whatever we wish to share it with our friends. 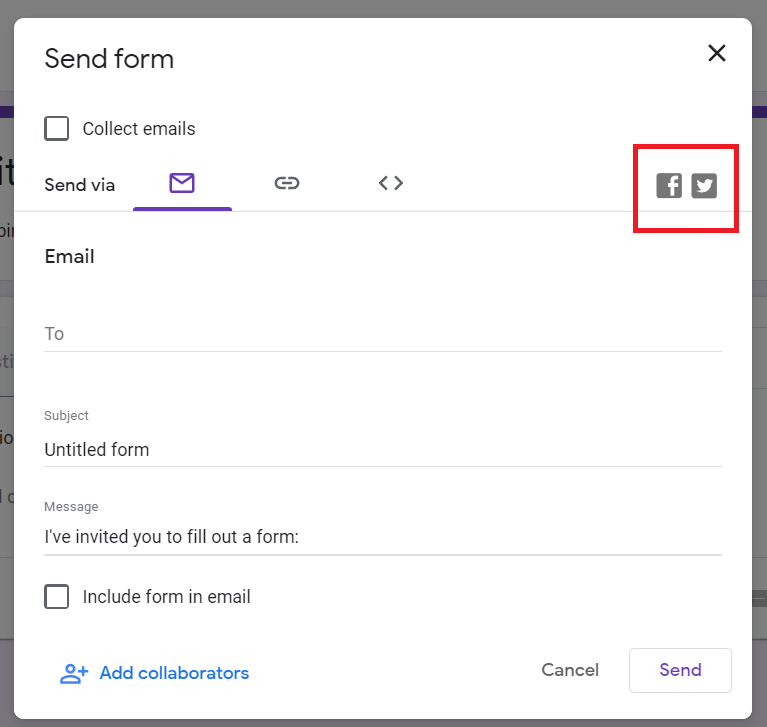
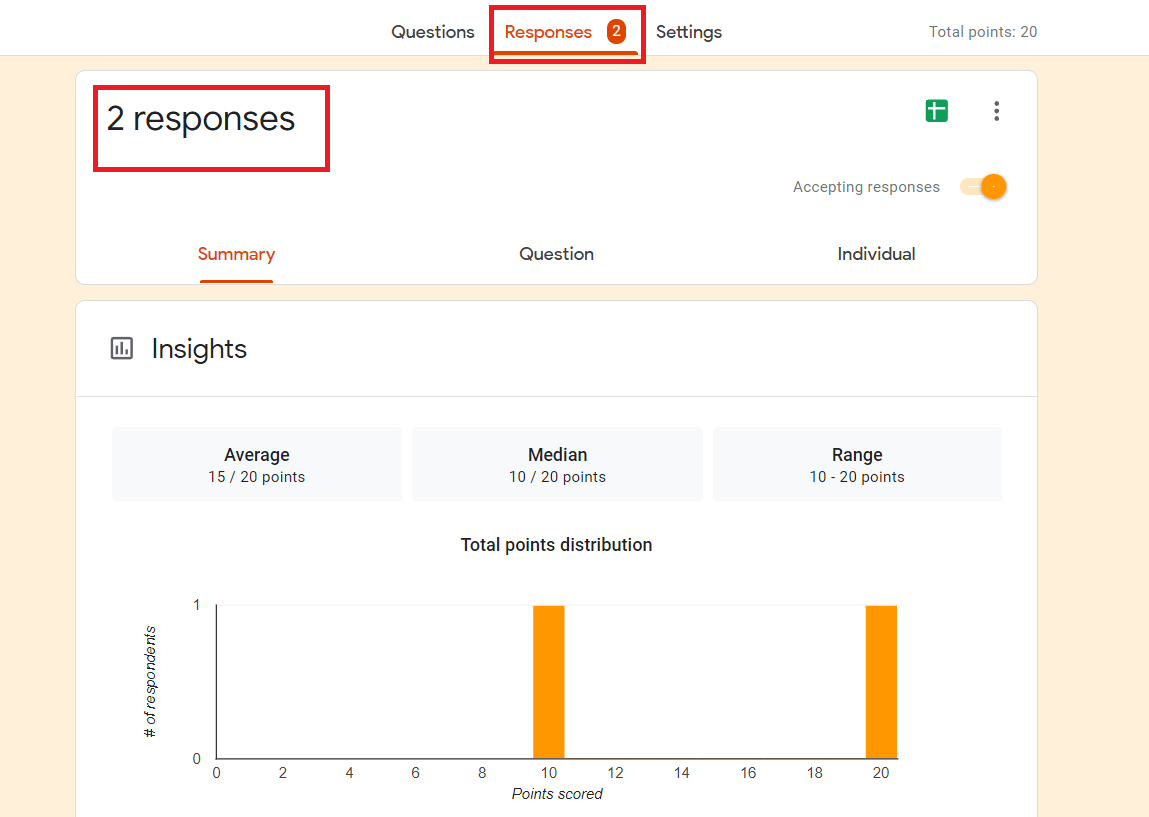
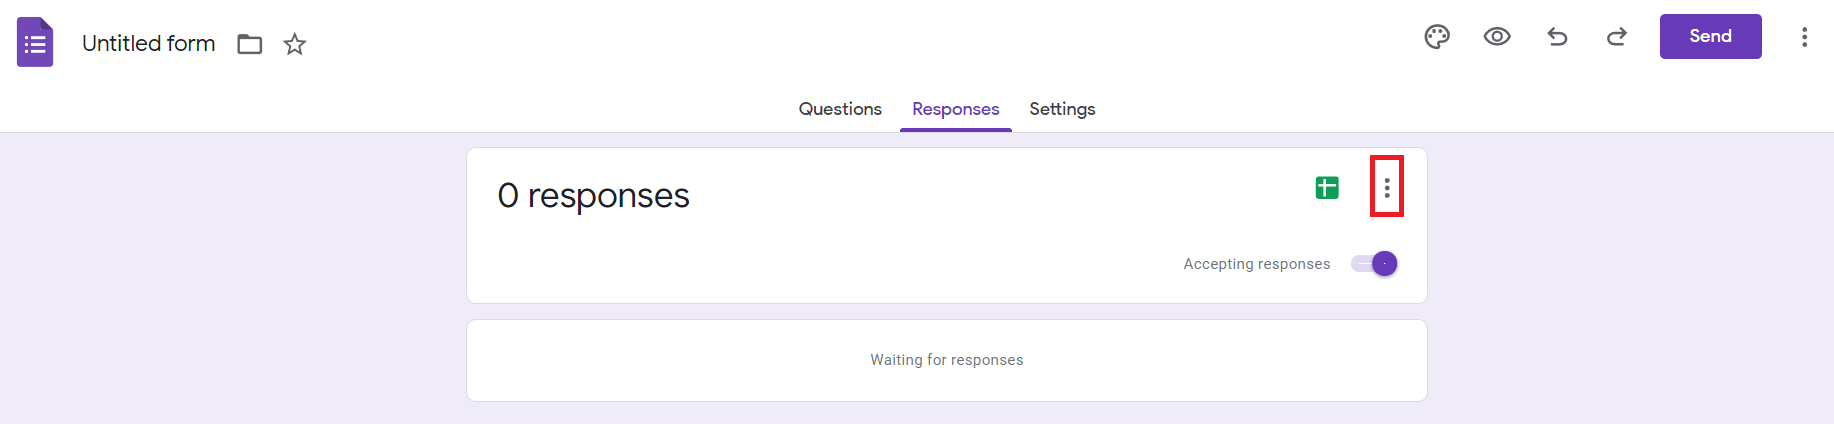
Now it's Time to Wait for Responses After we have shared our form with others, all we have to do now is wait for them to respond. We may need to arrange or evaluate these responses depending on our form. We will discuss this later. Organizing and Analyzing ResponsesAfter we send our form, it only takes a while for people to start responding. We have to open the form and click on the Responses tab to access these responses. Here, we will find the results from everybody who has so far responded, as well as numerous options. 
Use Google Sheets to organize resultsDespite the fact that all our responses can be accessed within the form itself, it may be tough to filter through and analyze everything. Fortunately, Google Forms allows us to store and organize our results in a spreadsheet using Google Sheets. To do this, we have to click on the Create Spreadsheet icon. 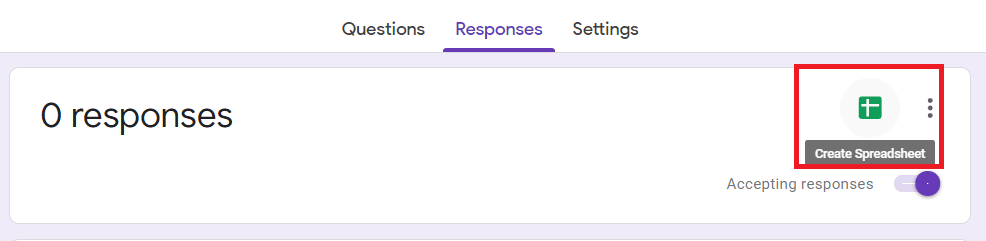
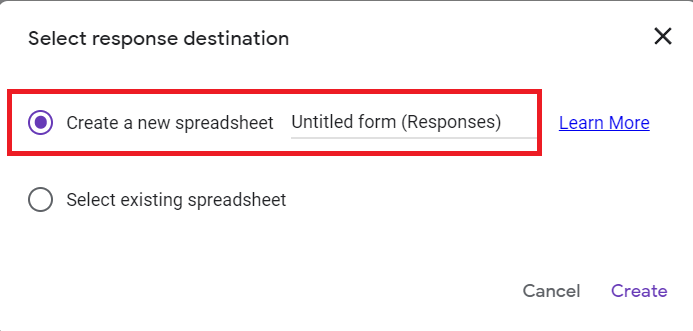
This will provide a menu where we can choose to either Create a new spreadsheet or Select existing spreadsheet. For this example, we will create a new one. 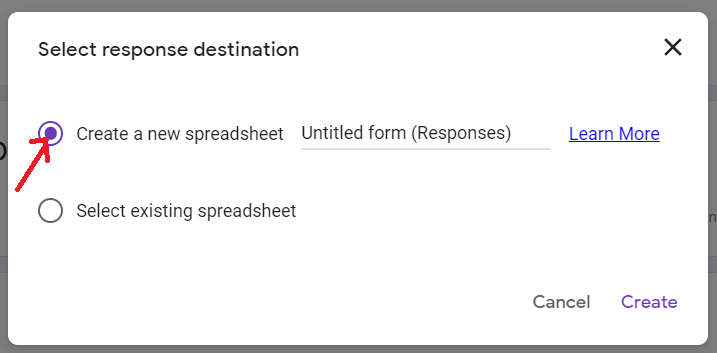
This automatically generates a spreadsheet and opens it in a new tab. Every row features the responses from every respondent, and each column features a question from our form. Analyzing Results in Google SheetsThe spreadsheet may appear intimidating at first, but Google Sheets provides a tool to make things more manageable. We will go through a few features that will help us analyze our data. Simple calculations like addition and subtracting are performed by formulas, while functions perform more complicated calculations like averages and counts. Suppose we want to know the average rating given by employees for an event we held. In order to calculate all of the ratings from one column, we can use the AVERAGE function. 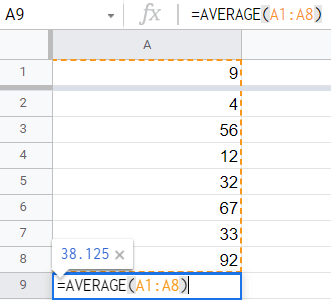
If we have a lot of responses on our form, pivot tables can help us summarize the data and make it easier to manipulate. To create one, navigate to Data> Pivot table. In this example, we created a pivot table to display how many times each number was selected for a specific topic. 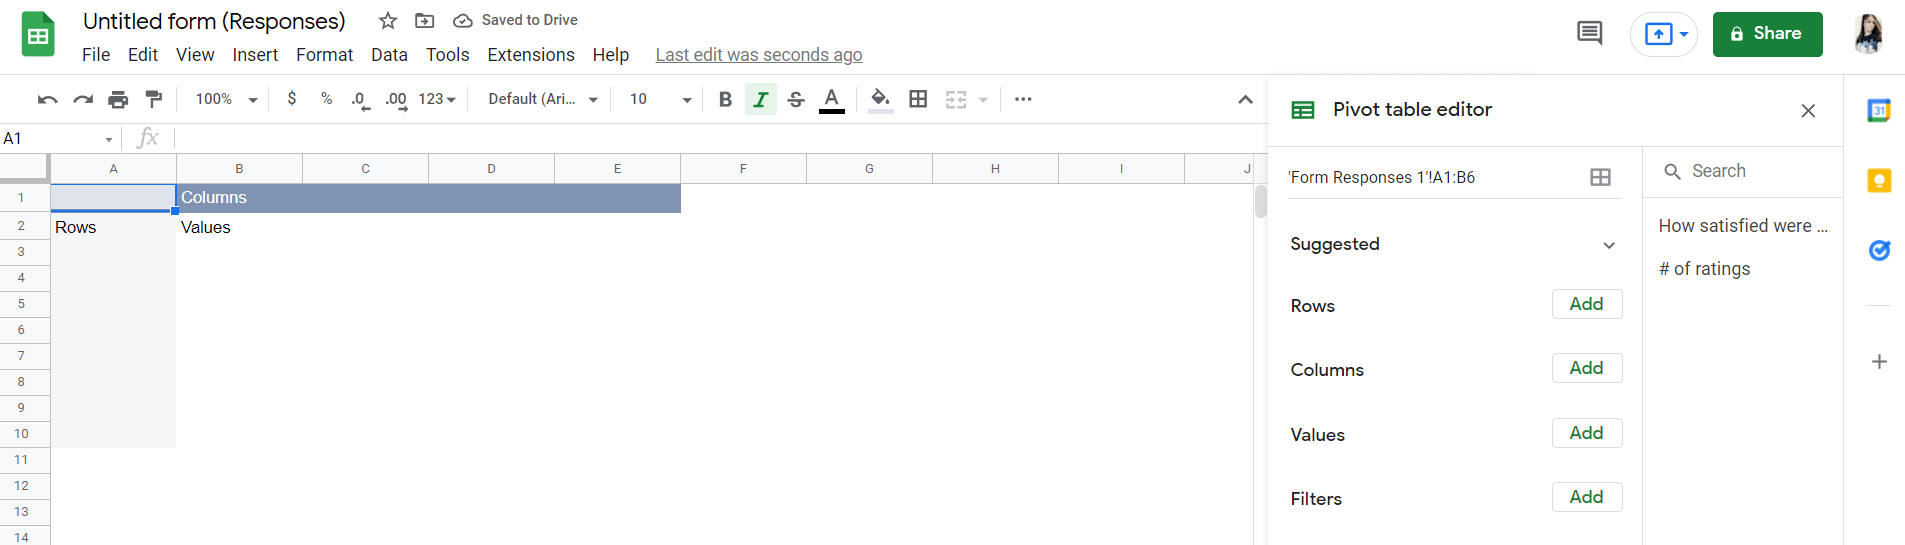
With the help of the Histogram charts and pivot charts, we can get a better picture of our responses. In order to create a chart, we have to click on the Insert > Chart and select the chart that we want to use from the Chart Type drop-down list. In the example below, we made a pivot chart showing the distribution of how satisfied people were with the event. 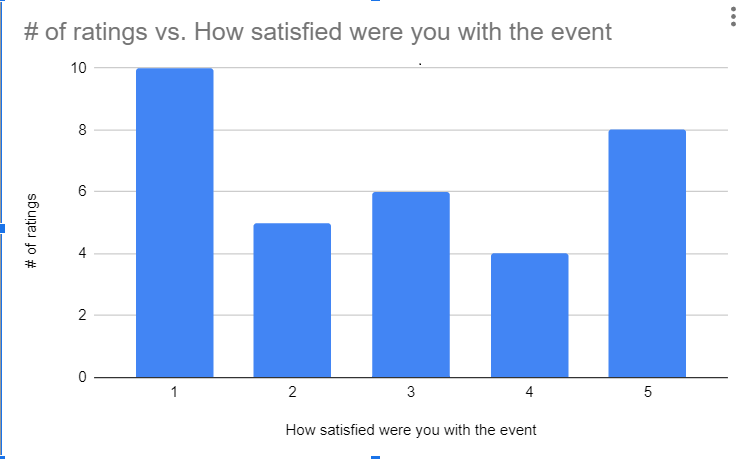
The approach we use will be determined by a number of factors, but the characteristics listed above should cover most of our fundamental analyzing requirements. Google Forms Add-onsGoogle Forms is fantastic on its own, but chances are it still doesn't have some of the features which we want. Forms add-ons allow us to add additional features to our forms, receive customized notifications, turn our forms into documents, and more. In the Google Forms menu, there is an entire library of add-ons. Simply go to the menu, click Add-ons…, then find an add-on which we need to install. We will then get a new puzzle piece icon in Google Forms, with a menu listing all of our add-ons. 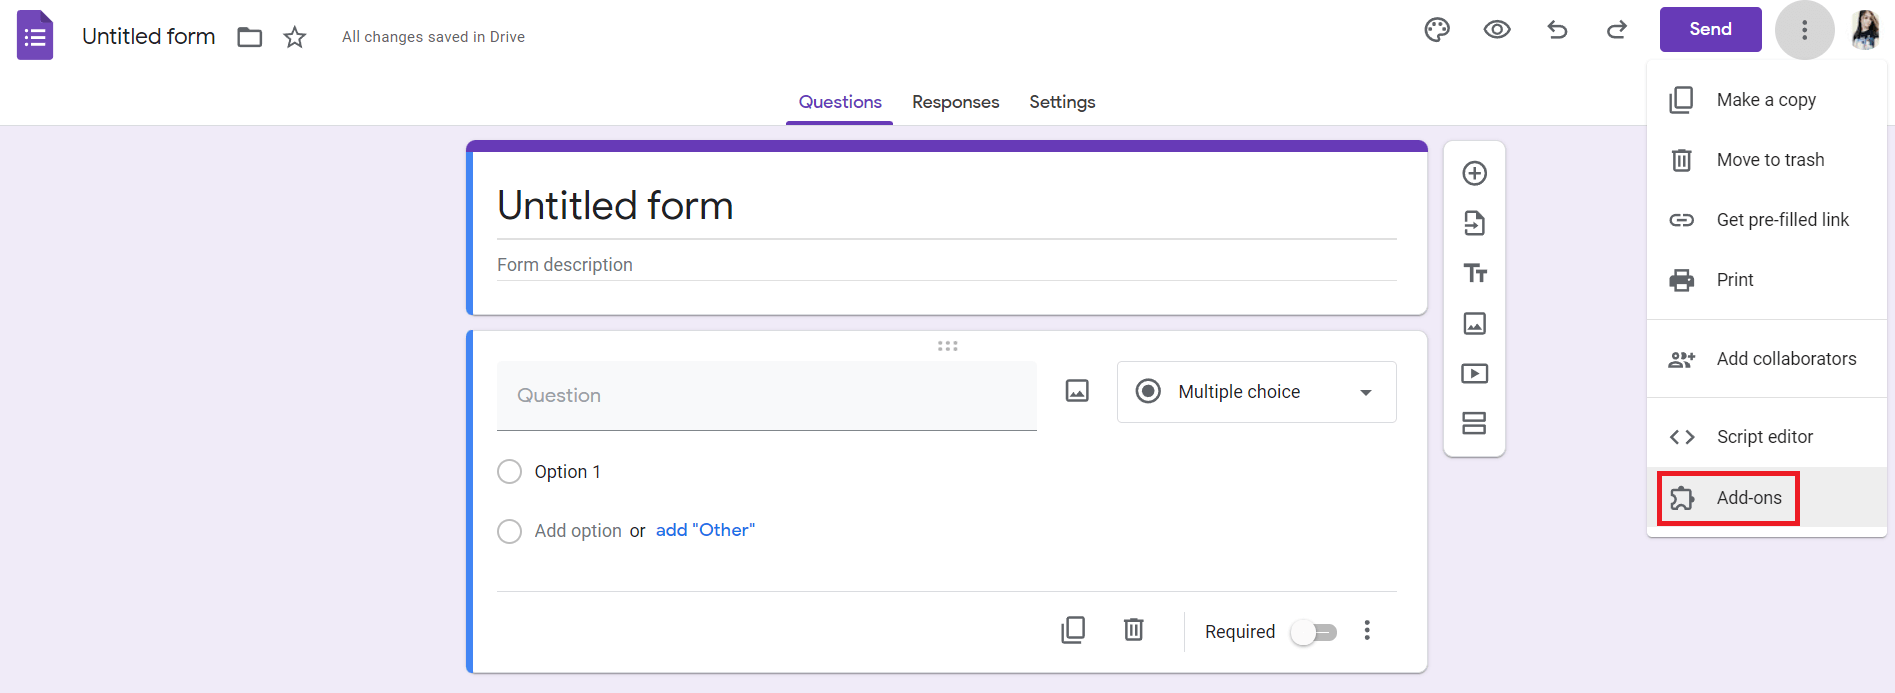
Most Google Forms add-ons run in a pop-over on the lower-right side of our forms editor, and they may also contain an options pane that opens in the center of our editor. In order to open an add-on, we have to select it in the add-ons menu, manage its settings from its add-on pop-over, and it will then run in the background automatically. No option is available to manage or delete add-ons; instead, just open the Add-one pane again, find the add-on we need to delete, click on the green Manage button, and then we have to select Remove in its menu. The following are some best Forms adds-ons to get started:
How to Build a Google Form QuizWith the help of Google Forms, we can easily create a Quiz. Due to the constraints listed below, it is harder to implement lead scoring in an inquiry form, and create assessments for research studies, business scorecards, and other use cases.
A useful survey or quiz, which we can quickly create with Google Forms, would be beneficial to any organization or project. The following steps are used to build a Google Form Quiz:
How to Make a Google Form SurveyUsing Google Forms, we can create our own customized surveys. One of the apps available in Google Docs or Drive is Google Forms. It simplifies the process of creating a survey or poll. We can also send the survey and receive and view all responses right from it. The data we gathered from the survey is automatically stored in a spreadsheet saved in our Google Drive. However, it should be noted, that this may only be done from the Google Drive website. In order to make a Google Survey, we have to follow the following steps: Step 1: First, we have to Go to forms.google.com and log in to our Google account if prompted to do so. Step 2: Next, we have to click on the form labeled Blank, which is represented by a plus symbol. 
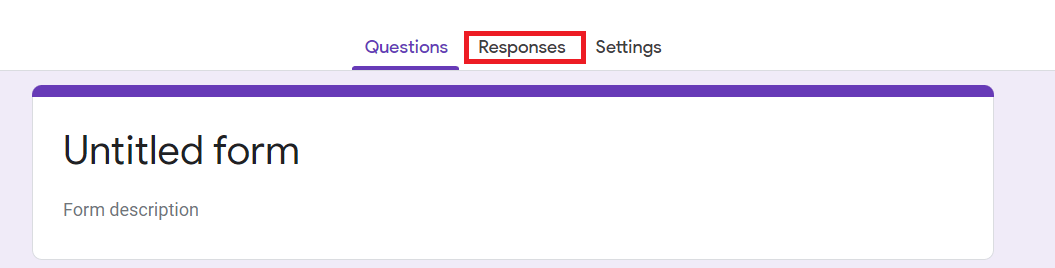
Step 3: Then, click on the field called Untitled Form and type the title we wish to use for the survey. We can also write the description of the survey by writing in the field directly beneath it called Form description. 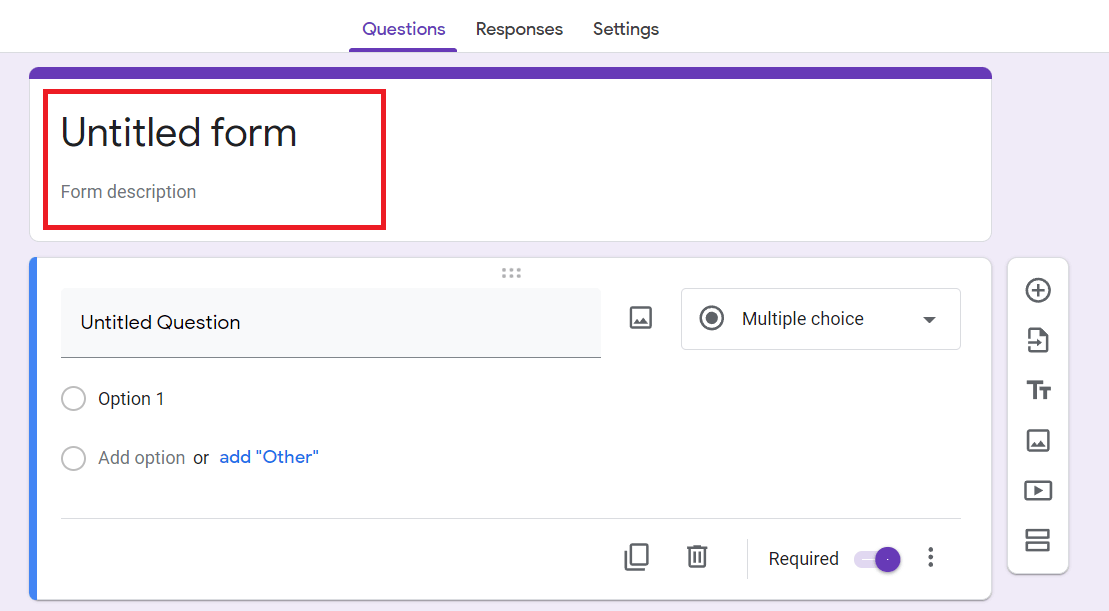
Step 4: After we are given our survey a title, we can add the question by clicking on the icons on the right side of the screen. Here's a basic rundown of what each icon does. 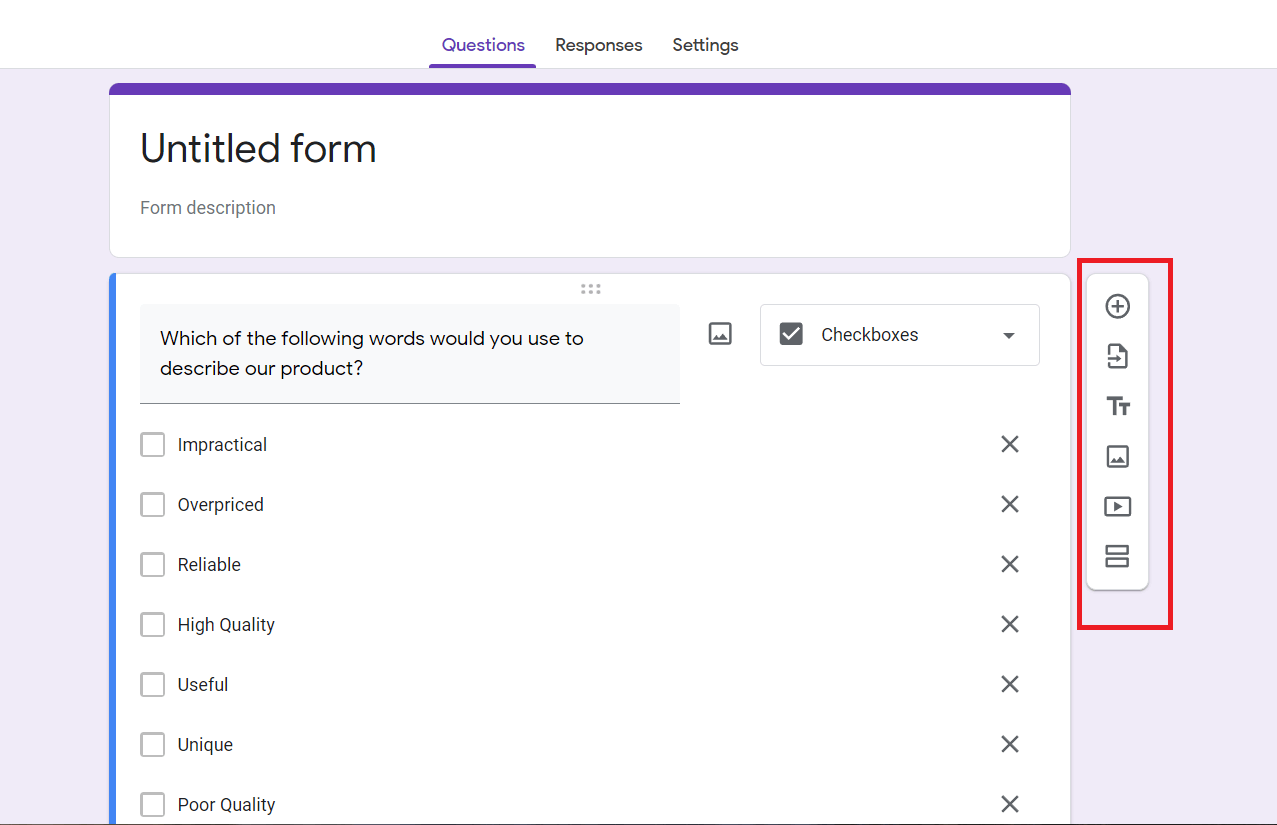
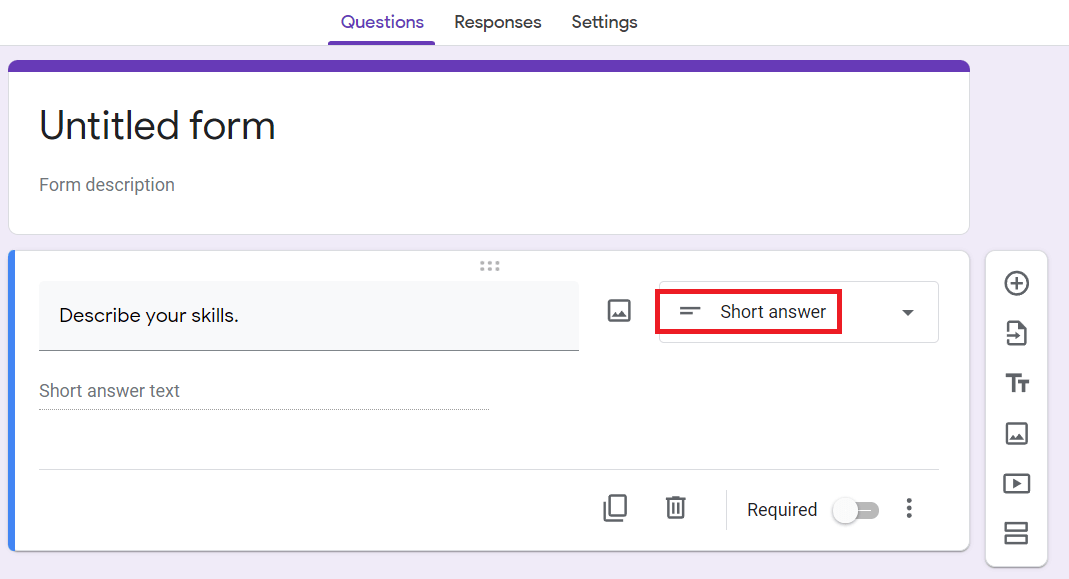
Step 5: Based on the type of question we are asking, respondents, can answer in a variety of ways, like short answer or multiple choice. We can modify the type of answer by clicking on a drop-down menu inside the question box and then clicking on the preferred answer type. The following types of answer are available: 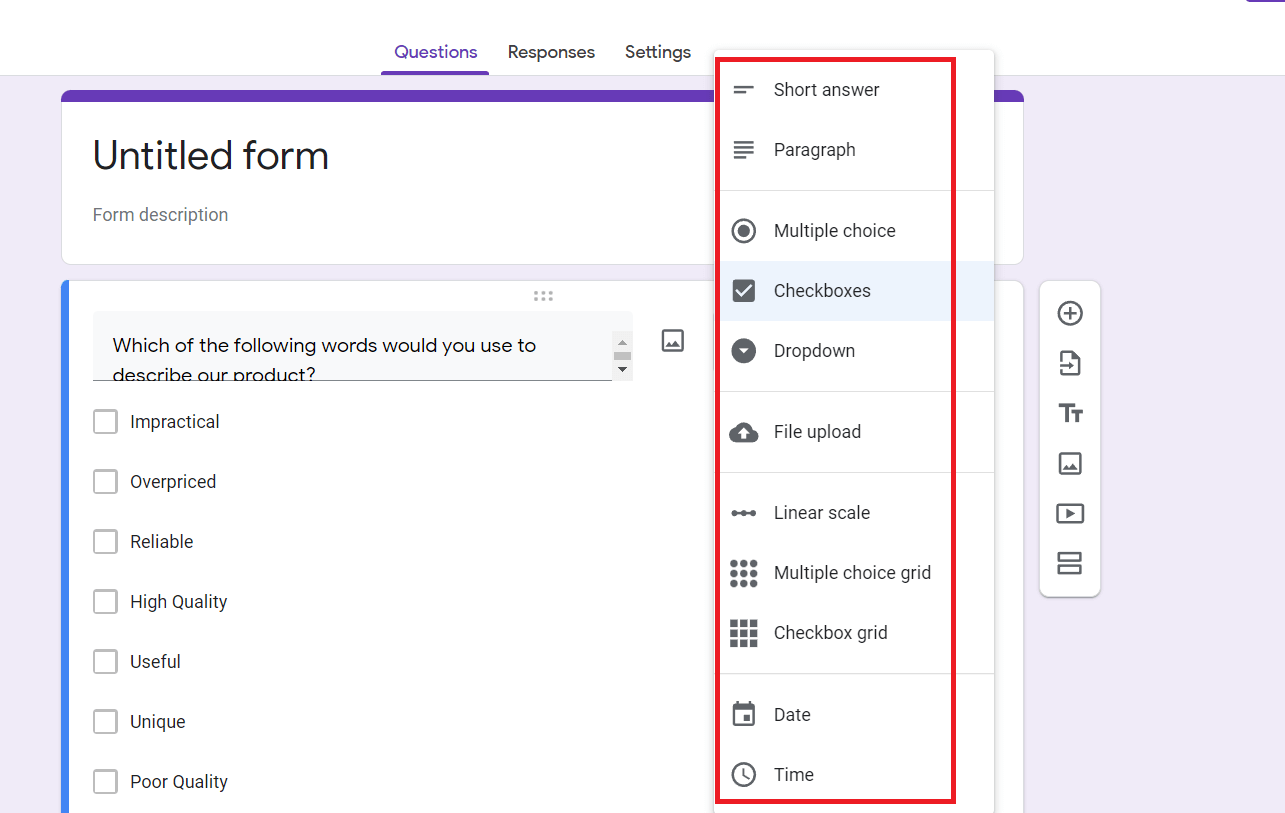
Step 6: Once we have added a type of question, we can write the question itself and specific answer options. To do so, click on the respective field and type the text we need to use.
Step 7: We have to repeat the process until we have created all the questions we need for our survey. How to Share Google Forms surveyWe can share our survey with others in various ways once we have finished it. To start, we need to click on the Send button, which is in the upper-right corner of the form. 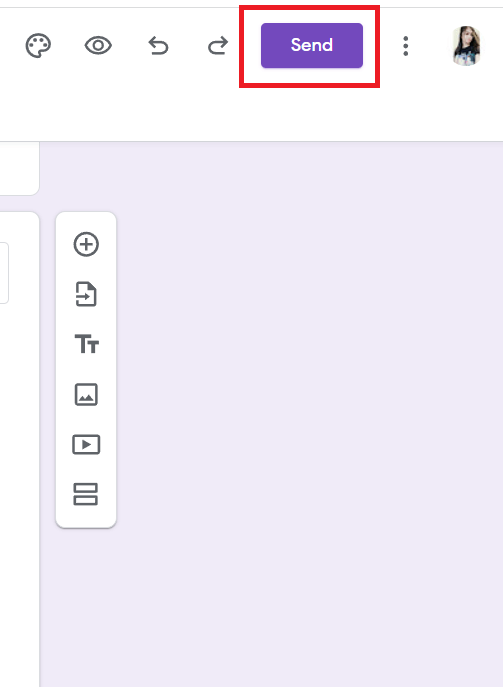
Email the Survey to Specific RecipientsWith the help of the Email tab selected (first from the left), click in the field labeled To and type in the email address of our intended survey recipient(s). If we wish, we can also include a message. Click Send in the bottom-right corner once we're done, and the survey will be sent to all of the recipients. 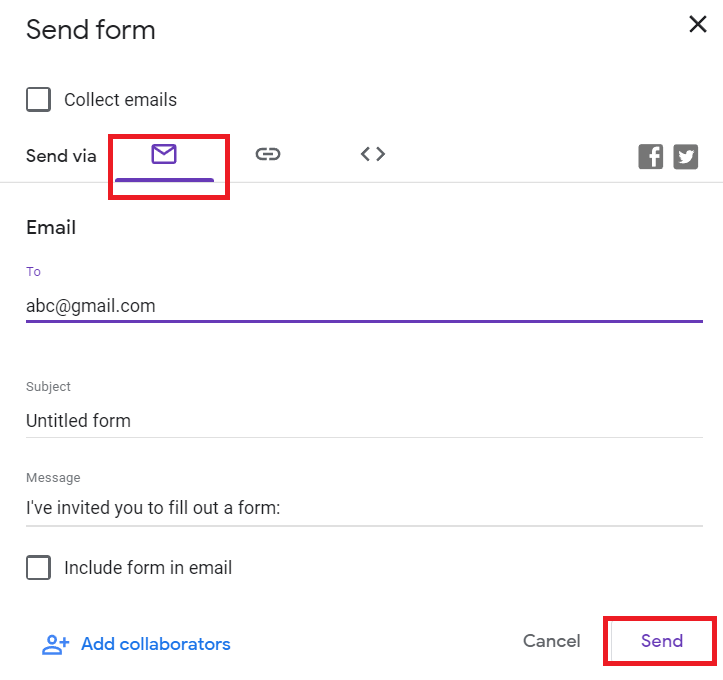
Copy a Link to the Survey and Post it ElsewhereUsing the Link tab selected (second from the left), click on the Copy button in the bottom right-corner of the screen. If we need a shorter version of the link, we have to click on the field next to the Shorten URL so that the check mark appears and then click on the Copy button. From there, we can paste the link elsewhere, like on social media, and anybody who clicks on the link will be able to answer our survey. 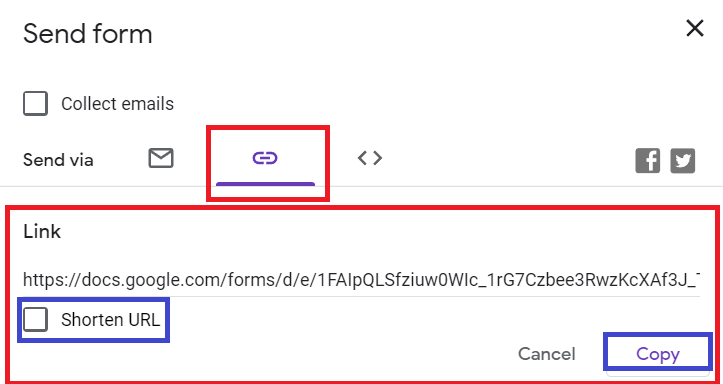
Embed the Survey into WebsiteIt is more difficult because it requires us to code the survey into our own website or blog. Using the Embed HTML tab selected (third from the left), click Copy in the bottom-right corner of the screen. This will copy the code of the survey such that we can embedded it in the code of our website or blog, which we will have to accomplish on the website's hots site like WordPress. 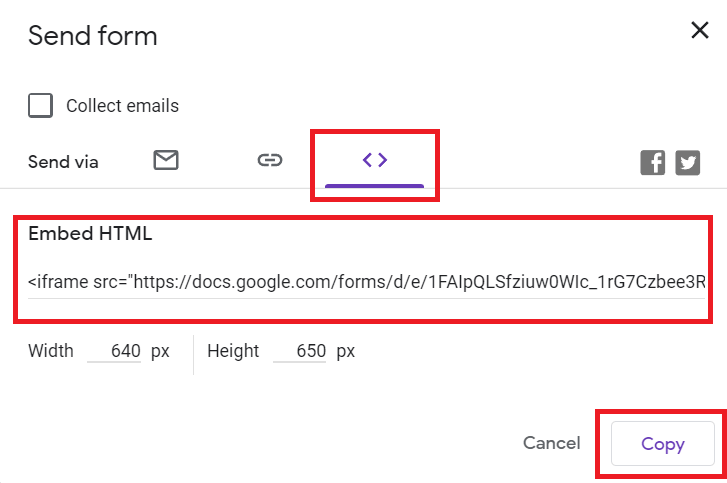
Advanced Google Forms Tips and TricksThe following are some advanced Google Forms tips and tricks:

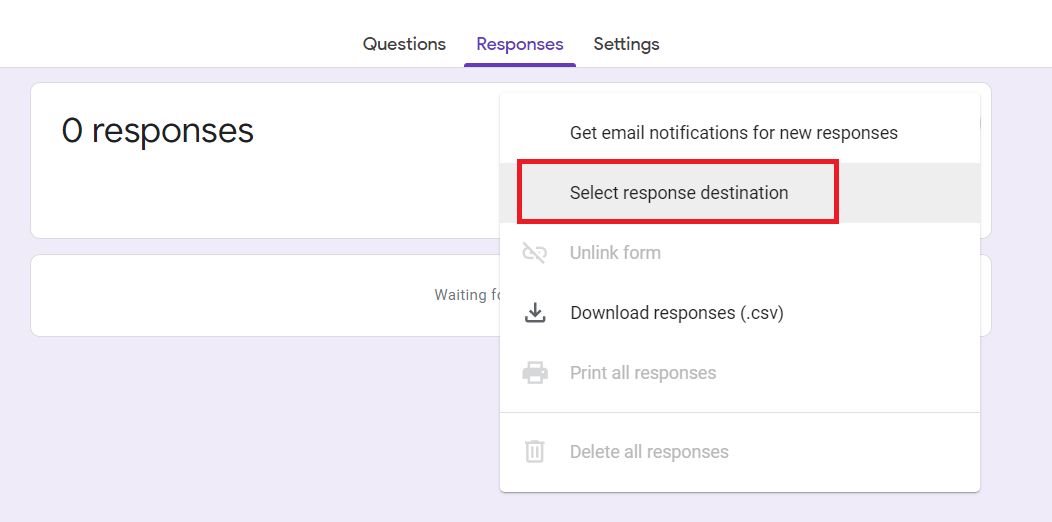
1. Choose Your Response DestinationIf we are regular users of Google Forms; we are surely aware that we can save our results as a spreadsheet or keep them in the form itself. Although, we may be unsure of which option to be select or why. In order to choose our result destination, we have to follow the following steps:
If we need to rapidly send our responses to a spreadsheet, we can also click on the green Create spreadsheet button. Alternatively, we can download it directly to our computer Select More > Download responses (.csv). If we create a new spreadsheet, it will reside in Google Sheets with the name we assign. If we select to add to an existing spreadsheet, we will select the one we want in the pop-up window for Google Sheets. It is ideal to use a spreadsheet to store the results if we want to manipulate the data. If we accept more than 400,000 responses, we might want to keep the results in forms because a typical Google Sheets spreadsheet has a limit of 400,000 rows. Whichever destination we choose, we can always go to the Responses tab to get a more visual view of results, which is faultless if most of our questions are multiple-choice or can be graphed somehow. 2. Insert Google Forms Multiple PagesIt is feasible to add additional pages to our form and make it more manageable to respondents by including sections. We have to Go to the last block on our page and click the Add Section button from the toolbar. Each page can include a header and description, allowing us to easily differentiate questions of a certain kind or for a particular type of response. 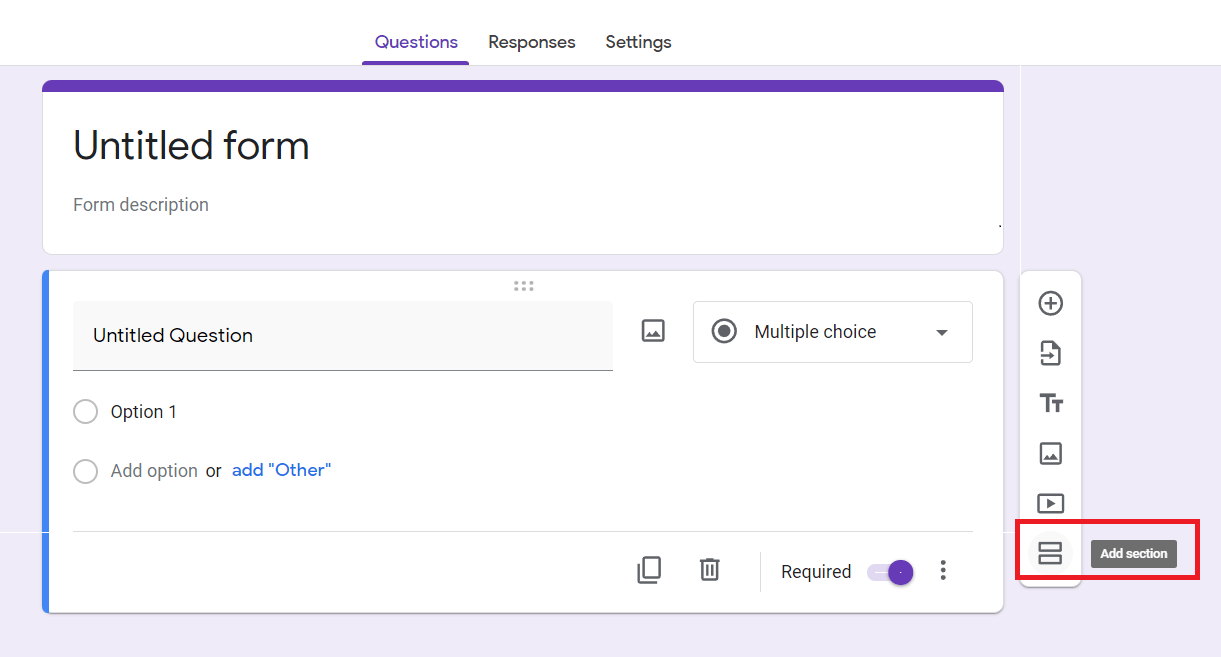
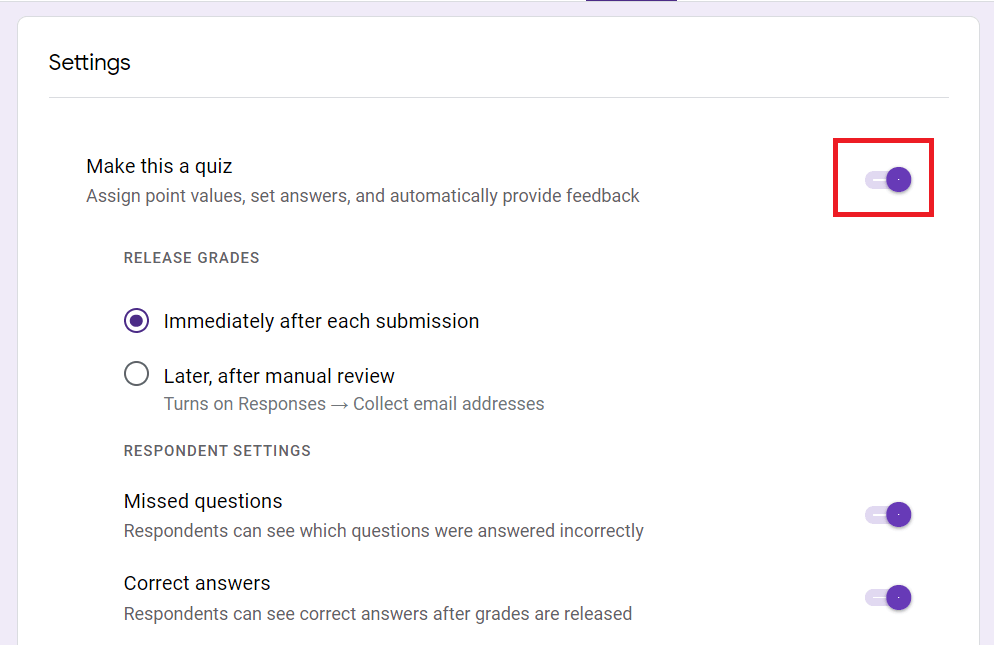
3. Create an Auto-Grading QuizAn auto-grading quiz in Google Forms is a simple solution for teachers to save time. We have to switch to the Settings tab and enable Make this a quiz to set this up. 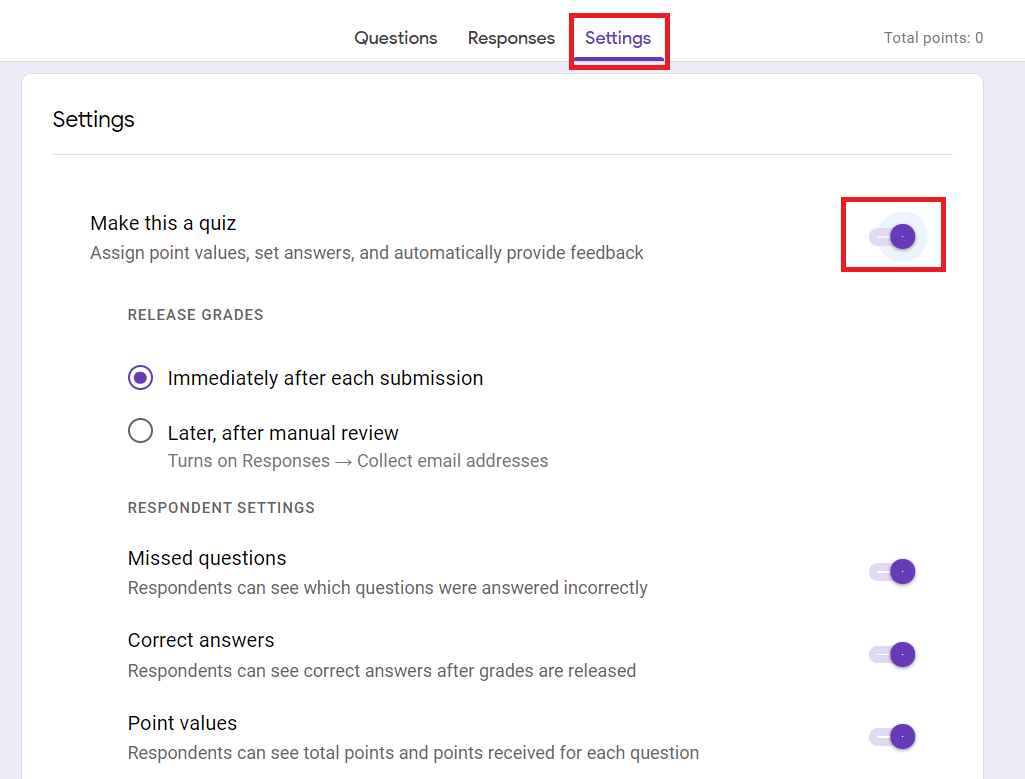
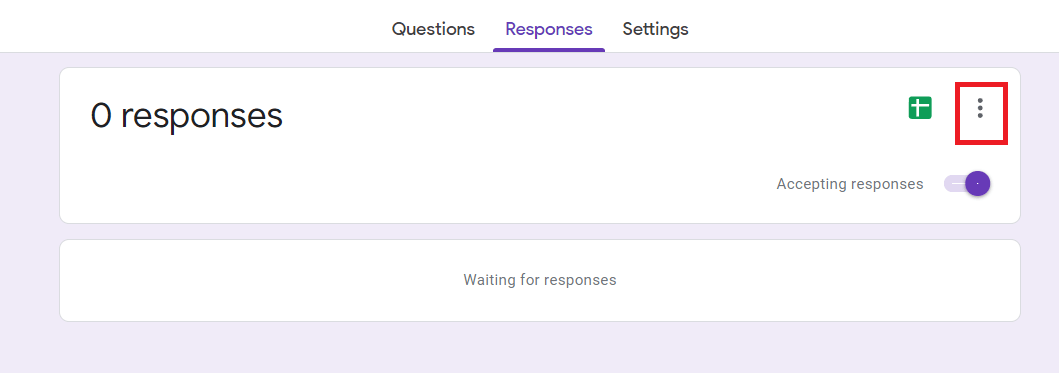
Additional options will then appear below it, such as whether the respondent must have to see their grade instantly, whether they can see what they got incorrect, and so on. Every time we add a question to our quiz, we can assign it a point value and provide feedback for right and inappropriate answers. 4. Receive Notification for SubmissionsIf we'd like to receive email notifications when someone submits our form, we can set this up in just two clicks. 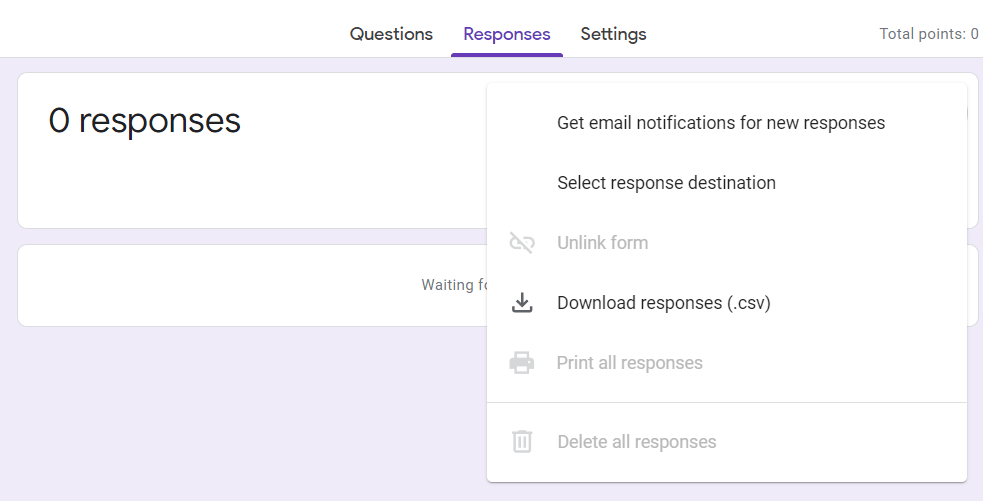
Click the More (three-dot icon) button on the Reponses tab and then select Get email notifications for new responses. The email address at which we will receive the responses is the address of the account we use to log in to Google Forms. 5. Embed an iFrame of our FormIf we need to use Google Forms to create a contact form for our website or any other reason where it is helpful to embed the form as an iFrame, it's simple to use. On the top right of the form page, click on Send. Then we have to click on the Embed icon, adjust the width and height of our iFrame if we want, and click on Copy. We can then paste the code where we necessity it. 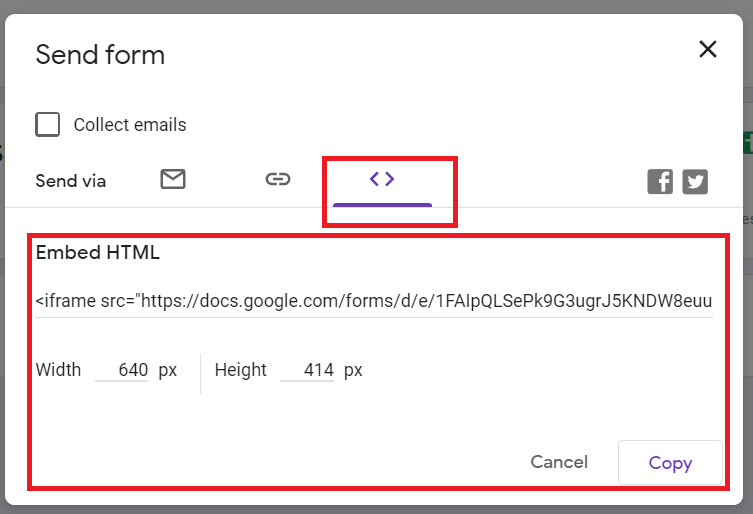
6. Adjust Defaults for Emails, Required Questions, and Point ValuesIf we plan to create forms and always wish to collect email addresses, we can mark a setting to make this a default. In addition, if we want all questions to be required or use the same point value for quiz questions, we can set these defaults as well. In order to do this, we have to switch to the Settings tab. Inside the Defaults section, expand Form defaults and Question defaults and make our choices. If we plan to use the same settings on forms again, this will save a lot of time. 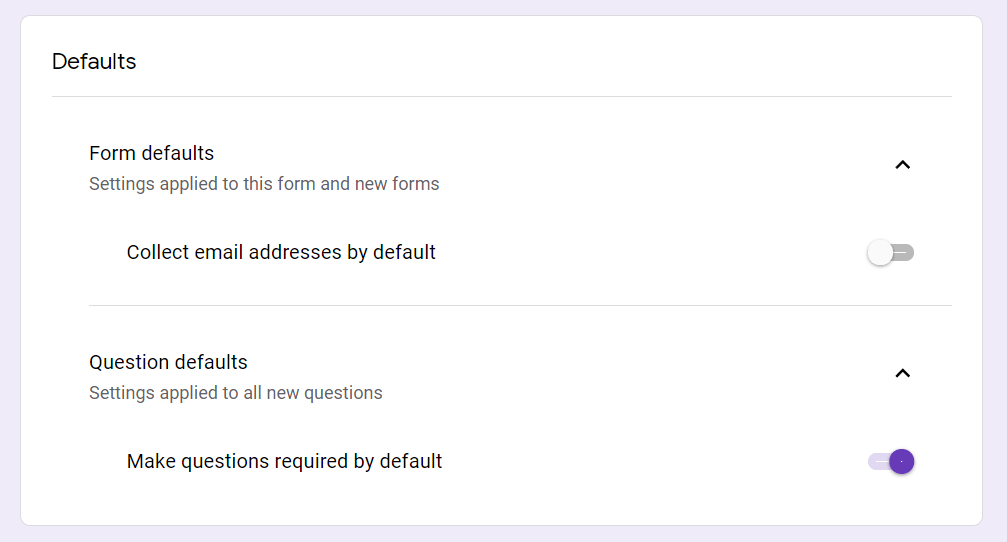
7. Use ScriptingThere are no scripts for the form itself, but we can use scripting if we want to. Select the Settings (gear icon) button which is on the top right of the form page and chooses Script editor. We will start with a clean slate in a new tab in which we can enter our script. Simply click File>Save when we finish. 8. Add Logic BranchingLogic branching is a great way of stating that our respondents will go to a specific page depending on their answer. For example, if we say we are Indian, the question will be about Indian regions. We might get age-appropriate questions if we specify a specific age range as an answer. This can be used for any question where the user can give one answer from a list of options. Click the More (three-dot icon) button for the question and select Go to section on the basis of the answer. Then, from the selection box, choose where we want to direct our respondents from the dropdown box. We can also ask them to submit the form instead of sending it to the new section. 9. Obtain a Pre-Filled LinkWe might want to pre-fill out some of the answers on the form for our respondents. For example, this may be used to kickstart a contact from on our website. Click More on the top right of the form page (next to Send) and then select the Get pre-filled link. After that, simply fill the form out as we'd like the respondents to do for any given question and click Get Link. Then we will see on the bottom left that our link is ready; simply click on Copy Link and then paste it wherever we need to share it. 10. Collaborate in Real-TimeAll the G Suite Office apps have this feature in stock, and with Forms, it's not different. Assuming we are creating a form with our team, it's only natural that everyone can collaborate on it in real-time. So, to begin building a form together, we have to click on the three dots symbol on the top-right of our screen and select Add Collaborators. Then a pop-up window will appear, where we can type each collaborator's email address. On the section Get Link, we can also click on "Change" and select if we want the people we share to view or edit the form. Then click on "Copy link" and share it with our collaborators through email or another channel. Reasons to Use Google Forms with StudentsGoogle Forms is a web-based application that is used to create forms for data collection purposes. Google Forms can be used by students and teachers to create surveys, quizzes, and event registration sheets. The form is web-based and can be shared with respondents by sending a link, emailing a message or embedding it into a web page or blog post. The information obtained through the form is usually stored in a spreadsheet. Despite the fact that there are other online survey apps, Google Forms is a great free option. The following are some reasons to use Google Forms with students:
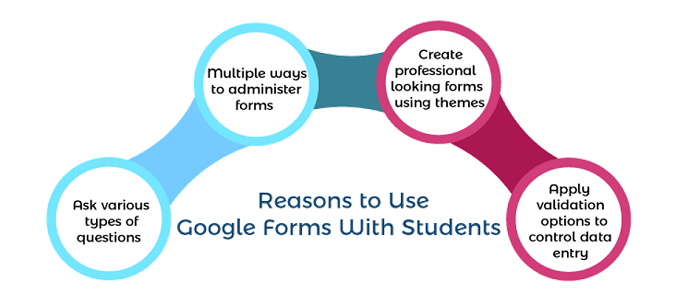
1. Ask Various Types of QuestionsGoogle Forms permits us to ask both open-ended and closed-ended options. In order to collect data, we can use drop-down menus, multiple-choice, checklists, rating scales, and short answers text boxes. The following are the types of questions we can use in a Google Form:
2. Multiple Ways to Administer FormsGoogle Forms allows us and our students to collect data in a variety of ways. A form can be included in the body of an email, allowing a respondent to submit their response from their boxes. A link can be created, permitting respondents to answer the questions using a web-based form. Code can be generated and then embedded into a blog or web page as another option for data collection. If we prefer to use paper and pencil, the form can also be converted to a PDF file using Google Chrome. 3. Create Professional Looking Forms Using ThemesWe may use Google Forms to create a professional-looking form. Themes are also available which permit our students and us to select from over twenty pre-set designs. Furthermore, a custom option encourages creativity. We can change the header, text, form background, and page background. Exploring the header picture library (some of them are animated)! Is entertaining. The option to change the page background is one feature we like. We can upload a picture, take a snapshot, or load an image from a Google Drive or URL to create a custom look. With a number of web pages limiting the creative process, it is refreshing that Google Form's appearance is not limited to just a few templates. 4. Apply Validation Options to Control Data EntryData validation is a rule which is applied to data entry to ensure that the data is accurate and helpful. Google Forms provides many options for manipulating answers provided by respondents. We can set the questions required in order to prevent respondents from skipping a question. We can limit a number or text to a specified entry, character count, or range. The number of options selected on a checklist can be limited. In addition, the order of alternatives for a question can be randomized to avoid placement within a list influencing selection. Google Form's validation features help progress the quality of the data collected. |


 For Videos Join Our Youtube Channel: Join Now
Feedback
- Send your Feedback to [email protected]
Help Others, Please Share


