| |

Gradle WrapperThe Gradle wrapper allows us to run a build with a specified version and settings without the Gradle installation. This wrapper can be considered as a batch script on Windows and shell script for other OS. When we invoke the Gradle with the wrapper, it automatically downloads and builds the specified version. Most of the software requires installation on a computer before use. Installation of any tool on a computer becomes an unnecessary burden for the users. It is also important to check that if the user has installed the right version or not. The Gradle wrapper overcomes all these problems and preferred by all the developers to start a Gradle build. Gradle executes the build process that is independent of the installed version. So the wrapper is the preferred way for starting a Gradle build. We can create the wrapper script according to our needs. Below figure demonstrate the workflow of Gradle: 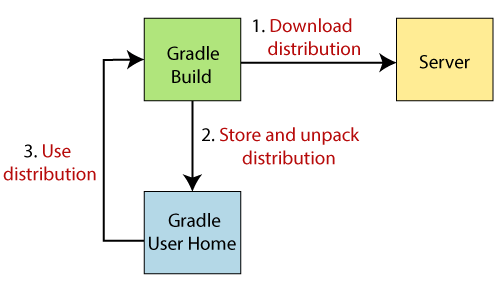
We can find a gradlew file for UNIX based systems and gradlew.bat for Windows systems. These files act as gradle commands so, if Gradle is not installed on the machine, then it will be automatically downloaded and installed. It is also possible to define a task that defines the version of the wrapper. If this task is executed, it creates the wrapper and downloads the correct version of Gradle. Benefits of the Gradle WrapperFollowing are some benefits of using Gradle wrapper:
We are going to do the following things with a first Gradle wrapper:
Adding the Gradle WrapperGradle comes with a built-in task called as a wrapper. When this task is executed, it generates the essential wrapper files in the project. To add the wrapper to a project, run the wrapper command as follows: Output: 
The above command will provide the wrapper to our project and generate the wrapper properties file into directory gradle/wrapper/gradle-wrapper.properties. 
The content of gradle-wrapper properties file is as follows: This file contains the below information about the Gradle distribution:
Note: If we want to share the wrapper files to other developers and execution environments, then we have to push them into version control. Mostly the wrapper files, including JAR files, are smaller in size. It is expected to add the JAR file to version control. However, some companies do not allow projects to submit binary files to version control. At that moment, there is no other option apart from this approach.All of the above aspects can be configured with the help of the command-line during wrapper files generation. The below command is used to specify the Gradle version for downloading and executing the wrapper: Below command is used to specify the Gradle distribution type used for the wrapper. Available options are bin and all, and the default value is 'bin': Below command is used for pointing the full URL to the Gradle distribution zip files: Consider the following example to explain the use of the command-line options. We want to create the wrapper with version 6.1 and use the -all distribution to enable our IDE to enable code-completion and being able to navigate to the Gradle source code. The following command can fulfill these requirements: The above command will create a wrapper with version 6.1. How to use the Gradle WrapperIt is recommended to execute a build of the project with the wrapper to ensure a standard, control, and reliable execution of a build. Wrapper executes a build, almost like executing a build with a Gradle installation. We can either run gradlew or gradlew.bat command instead of the gradle command according to our operating system. The following command demonstrates how to use the wrapper on a Windows machine for a Java-based project: Output: 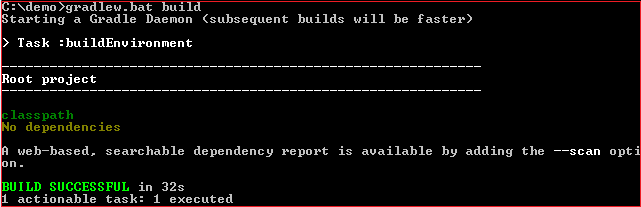
If the Gradle distribution is not available on the machine, the wrapper will download and make it available to us and store it in the local file system. The subsequent build invocation will reuse the existing local distribution since the distribution URL in the Gradle properties doesn't change. Updating the Gradle WrapperUpdates are necessary for software to keep it connected with the latest versions to get benefit of new features and improvements. We can also manually upgrade the Gradle version by changing the distribution URL property in the wrapper property file. But, it is recommended to upgrade the wrapper version by the wrapper task, pass the specified Gradle version. The wrapper task ensures that any optimizations made to the Wrapper shell script are applied to the project, although we have to commit these changes to the wrapper files to version control. The gradle wrapper task is used to generate the wrapper for a specified version. By default, it will consider the installed version. For upgrading Gradle wrapper to a specified version, run the below command: The above command will upgrade the project to Gradle version 6.1. Consider the below output:
We can check the specified version by executing the below command: Customizing the Gradle WrapperThe default runtime behavior of Gradle is quite good, but we can customize the Gradle. Security Constraint might require to customize the wrapper for the organization that uses Gradle. However, the built-in wrapper task provides numerous options to create the runtime behavior that we need. Let's assume we don't want to use -all options repeatedly so that we can save ourselves some keyboard strokes. To do so, we can re-configure the wrapper task. Add the below code snippet in the
Next TopicGradle Multiproject Builds
|
 For Videos Join Our Youtube Channel: Join Now
Feedback
- Send your Feedback to [email protected]
Help Others, Please Share


