How one can run Macro in Microsoft Excel and create macro button?In this tutorial, we will be covering many different methods that can be used to run a macro in Microsoft Excel - either from the ribbon or by using the VB Editor, and also with a custom keyboard shortcut, and by just creating our macro button, respectively. Though running an Excel macro is simple for various experienced users, it would also take some time for beginners. Besides all this, we will be seeing several methods that can be used to run macros, some of which may completely change our way of interacting with Microsoft Excel workbooks respectively.
How can one efficiently run a macro from Excel ribbon in Microsoft Excel?It was well known that one of the fastest ways to execute a VBA (Virtual Basic for Application) in Excel is to just run a macro from the Developer tab. And if an individual has never dealt with VBA (Virtual Basic for Application) code before, then in that case, we may need to activate the Developer Tab first. And then, we will do the following step as well: Step 1: First of all, on the respective Developer tab, in the Code group, an individual need to click on the Macros or can press out the Alt + F8 shortcut as well. Step 2: And after that, in the dialog box that appears on their screen, an individual must select the Macro of interest and proceed further by just clicking on the Run option effectively. 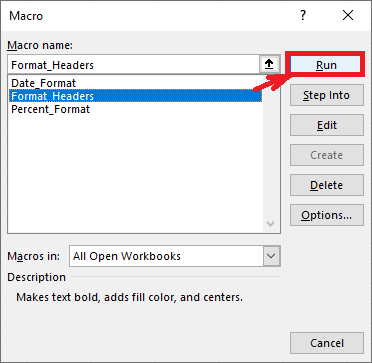
Note: If in case the Developer tab is not gets added to our Excel ribbon, then in that particular, we need to press out the shortcut from our keyboard, that is: Alt + F8, to open the Macro dialog box respectively.How can one run a macro with the help of the custom keyboard shortcut in Microsoft Excel?If we are executing a particular macro regularly, then in that specific scenario, we can easily assign a shortcut key to it as well. And a shortcut can be efficiently added while recording a new as well as a existing macro. For this purpose, we will be, carrying out the below-mentioned steps efficiently: Step 1: First of all, on the Developertab, in the Code group, we will be clicking on the Macros. Step 2: After performing the above steps a Macro dialog box get appears on our screen in which we will be clicking on the Options respectively: 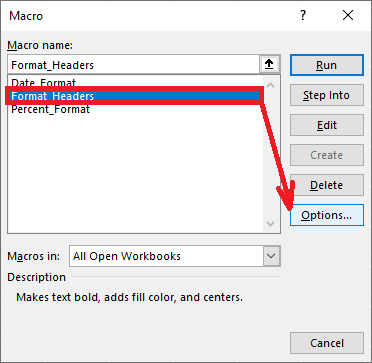
Step 3: After that, the Macro Options dialog box will appear on the screen. And in the Shortcutkey box, we will be typing any uppercase or lowercase letter which we want to make use of for the shortcut as well, and then we will be clicking on the OK to save the changes respectively:
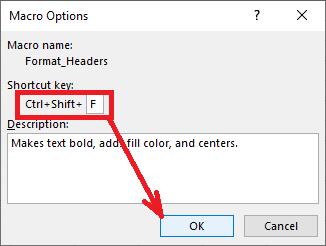
Step 4: And when we have perform all the above steps, then we will be closing the Macro dialog box. Note: It is always recommended to always make use of the uppercase key combinations for the macros (Ctrl + Shift + letter) not to override the default Excel shortcuts.
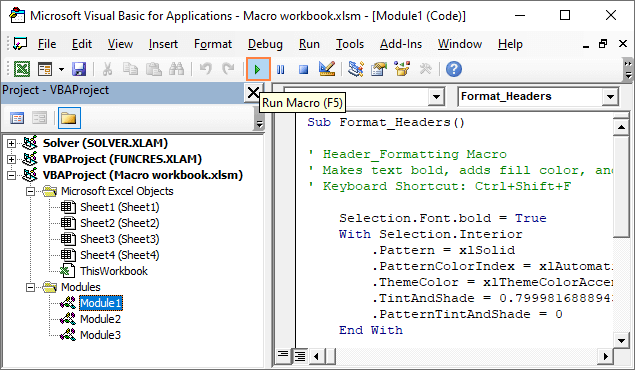
And once the shortcut is being assigned, and then we need to press that key combination for the purpose of running our Macro effectively. How can one run Macro from VBA Editor in Microsoft Excel?And if we are aiming to become a Microsoft Excel pro, then we should know how to start a macro from the Excel as well as the Visual Basic Editor. And the good news is that it is a lot easier than we might expect respectively: Step 1: First, we will press the shortcut from the keyboard, that is: Alt + F11, to launch the Visual Basic Editor. Step 2: Now, in the Project Explorer window on the left side, we will double-click the module containing our MacroMacro to open it respectively. Step 3: And in the Codewindow, which is present on the right, then we will see all the macros listed in the module, and placing out the cursor anywhere within the MacroMacro which we want to execute and do one of the following as well:
Alternatively, we can make use of one of the following shortcuts:
How one can create a macro button in Microsoft Excel?It is well known that one of the traditional ways that can be used for running macros is not hard, but it still might present a problem if in case we are sharing a workbook with someone who has no experience with VBA (Virtual Basic for Application) - they would not know where to look! And in order to make running of a macro easy as well as intuitive for anyone, we will be creating our macro buttons. Step 1: First of all, we will be moving to the Developer tab; in the Controls group, we will click on the insert options and then select Button under From Controls as well. Step 2: First, we will click anywhere in the respectively given worksheet as this will also open out the Assign Macro dialogue box. Step 3: After that, we will be selecting out the Macro which we would like to assign to the button and click on OK. 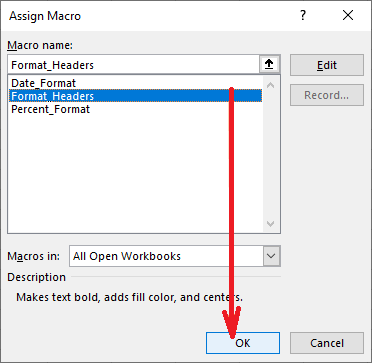
Step 4: And in the next step, the button will get inserted in the worksheet as well, in order to change the button text, we will be right-clicking the button as well as selecting the Edit Text from the context menu as well. 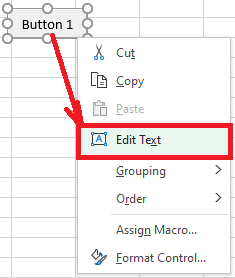
Step 5: And then we will be deleting the default text, like as Button 1, We can format the text in bold or italics in accordance to our needs respectively. 
Step 6: And if the selected text does not fit in the button, then we will be making the button control bigger or smaller by just dragging out the sizing handles. When finished, we will click anywhere on the sheet in order to exit the edit mode. And now, after that, we can quickly run the Macro by just clicking its button. The Macro, which we have assigned, formats the selected cells as shown in the screenshot below as well: 
Note. And it should be noted that, one can also assign a macro to an existing button or other Form controls such as spin buttons or scrollbars, as for this, we will right-clicking on the control inserted in our worksheet and choose the Assign Macro from the pop-up menu.How we can create a macro button from a graphic object in Microsoft Excel?It is not possible to customize the appearance of the button controls, and because of this, the button which we have created a moment ago could look friendlier and make a beautiful Microsoft Excel macro button as well. We can make use of various shapes, icons, images, and other objects. As an example, we will show how we can run a macro by just clicking a shape as well: Step 1: First of all, we will move to the Insert tab in the Illustrations group, click on Shapes, and select the desired shape type, e.g., a rectangle with rounded Corners: Step 2: In our respective worksheet, we will also click the area where we want to insert the shape object. Step 3: After that, we will format our shape button how we want.
Step 4: And now for the purpose of linking a macro to the respective shape, we will be then right-clicking on the shape object, we will be choosing Assign Macro?, then select the desired Macro and click on OK. Now we have a shape that looks like a button and will then runs the assigned Macro whenever we click on it: 
How we can add a macro button to Quick Access Toolbar in Microsoft Excel?It is well known that the macro button inserted in a worksheet looks perfect, but adding a button to every sheet is very much time-consuming, and to make our favorite Macro accessible from anywhere, adds it to the Quick Access Toolbar Here's how we can achieve this as well: Step 1: First, we will right-click on the Quick Access Toolbar and choose More Commands? from the context menu. Step 2: After that, we will select the Macros in the Choose commands from the list. Step 3: Now in the list of macros, we will be then choosing the one which we want to assign to the button and will click on Add option respectively, as this will move the selected Macro to the list of the Quick Access Toolbar buttons on the right. 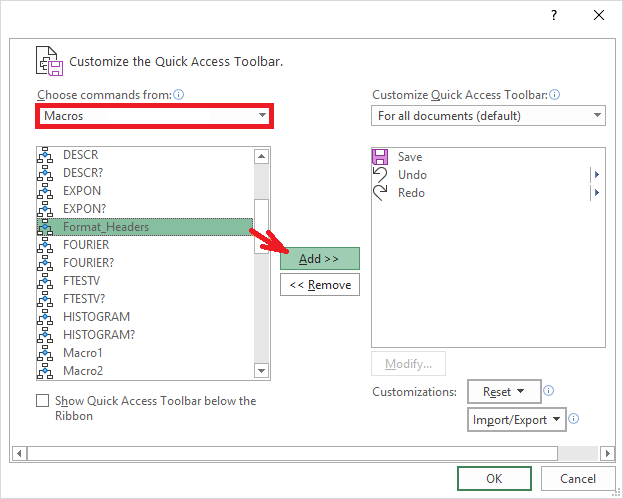
And at this point, we will be clicking on OK in order to save the changes or will do a couple of more customizations as described below: Step 4: And if in case we find that the icon added by the Microsoft is unsuitable for our Macro, then we will be clicking on Modify in order to replace the default icon with another one. 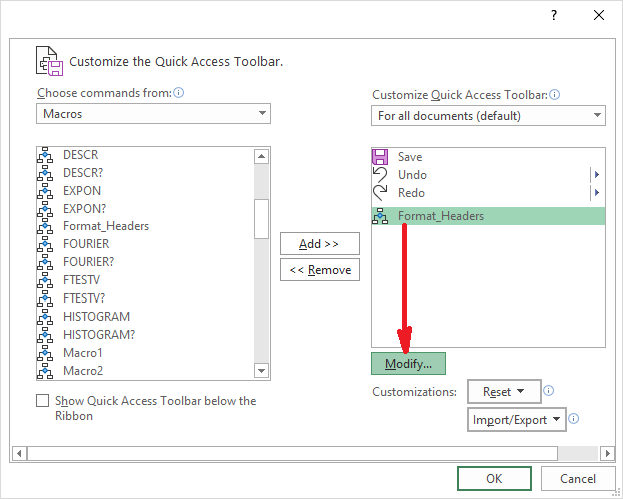
Step 5: In the Modify button dialog box that appears on the screen, we will also select an icon for our macro button. And optionally, we can also make changes in the Display name for the purpose of making it more user-friendly. 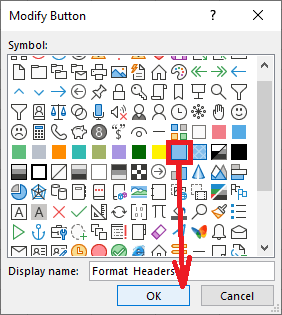
Step 6: Now in this step, we will be clicking on the OK twice in order to close both dialog windows. 
How can one put a macro button on the Excel ribbon?Suppose we have a few frequently used macros in our Microsoft Excel toolbox. So in that case, we could find it convenient to have a custom ribbon group, say My Macros and we can also add various popular macros. Firstly, we are required to add a custom group to an existing tab. And then, we will be adding a macro button to our custom group by performing these steps as well: Step 1: First, we will right-click on the ribbon, then click on the Customize the Ribbon option. Step 2: And in the dialog box which gets appears on the screen, we will do the following:
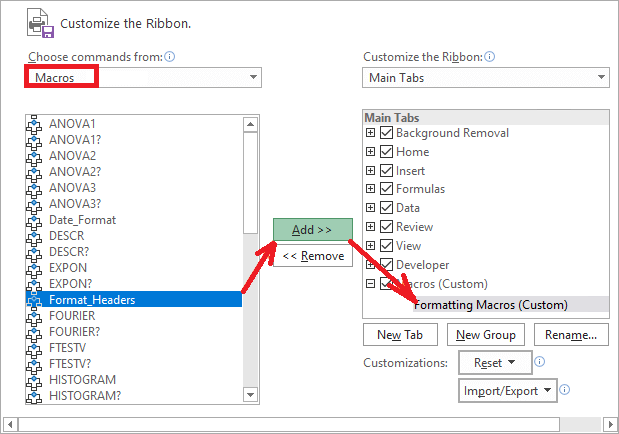
Step 3: And the Macro is now got added to the custom ribbon group, and to give our macro button a friendlier name, we will select it and then we will click on the Rename option as well: 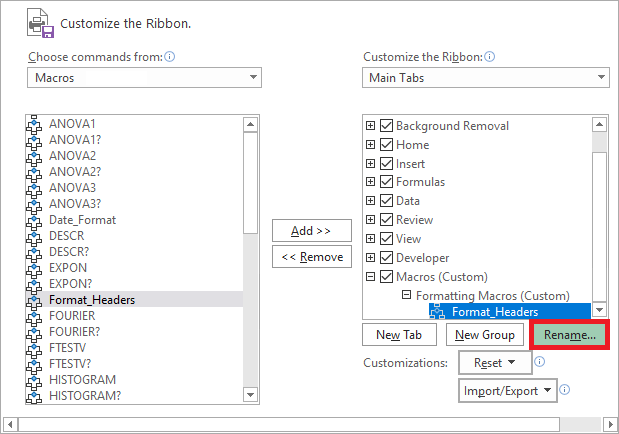
Step 4: And now in the Rename dialog box, we will type any name which we want in the Display name box and choosing an icon for our macro button respectively. When done, click the OK option as well. 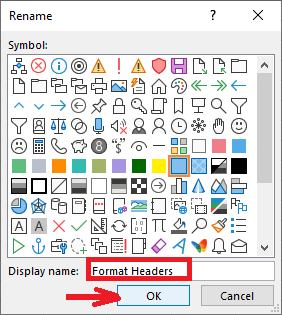
Step 5: We will click on the OK to save our changes and close the main dialog box respectively. And for example, we have put 3 macro buttons to my Excel ribbon and we can easily run any of them with a click on the button respectively: 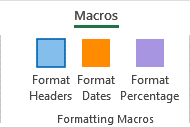
How to run a macro on opening a workbook in Microsoft Excel?In some of the case, we may just want to run a macro automatically on the opening of a workbook;
Run Macro automatically by making use of the Workbook_Open event Below are the steps for the purpose of creating a macro that will automatically runs whenever we open a specific workbook: Step 1: First of all, we will be opening the Workbook in which we want the Macro to be got executed. Step 2: After that, we will press the Alt + F11 to open the Visual Basic Editor. Step 3: In the Project Explorer, we will double-click ThisWorkbook to open its Code window as well. Step 4: In the Object list above the Code window, we will select the Workbook, as this will create an empty procedure for the Open event to which we can add our code, as shown in the screenshot below. 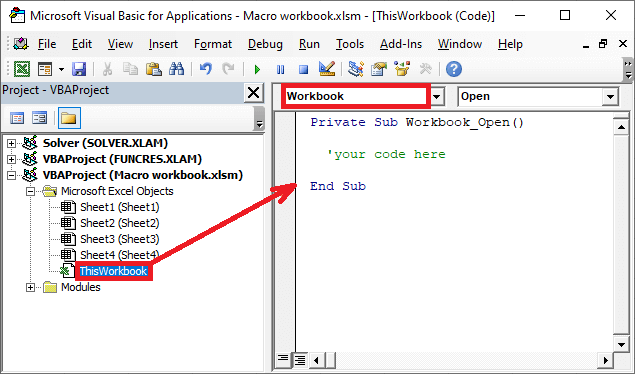
Trigger Macro on workbook opening with Auto_Open event And the other way, which can be used for the purpose of running a macro automatically on workbook opening, is by making use of the Auto_Open event. Unlike the Workbook_Open event, Auto_Open () should sit in a standard code module, not in ThisWorkbook. Here are the few steps which can be used for the purpose of creating such a macro: Step 1: In the Project Explorer, we will be first right-clicking on the Modules, then click on on Insert > Module. Step 2: And in the Code window, we will be writing the following code. 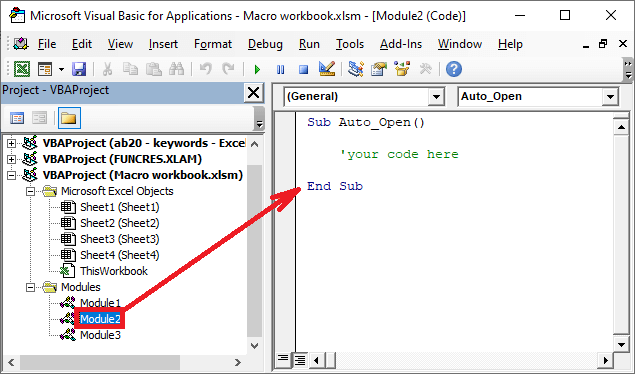
Here is an example of the real-life code that displays a message box on a workbook opening: Whichever event we may use, our Macro will run automatically every time we open the Excel file containing the code. In our case, the following message box is displayed as well: 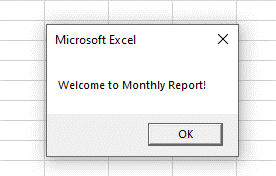
Next TopicCopy and Move the Worksheet to Excel
|
 For Videos Join Our Youtube Channel: Join Now
Feedback
- Send your Feedback to [email protected]
Help Others, Please Share


