| |

How to Access Android Settings MenuWhen people buy a new device, it takes time to get familiar with its features and functionality. Similarly, when you purchase an Android smartphone, it may take some time to get used to it. In the last few years, Android phones and tablet has made many improvements in its feature and UI structure. If you made a vast version of gape using an Android device from Lollipop to Android 10 or 11, you might get confused initially about the device Settings menu. In newer versions of Android smartphones, you will notice many changes in their navigation options, icons, app drawer, settings, widgets, features, etc. In this situation, it will not be surprising if you desire help. 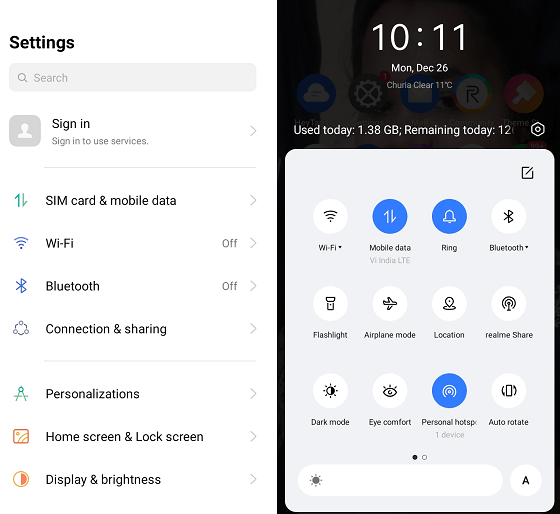
The best way to explore a new phone and familiarize yourself is by reviewing its settings options. You can make changes and customization default settings from the Settings Menu. The device Settings menu (or panel) is a gateway to solve problems such as Wi-Fi or network connectivity issues, account-based issues, ringtones, developer mode, and many more. Knowing all the above points, the Settings menu is a central control system of Android smartphones. Here, we discuss all Settings menus and their various settings options. Note: Smartphones don't have the same Settings options, and they vary from manufacturer to manufacturer, so check the correct settings before changing any.How to visit at Android Settings MenuThere are several ways to access the Android Settings menu; some of them are described below:
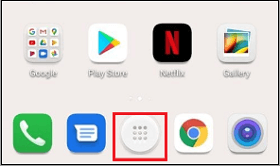
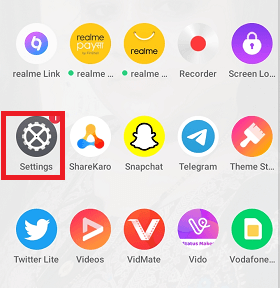
From the App DrawerYou can access all the Android apps on your device from App Drawer. Like other apps, you will also find the Settings app here. Follow the below-given steps to access the Settings menu through App Drawer:
From the Home Screen ShortcutAdd the shortcut of the Settings icon on your Android phone's home screen. It will let you visit the Settings menu with one click.
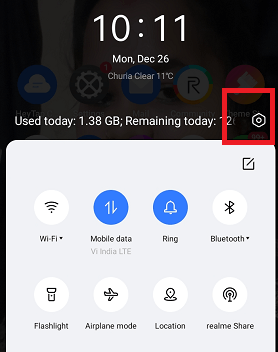
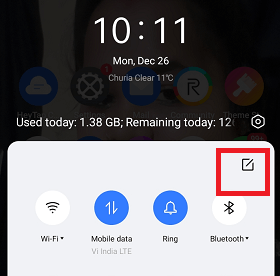
From the Notification PanelAndroid Notification Panel is another area where you can access the device Settings menu. Drag down the screen from the Notification panel to open the Quick Settings Panel. This screen contains several toggle switches for instant activation for Mobile-data, Wi-Fi, Bluetooth, dark mode, etc. Besides these options, there has also an option to open the Settings menu; click on the small setting (or gear) icon.
Using Google AssistantAnother exciting feature of Android devices is Google Assistant technology, which helps to access devices via voice command. Modern Android phones are in-built with innovative Artificial Intelligence that reads sound commands. You can activate Google Assistant by saying "Ok Google" or "Hey Google". Once Google Assistant starts listening, command it "Open Settings", and it will launch the Settings menu. 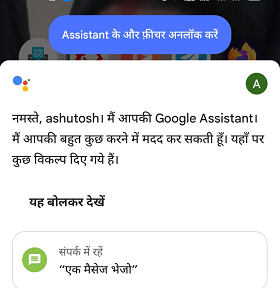
Using third-party Settings appIf you don't want to use the pre-installed default Settings app on your Android phone, choose a third-party Settings app. You will find several settings apps on Play Store from various publishers. Download and install any Settings app you prefer. The advantage of such apps is the ease of customization, which offers many additional features. They contain different settings for volume control, orientations, screen timeout, etc. There are other settings menus like Google account settings, keyboard settings, Wi-Fi and network connectivity settings, etc. 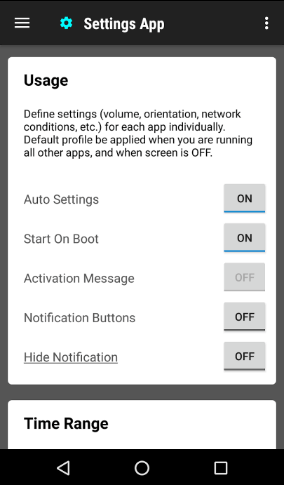
Access Android's phone different Settings menuOnce you visit the Android Settings menu screen, you will find different settings menus to customize, change the default settings option, and enable or disable various other features. Below we have discussed how to access various Settings menus:
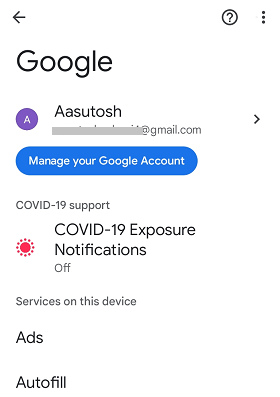
Google SettingsYou must go through the Google settings option to change and customize preferences and services offered by Google. Making changes and customizing services provided by Google, like Google Assistant, Google maps, etc., you can do all via Google Settings.
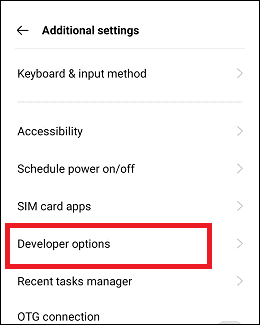
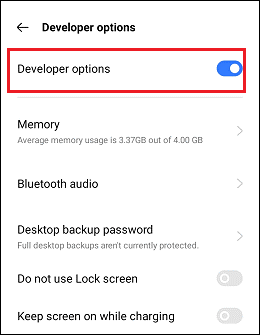
Developer OptionsAndroid Developer Options contains advanced settings that widely affect device performance and appearance. Sets up various options of developer mode are not for regular users. If you want to customize several advanced features like rooting your phone, app development testing only needs device Developer mode. Look at our article to enable Android Developer Options. Once the "Developer options" get enabled on your device, you will see a short message: "You are now a developer". It allows you to access the Developer mode's features and settings options from Settings. Look at the below steps to access Developer options:
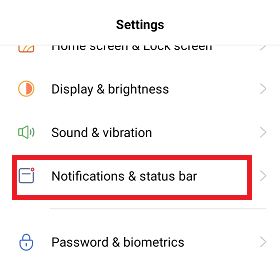
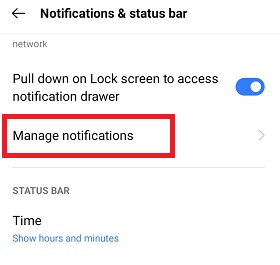
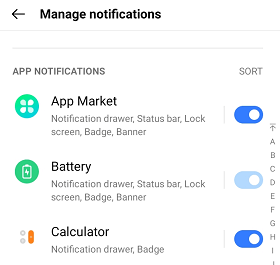
Notification SettingsReceiving notifications on the phone sometimes became helpful, and sometimes it isn't charming. If the number of apps on your phone is less, it may be acceptable to manage. But as the number of apps on your phone grows, you may get overwhelmed with the notifications you receive. You can choose and set up which apps get the notification and which don't. You can set some preferences on apps using notification settings. The different phone has different steps for notification settings.
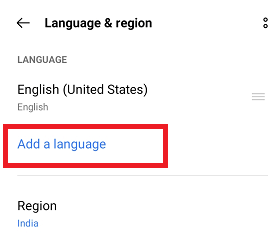
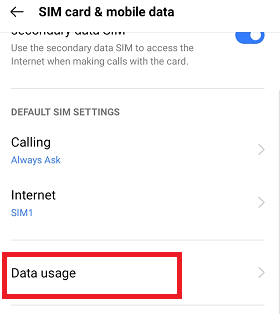
Network/Internet/ SIM SettingsIf you want to make any changes in settings options that involve network and internet connection, you need to visit inside Wireless & network settings. Some latest devices give all connection settings on the main Settings screen, such as Wi-Fi, Bluetooth, SIM card and mobile data, and Connection & sharing. You can make changes to their particular section. Language and Input SettingsLanguage and Input Settings allows you to change and customize the language settings of your Android phone. You can choose from various language options based on the language supported by your device. Also, you can select the default keyboard and region.
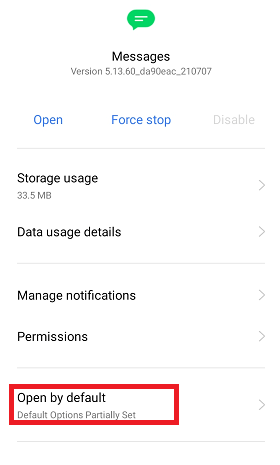
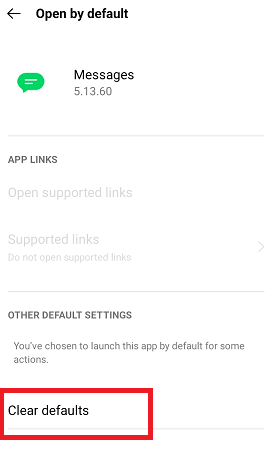
Default App SettingsYou might notice that tapping on some files prompts multiple app options to open that file. It means no default app has been set to open such a file. When you set the default app for a specific file type, the file always uses that app to open it. If you want to change the current default, visit the default app settings:
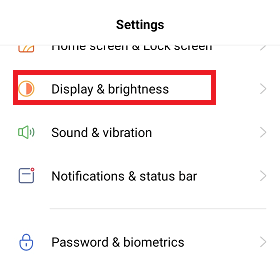
Change Brightness SettingsWe all access our Android phones on variant light intensity (day, night) may require adjusting device brightness for comfort on your eyes. If you recently purchased your phone and want to adjust its screen brightness, here are the steps:
Besides the above brightness settings steps from Settings, you can directly adjust screen brightness by dropping down from the top screen of your device. In the Quick Setting panel, adjust the brightness slider or tap "Eye comfort". Change Privacy SettingsThe privacy settings allow you to choose various apps, lock, hides app, and adjust limit ad tracking. These settings protect your device and apps from unauthorized users and online trackers. Follow the steps below to access device privacy settings:
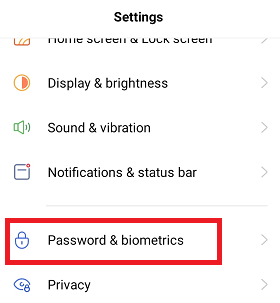
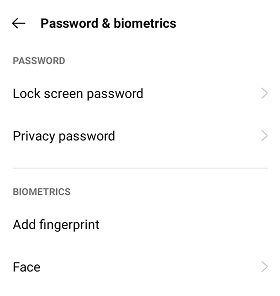
Password and Biometrics settingsPassword & biometrics are very sensitive and lock your device screen and apps from unauthorized users. Several types of password & biometrics protections are available, including password pin, patterns lock, face lock, or fingerprint. If you want to set up password & biometrics for your device, the following are the steps mentioned below:
Change Keyboard SettingsIf you want to customize and change your keyboard settings as per your choice, like changing default language, theme, clipboard, and appearance types. Follow the steps mentioned below (however, different phone model has different steps):
Reduce Data UsageIf you have limited data to use, this setting gets helpful for you. Data saver mode setting is mainly done when you don't have a Wi-Fi connection or an unlimited data pack to use internet service. Enabling data saver mode reduces data usage, and it stops the background running app from consuming your data pack. Following are the steps to enable data saver mode from the Android phone settings menu:
Location settingIf you don't want to share your location unnecessarily with Google or its services or any other apps, disable the location option. There are two ways to access location settings, i.e., from the Settings menu or the Quick Settings panel. Following are the steps to enable/disable device location:
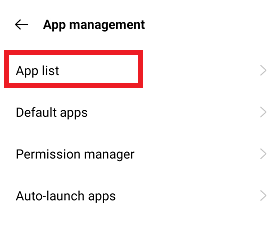
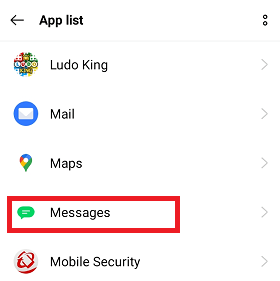
Change Default App SettingsThere are certain default launcher apps to perform a specific task, such as Contact for the call, Messages for SMS, Chrome for browsing, etc. If you want to change the default app to some other, you can also do so. Follow the steps mentioned below to change the default app setting:
Search the Settings Menu on AndroidDifferent device manufacturers offer different structures to access the settings menu. If you find it hard to locate any setting option that you want to change, there is a search box (or search icon). You can search for the specific setting keyword from the search box to locate it quickly. However, first, you have to visit the Settings page. As discussed above, you can access Settings by opening the Settings app or swapping down from the top of the screen and tapping on the gear icon. The primary purpose is to find a search bar or icon (looking like a magnifying glass). Here is what it looks like in a Realme phone: Once you find a search box, enter the search keyword you are looking for. You will find related results underneath. Pay attention to small texts that indicate the location of the setting menu you are looking for. 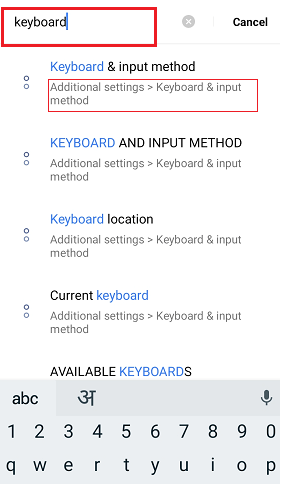
Tapping on the relevant result takes you to that location in Settings. Now, you can customize the Settings menu from the actual setting location. 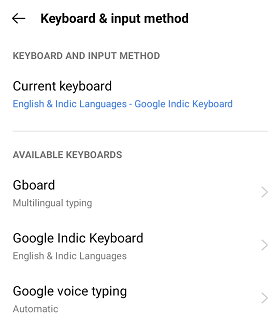
Quick Settings Menu on AndroidBesides the Settings app for Android phones or tablets, there has been a Quick Setting panel since Android Jellybean to instant set setting menu. Below we have mentioned some of the standard and widely used Settings options from the Quick Setting panel. 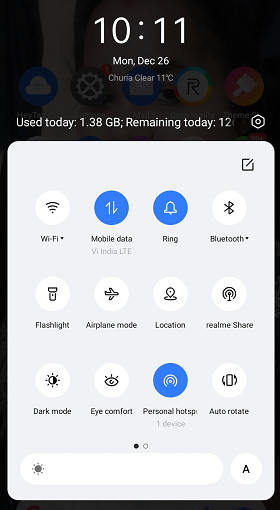
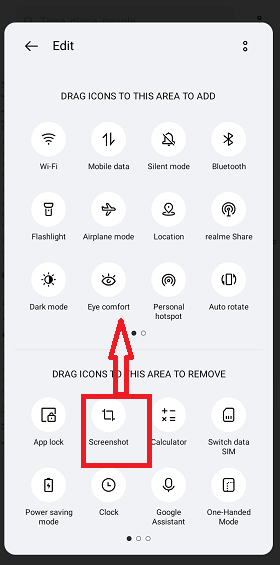
Use Quick Settings when your Phone is LockedQuick Settings is the most straightforward panel to enable or disable device features and settings. You can even use Quick Settings when your phone is locked; you don't need to unlock it. However, Quick Settings offer limited setting menus, which are very common and widely used. You can instantly enable/disable Wi-Fi, turn on a flashlight, access Bluetooth, etc. But when you try to access such settings option that needs user authentication, it prompts you to unlock your device to proceed further. Airplane ModeAirplane mode controls the device's cellular network and Wi-Fi connection. Enabling/disabling the Airplane Mode tile turns off/on the device network. Also, you can long-press on the Airplane tile icon to view the Wireless and Networks settings options. BatteryThe Battery icon is very much familiar to phone users. It indicates how much the device battery has charged. It also displays whether the battery is currently charging or not. If you tap the Battery icon while the phone is on the charge, you will see a graph of your recent battery use. If you tap the battery icon while your phone is not charging, it will turn your phone into power (Battery) saving mode. Enabling power saving mode dims screen brightness and conserves battery power. FlashlightEnabling the flashlight icon turns on the flash from your phone's backside and helps you capture photos even in a low-light place. You can also use it in a dark place or at night for visibility, and just toggle it on or off to use it without unlocking your phone. CastThe cast icon can quickly connect to Chromecast and other Google-Home-installed devices. Using this setting option, you can mirror your Android phone's screen to Chromecast devices. There is also some app like Netflix, Pandora, YouTube, or Google Play that allows casting Android device screen on some other supported big-screen device. Edit Your Quick Settings MenuIf you don't find any quick setting function on the home screen of the Quick Settings panel, edit it. To edit Quick Settings menu options, you must unlock your phone first.
Next TopicBest Rooting (Root) Apps for Android
|


 For Videos Join Our Youtube Channel: Join Now
Feedback
- Send your Feedback to [email protected]
Help Others, Please Share


