| |

How to Install Httpd in Ubuntu?This article will guide you in installing httpd on a computer system consisting of the Ubuntu operating system. Before diving into the installation guide first let us understand what is httpd. What is httpd?In Ubuntu, httpd refers to the Apache HTTP Server, which is a popular open-source web server software. It is designed to serve web pages and applications over the internet and is widely used for hosting websites and web applications. The Apache HTTP Server is a cross-platform software that can run on various operating systems, including Ubuntu. It is designed to be modular, allowing developers and administrators to add or remove modules to customize the server's functionality. This modular design makes it highly configurable and adaptable to a wide range of use cases. Some of the key features of the Apache HTTP Server include SSL/TLS encryption, virtual hosting, URL rewriting, authentication, and authorization. It also has a large and active community of developers and users who contribute to its ongoing development and support. The Apache HTTP Server is known for its stability, security, and performance, and it has a large and active community of developers and users who contribute to its ongoing development and support. It is also compatible with a wide range of third-party modules and extensions, allowing users to extend its functionality and integrate it with other software. In Ubuntu, httpd is typically installed using the apt-get command, and the configuration files for Apache HTTP Server are located in the /etc/apache2/ directory. By default, the Apache HTTP Server listens on port 80 for incoming requests, but this can be changed in the configuration files if needed. One of the most important configuration files is the httpd.conf file, which contains global server settings such as the server's port number and document root directory. Other configuration files, such as ssl.conf and vhosts.conf, can be used to configure SSL/TLS encryption and virtual hosting, respectively. Overall, the Apache HTTP Server is a powerful and flexible web server software that is well-suited for hosting websites and web applications on Ubuntu and other operating systems. Its modular design and extensive feature set make it a popular choice among developers and system administrators. Steps to install httpd in UbuntuTop of Form Bottom of Form In this guide, we will cover the steps required to install httpd on Ubuntu. Step 1: Update your package list Before we begin the installation, we should make sure that the package list on our system is up to date. This can be done by running the following command in the terminal: Step 2: Install the httpd package Once we have updated our package list, we can proceed to install the httpd package by running the following command: This will install the Apache web server along with its dependencies. 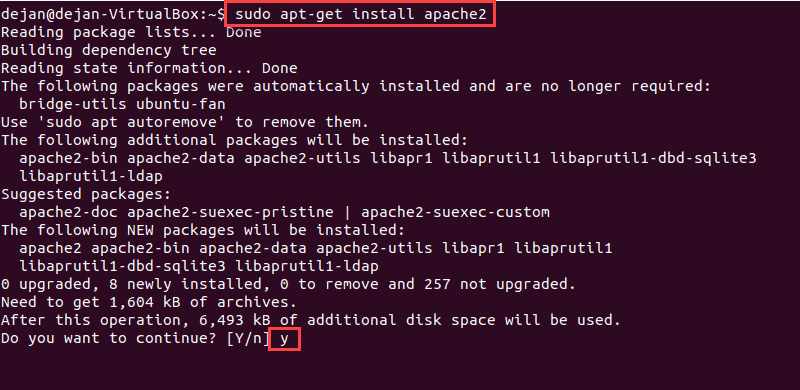
Step 3: Verify the installation After the installation is complete, we can verify that httpd is working properly by accessing the default page in a web browser. To do this, we need to enter our server's IP address or domain name in the address bar of the web browser. If httpd is installed correctly, we should see a page that says "It works!". Step 4: Configure the firewall If we have a firewall enabled on our system, we need to allow incoming traffic to the httpd server. By default, httpd listens on port 80 for incoming requests. To allow incoming traffic on this port, we can use the ufw firewall utility that comes pre-installed with Ubuntu. To allow incoming traffic, we can run the following command: Step 5: Configure httpd After verifying that httpd is working correctly, we can proceed to configure it according to our needs. The main configuration file for httpd is located at /etc/apache2/apache2.conf. We can edit this file using a text editor such as nano or vim. For example, if we want to change the default document root directory, we can edit the following line: and replace /var/www/html with the desired directory. Step 6: Enable modules httpd comes with several modules that provide additional functionality. By default, some of these modules may not be enabled. To enable a module, we can use the a2enmod command followed by the module name. For example, to enable the rewrite module, we can run the following command: Step 7: Restart httpd After making any changes to the configuration, we need to restart httpd for the changes to take effect. We can do this by running the following command: This will restart httpd and apply any changes that we have made to the configuration. In this guide, we covered the steps required to install and configure httpd on Ubuntu. We started by updating our package list and then proceeded to install httpd using apt-get. After verifying that httpd was working correctly, we configured it according to our needs, enabled modules, and restarted the server. By following these steps, we should now have a fully-functional web server running on our Ubuntu system. Hope you understood this topic.
Next TopicLinux Laptop
|
 For Videos Join Our Youtube Channel: Join Now
Feedback
- Send your Feedback to [email protected]
Help Others, Please Share


