| |

How to Install PhpMyAdmin in Ubuntu 16.04?IntroductionphpMyAdmin is a administration tool to handle MySQL database. It was created to provide a user interface so that database can be managed easily. PhpMyAdmin is an open-source and free administration tool for MariaDB and MySQL. Specified primarily in PHP as a compact web application, it has one of the most famous administration tools of MySQL, mainly for web hosting services. PhpMyAdmin supports a huge variety of tasks with MySQL. Continuously used tasks are supported via the user interface (handling database, permissions, users, indexes, relations, fields, tables, etc.), while we still have the capability to directly run any SQL statement. Brief History of phpMyAdminTobias Ratschiller, an IT consultant, and the Maguma software company's founder, started to operate on a PHP-based web front-end in 1988 to MySQL, influenced by MySQL-Webadmin. In 2000, he abandoned the project because of insufficient time. PhpMyAdmin has become the most famous MySQL administration tool and PHP application, with a major community of contributors and users. At SourceForge, a company of three developers enrolled the phpMyAdmin Project and took over the improvement in 2001 to coordinate the increasing patches. The downloads and the main website left SourceForge in July 2015 and moved to the content delivery network. The releases started to be PGP-signed at the same time. Later, the mailing lists were relocated, and issue tracking was shifted to GitHub. Before the 4 version, which extensively utilizes Ajax to increase usability, the application utilized HTML frames. Features of phpMyAdminThe program provides several features, including:
Using different parts of phpMyAdminDatabasesWe will see a list with every database managed by the database user inside the Databases tab. Once we click on the selected database name, we can start handling that database. We will find a table along with the number of rows and the tables, the used collations, the overhead and the total size, and the indexes and the data size. SQLWe can implement a MySQL query to the MySQL server with the help of this tab. We only need to enter the query, press the Go button, and then the phpMyAdmin tool will run the query and give the results through it. StatusWe can see detailed information associated with the MySQL server from the last reboot inside the Status tab. We can find the traffic managed by the MySQL server, the biggest simultaneous connections, the aborted and the failed attempts, the total count of queries transferred to the server, the total count of connections, and more associated details. ExportWe can export the content of our database tables in several formats, including XML, Microsoft Word, Microsoft Excel, PDF, SQL, CSV, and various others. We can choose every database table or simply select a few of them. We can include custom comments inside the exported content header. We can determine whether to ship only the data, the database structure, or both of them. We can ship the database tables within a file, or we can visualize many queries on the screen directly. ImportWe can import all database tables through a file stored on our local computer inside the Import tab. We can scan the file for importing and picking its character set with the drop-down menu. The timeout of the MySQL server can be reached if the file is too large. In such a situation, we can delay the import action. After that, we can proceed with data import specifying all queries to be bound from the file start. We can bound the imported queries and proceed from the interruption point. We can also select the SQL server mode of our imported file. We can search for more information inside the documentation of Server SQL Modes. SettingsWe can set up phpMyAdmin the way we want it to inside the Settings tab. VariablesEvery current variable of MySQL and its values are available in Variables. CharsetsWe can see every collation and charset supported via the MySQL server inside the Charsets tab. PluginsThis tab displays a list of every installed MySQL plugin currently and details of them, including version and description. EnginesThis tab launches a page and a list of every engine supported via the MySQL server. MyISAM is the default one. Another famous storage engine is InnoDB utilized by several databases. More details about the engines of the MySQL server can be detected in the official documentation. Managing databases with phpMyAdminManaging our database is the primary purpose of the phpMyAdmin tool. We will discuss how to utilize various functionalities of phpMyAdmin. When we launch the home page of phpMyAdmin, press Databases and choose a database for managing by pressing its name. We will find a list and the database tables, the permitted operations with them, the storage engine, the total records, the table size, the collation, and the overhead in the page. The possible operations which we can implement to a selected table are:
The table using the existing records can only be browsed. When we press the Browse option, a new page, and the record list will be opened in the table. By pressing the Edit option, we can edit ye selected record.
By pressing Structure, a new page will appear that displays the structure of the database table. We will find the field's names, types, attributes, collations, additional other information, and default values (whether the values of the field can be NULL). We can browse for different values by pressing the associated action icon. We can also edit the structure of a field or remove a field. We can specify distinct indexes: Fulltext, Index, Unique, and Primary.
We can produce a search query for the selected table using the Search button. We can use the Query by example feature to implement a search. We just need to use the distinct fields for structuring our search query and press the Go option to run it. For instance, if we wish to visualize every record and a field value that begins with "a", we should first choose the fields which we wish to display. Select the LIKE operator using the drop-down menu and input in the related field value "a%" (where % is used for a wildcard string). Press Go to view the output.
We can insert in our database table with the Insert option. Once we enter in the related values, press the Go, button and a new record will be added.
We can remove the entire database table and every record saved in it using the Drop button.
It permits us to empty any database table, remove the data, and keep the empty table. Usage of the Operations of phpMyAdminThere are distinct operations that we can implement on the entire database and a different table.
We first need to open our phpMyAdmin tool from our Site Tools and go to Databases. Choose a database and then navigate to Operations. A new page will open on which we can see every possible operation which we can apply to a database.
In phpMyAdmin, we should choose a desired table and press the Operations button to implement the related operations on the database table.
Installation of phpMyAdminIn this tutorial, we are installing and phpMyAdmin. Installation process includes the following steps. 1) Check phpMyAdmin First check, is phpMyAdmin already installed by using localhost/phpmyadmin on the browser. 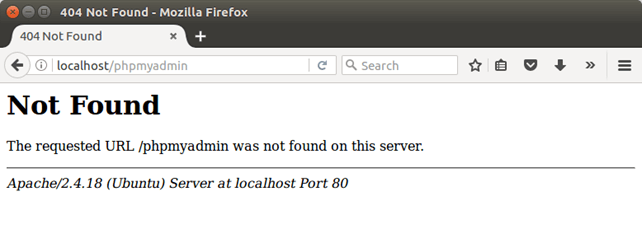
It displays Not Found message, it means phpMyAdmin is not installed. Now, lets install it. 2) Install phpMyAdmin Use the following command to the terminal. 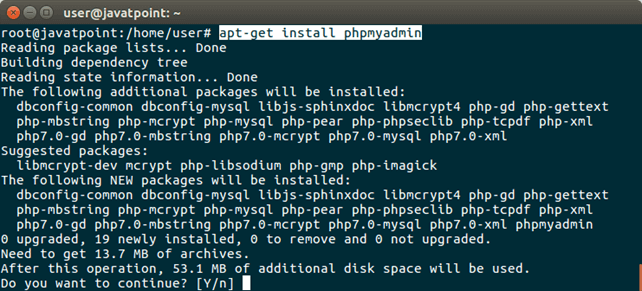
3) Configure with Apache Web Server During installation, it will prompt to configure phpMyAdmin with web server. Select apache2 and 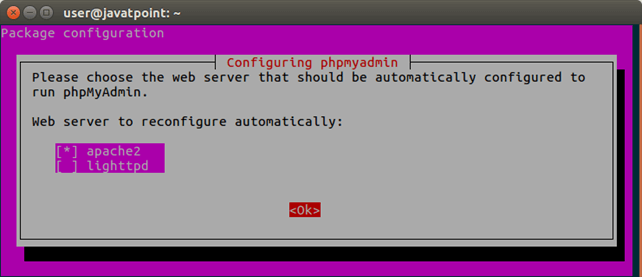
click Ok. 4) Configure Database MySQL Click Ok to configure phpMyAdmin with MySQL. 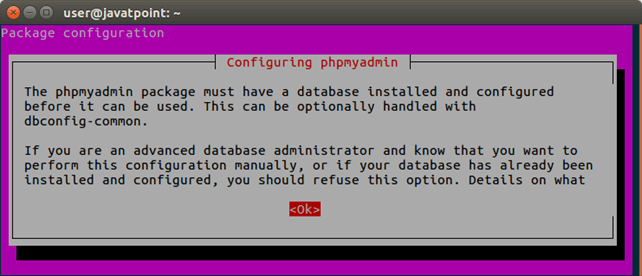
After clicking Ok, it asks for configure using dbconfig-common tool. 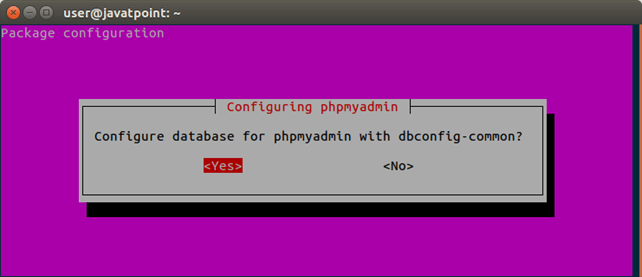
Provide MySQL password, so that it can connect and load databases to the user interface. 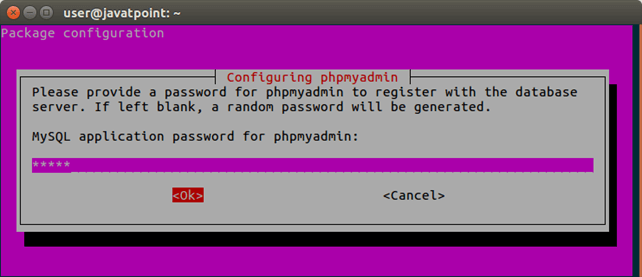
Provide MySQL password once again for confirmation. 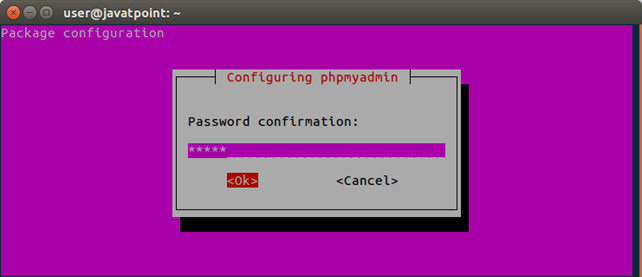
Click Ok, and all set. Now, access phpMyAdmin using localhost/phpmyadmin over the browser. 
It shows a login panel to access MySQL by using phpMyAdmin. Till now, we have successfully install phpMyAdmin in the Ubuntu 16.04.
Next TopicHow To Install Composer In ubuntu
|
 For Videos Join Our Youtube Channel: Join Now
Feedback
- Send your Feedback to [email protected]
Help Others, Please Share


