How to use chkdsk Command in Windows?
The chkdsk command is a command-line utility that checks the file system integrity on a hard disc or another storage device. Check disk is another name for it. The drive's performance and stability are checked with this Command for faulty sectors, missing clusters, directory errors, and other problems. If the file system needs repair, it can also be employed. The Command can be used from a scripted automated programme and the command line.
Chkdsk will show the state of the disc and a menu if it is run without any parameters. Additionally, it can be used to show the current file system status, the amount of free disc space, the amount of disc space consumed, and the amount of available disc space. Chkdsk can check the disc for faults, correct mistakes, and retrieve lost files if specific parameters are specified.
Chkdsk Command Availability
In the following operating systems, you can use the chkdsk command:
- Windows 10
- Windows 8
- Windows 7
- Windows Vista
- Windows XP
In addition to Advanced Start-up Options and System Recovery Options, the chkdsk command is accessible in the Command Prompt of Windows 10, 8, 7, Vista, and XP. MS-DOS, Windows 2000 and XP's Recovery Consoles have it.
CHKDSK in Windows 10
To check your hard disc, external drives, and any SSDs, use CHKDSK (check disc).
Run CHKDSK in Windows 10's File Explorer:
- File Explorer should be launched. Right-click the drive that houses Windows OS (often C) to access properties.
- Click Check on the Tools tab after navigating there.
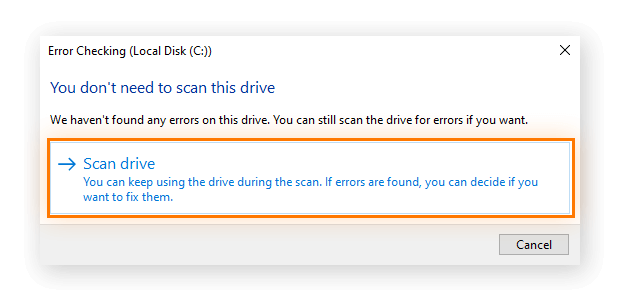
- If there are no problems found, the prompt lets you know that you don't need to scan this drive. If you want to continue scanning the drive, click Scan drive.
- After CHKDSK is complete, click Show Details to view any fixed mistakes or click End to close the window.
Run CHKDSK in Windows Command Prompt:
- In the Start menu's search box, enter cmd (Command Prompt), and then click Run as administrator.
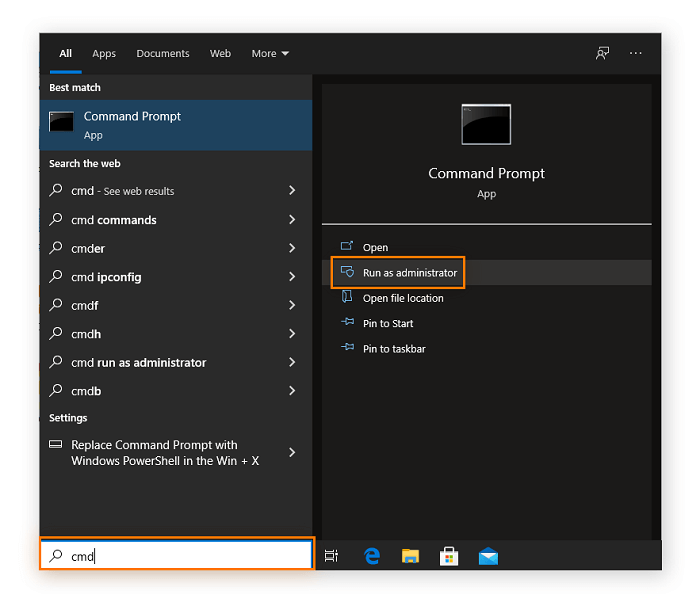
- Hit Enter after entering chkdsk. CHKDSK will check for drive faults and inform you if any were discovered that you should address, but it won't attempt to do so without a command.
Run CHKDSK using the installation media.
- Restart your computer after inserting the CD, DVD, or USB drive that contains bootable Windows installation software.
- Press the F8 key several times before the Windows logo shows.
- If given the option, choose to Repair your machine.
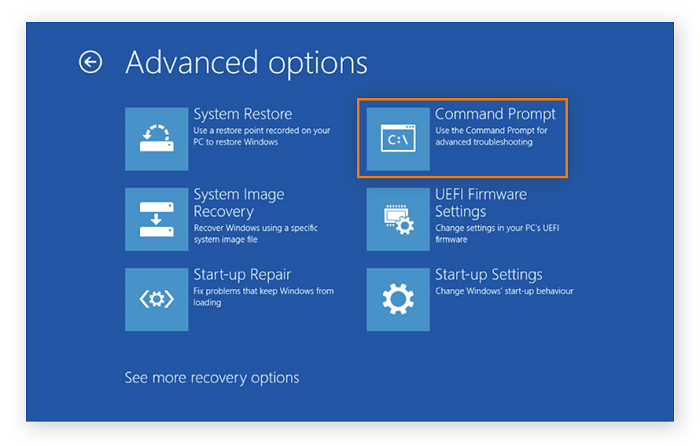
- Select Advanced Options after clicking Troubleshoot.
- Choose Command Prompt.
Note: Ensure you are aware of the drive or drive partition on your computer that houses Windows (usually the C drive). Enter "c:" and write "test" to see whether it works. Next, enter dir and press Enter. If there are any Windows items visible in the directory, then this is your home drive. Continue doing that for each drive until Windows items display.
- Now type the CHKDSK instructions of your choice into the Command Prompt.
- When asked to execute CHKDSK the following time, your computer restarts, enter Y and click Enter.
CHKDSK in Windows 8
- Open the Charms bar by pressing the Windows Key + C.
- Select Search.
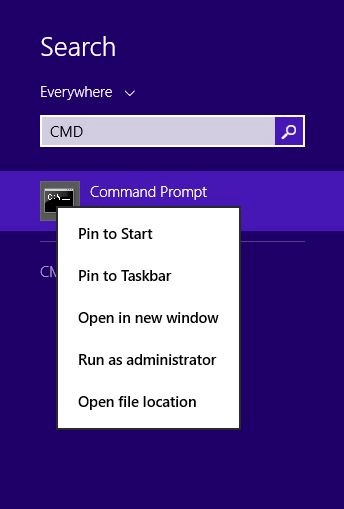
- Input "cmd" and hit Enter.
- To run as administrator, right-click the Command Prompt icon and choose Run as.
- Enter after typing "chkdsk /f /r".
- Type in "Y" when asked if you want to schedule a disk check and press Enter.
- Reboot your Computer.
- When the Computer reboots, the disk check will start automatically.
CHKDSK in Windows 7
- Press the Windows key on your keyboard and the letter "X" to open the Power User menu.
- Select the "Command Prompt (Admin)" option.
- Type "chkdsk" followed by a space and the drive letter you wish to check, for example, "chkdsk c:"
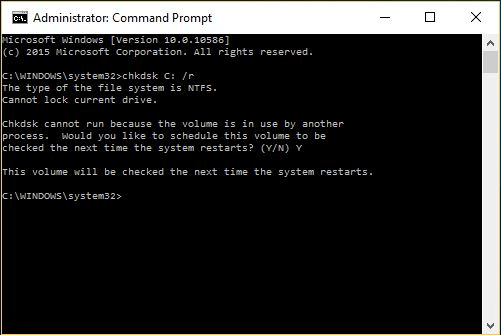
- Press Enter to initiate the CHKDSK scan.
- If you want CHKDSK to run the next time your computer starts, enter "y" and hit Enter.
- Restart your Computer for CHKDSK to run.
- Once CHKDSK has finished running, it will display the scan results.
CHKDSK in Windows Vista
- Click the Start button and select Computer.
- To check a hard disc, right-click it and choose Properties.
- Click the Check Now button after choosing the Tools tab.
- The dialogue window for Check Disk will appear. Check both boxes to scan the drive for errors and to attempt to fix any errors it finds.
- Click Start.
- When the Computer restarts, a notification will ask if you wish to schedule a disc check for that time. To schedule the disc check, select Yes.
- To start the disc check, restart your computer. It will take a while for the disc check to finish. Once it is done, the Computer will restart again, and you will be able to check the results.
CHKDSK in Windows XP
- Click Start, then Run.
- Type "cmd" in the box and press Enter.
- Type "CHKSDK" and press Enter.
- Type "/f" and press Enter to initiate a "fixing" of any errors found.
- Type "/r" after "/f" to initiate an "in-depth" scan of the drive for any bad sectors.
- Press Enter after typing the parameters, and the Computer will begin to scan the drive.
- Watch for the scan to finish. Depending on the drive's size, it can take several minutes or longer.
- When the scan completes, reboot your Computer, and the errors should be fixed.
Chkdsk commands and parameters
The chkdsk command is a Windows command used to check the integrity of your hard disk and fix any errors that may have been detected.
Chkdsk command syntax:
chkdsk [drive:][[path]filename] [/F] [/V] [/R] [/X] [/I] [/C] [/L[:size]]
The following are some of the most common chkdsk commands and their respective parameters:
- /F - This parameter forces chkdsk to fix errors on the disk.
- /V - This parameter shows the complete path and file name of each file on the drive.
- /R - This parameter searches for faulty sectors and makes an effort to salvage any readable data that may be present.
- /X - If necessary, this parameter requires the volume to dismount first.
- /I - This parameter performs a minimal check of index entries.
- /C - This parameter skips cycles within the folder structure when checking.
- /L: size - This parameter allows you to specify the size of the log file (in bytes) used for the chkdsk process.
- /B - This parameter re-evaluates problematic clusters on the volume (NTFS only).
- /A - This parameter repairs disc faults automatically.
- /S - This parameter skips checking of security descriptors.
- /P - This parameter clears the reparse points on the volume.
- /Scan - This parameter performs a full surface scan of the hard disk.
- /spotfix - This repairs bad sectors found during a scan.
- /offlinescanandfix - This fixes and scans the volume offline.
- /purge - Removes any traces of files that have been declared to be gone.
The volume you are about to check cannot be locked; this is a requirement of the check desk programme. You will be informed as follows if the volume you are about to scan is locked:

If so, enter Y and press Enter to run a scan the next time your system boots.
How to change a scheduled disk check in windows?
- Search for Command Prompt in the Start Menu's search field. When you see this entry listed, click the Run as administrator option from the context menu.
- Enter the command chkntfs /t:000, replacing 00 with the number of seconds you want the countdown to last. For instance, chkntfs /t:10 indicates that CHKDSK will begin your hard disc scan after counting down from 10 seconds.
- This will alter how long CHKDSK waits to begin when it is scheduled to run during your subsequent boot.
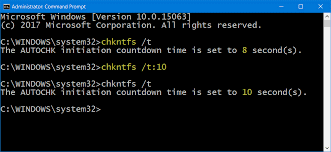
Note: From 0 to 259,200 seconds, you can enter any value (three days). If you enter 0, there won't be a countdown, and the scan will start immediately.
CHKDSK Troubleshooting in Windows
Service Host Superfetch is one of many services that Windows runs that keeps a hard disc busy. On any drives that Windows is currently using, CHKDSK cannot be executed. Before CHKDSK can make any adjustments, your drive must be idle.
The drive is active and cannot be verified, according to the error messages shown below:
- It cannot continue in read-only mode.
- Cannot lock the current drive.
- Volume is in use by another process.
Because of all these errors, the drive is currently busy. For instance, you might have a photo open and only need to close the programme to stop using the volume.
Verify if you are working on a file:
Check to see if there are any programmes you can shut using your task manager.
Use Safe Mode:
Windows could also be utilizing your drive, which is another possibility. You can avoid this at this prompt by agreeing to allow CHKDSK to execute during the subsequent Restart. Select Y.

After restarting your computer but you are still unable to perform CHKDSK, select Advanced Options in Safe Mode. To access these options, repeatedly press the F8 key during startup.
By following these instructions, you can also access the advanced options from your desktop:
- Click Settings.
- Activate Update & Security Options.
- Choose Recovery.
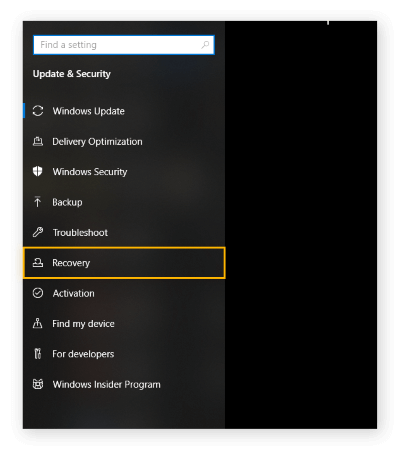
- Under Advanced Startup, click Restart now.
- Now that you've reached the Advanced Startup choices, you may easily enter the command prompt and issue the CHKDSK command on the Windows drive.
Utilizing a comprehensive maintenance programme is one approach to getting over these barriers. AVG TuneUp understands when to scan your hard drive with CHKDSK, so you can avoid going into these complicated settings. It covers everything, including cleaning junk files and emptying the browser cache.
|


 For Videos Join Our Youtube Channel: Join Now


