| |

Install NVM UbuntuIn this article, we will install NVM on the 20.04 version of Ubuntu. Node Version Manager is one of the famous tools available for the version management of Node.js. If we are a developer of Node.js or a beginner then it's very essential for us to have knowledge about this tool. We can install any Node.js version and even switch our version easily using this tool. Usually, this activity is implemented for testing the code with distinct versions. Introduction to NVMNVM can be described as a Node Version Manager tool. We can install more than one version of Node.js on one system with the help of the NVM utility. Also, we can select a particular version of the node for many applications. Also, it gives an option for auto-selecting the version of the node with the configuration file, i.e., .nvmrc. Node.js is a runtime of JavaScript for programming on the server-side. It permits developers for creating the functionality of scalable backend with the help of JavaScript, a language almost everyone is already known from web development (browser-based). NVM is used to install and manage distinct types of node.js versions in several environments of Linux. Any developer of node.js working on more than one project which needs different versions of node.js usually prefers NVM for installing, uninstalling, and switching various versions of a node rather than manually installing and uninstalling all versions needed for all projects. One can establish their applications with the help of the tool. This tool will save lots of effort and time undoubtedly. Prerequisites
Installing NVM for Node.js in Ubuntu 20.04Step 1: Updating the SystemBefore going to install any new package on our system, it's always suggested to update our system with the help of the apt-get update or apt update commands. This command will help us to download and install every currently available update using the Ubuntu repository. The command is mentioned below: 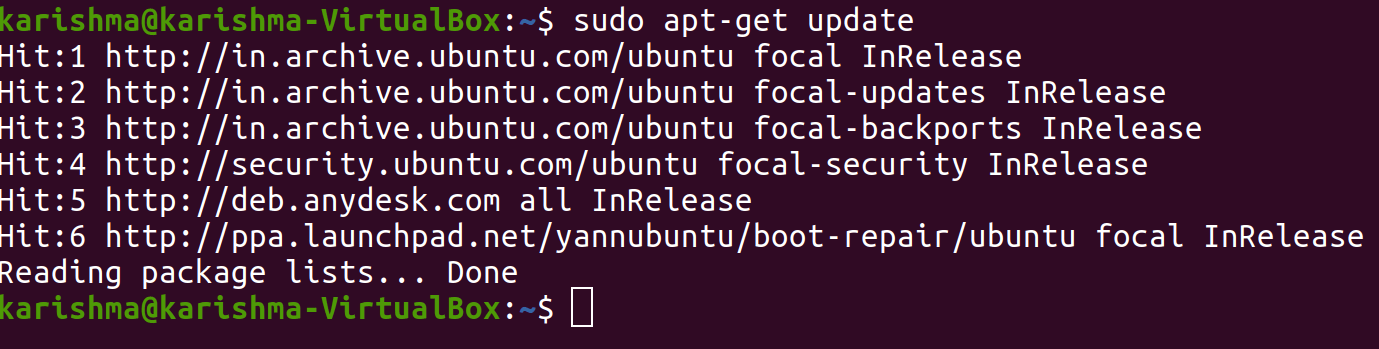
Step 2: Downloading and Installing NVM for Node.jsWe will download and install the Node Version Manager with the help of the following command after updating our server. 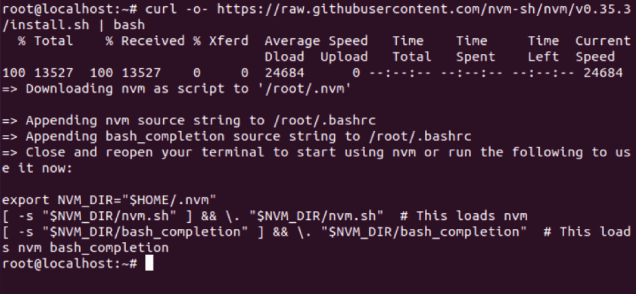
Step 3: Check the Version of NVMWe can check the version of NVM with the help of the command once NVM is successfully installed on our server. The command is mentioned below: Step 4: Installing Node.js using NVMNow we can install node.js with the help of the command after installing NVM. This command will help us to download and install the current version of Node.js using its official link. This command is mentioned as follows: 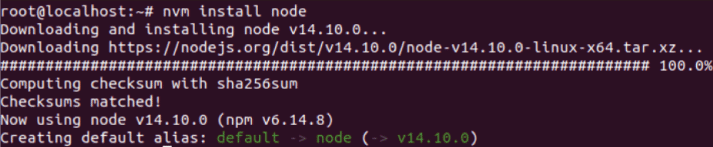
Step 5: Check the Version of NodeWe can check the version of the node in Ubuntu 20.04. We will use a command, i.e., node --version which will display the current version present on our system. Step 6: Installing Current LTS Version with --ltsIf we wish to install the current LTS version of node.js then we need to apply a command which is mentioned below. This command will find and install the current LTS version for us. We do not have to manually describe the version. 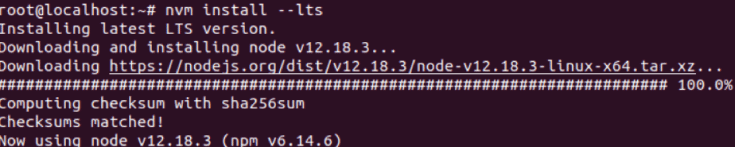
Step 7: Installing a Specific Version of Node.jsIf you wish to install a specific version of node.js then we need to apply a command which is mentioned below. We will install the 11.5 version of node.js with the help of the following command: 
We can use this command for installing any specific version of Node.js. Step 8: List Every Installed VersionIf we wish to check every installed version of node.js then we need to apply a command which is mentioned below. The following command will show different versions of the node that are currently present on our system. 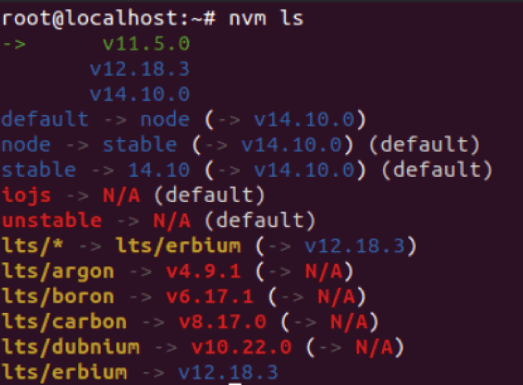
Step 9: Switch the Version of Node.jsIf we wish to switch the version of node.js then we need to apply a command which is mentioned below. We will switch the version of node.js to the 14.10.0 version with the help of the following command: 
Step 10: Uninstalling the 11.5 Version of NodeIf we wish to uninstall a particular version of node.js then we can apply the command which is mentioned below. We will uninstall the 11.5 version with the help of the following command. If we execute the following command then we will not see the 11.5 version in the list after the uninstallation process. 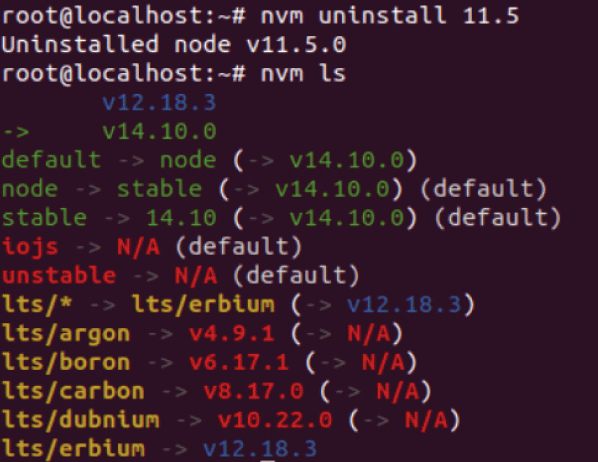
Step 11: Installing Stable Version of Node.jsIf you wish to install the stable version of node.js then we can apply the following command. 
We may have noticed that we aren't describing any specific version here. Hence, this command could be used if we do not know the current stable version.
Next TopicInstall JDK Ubuntu
|
 For Videos Join Our Youtube Channel: Join Now
Feedback
- Send your Feedback to [email protected]
Help Others, Please Share


