| |

Install Virtualenv UbuntuIntroduction to VirtualenvIt is a tool to make separate Python environments. Since the 3.3 version of Python, a subset of virtualenv has been developed into the standard library upon the module, i.e., venv. This module doesn't provide every aspect of this library for naming, only some more prominent ones.
The common problem being described is one of the versions, dependencies, and permissions indirectly. Suppose we have software that requires LibFoo version 1, but another software needs 2 version. How can we use these libraries? If we install everything into our host python (for example, python 3.8), it is easy to end up in a condition in which two packages have clashing requirements. Or what if we wish to install software and leave it be? If the software works, any modification in its library or those library versions can break the software. What if we can also not install packages into the global directory, i.e., site-packages, because of not having permission to modify the host Python environment? In each of these situations, virtualenv can aid us. It makes an environment that includes its installation directories that do not share libraries with any other virtualenv environment (and do not access the installed libraries globally). Virtualenv has a common command: It will establish a Python virtual environment of a similar release as virtualenv, installed into the venv subdirectory. The command line tool has some flags that change the behavior of the tool. For a complete list, make sure to inspect CLI flags. These tools work in two different phases:
Note: In our virtualenv, the python is isolated effectively from the python that was utilized to establish it.In Python, a virtual environment is composed of two necessary elements: the Python interpreter, in which the virtual environment executes, and a folder having third-party libraries in the virtual environment. They are separated from several virtual environments, which defines any modifications to dependencies in a virtual environment do not impact other virtual environment dependencies or the system-wide libraries. Hence, we can establish two or more virtual environments using several Python versions and the same or different libraries in different types of versions. Why do we use Python Virtual Environments?The usage of Python virtual environments becomes possible if we have several Python projects on a similar device that rely on different releases of similar packages. Some other use cases that define the essential usage of Python virtual environments are if we are working on production environments or managed servers where we can not change the system-wide packages due to specific requirements. These virtual environments build separated contexts to carry dependencies needed by different types of projects isolate so they do not conflict with system-wide packages or other projects. Usually, setting up any virtual environment is one of the best ways to separate many Python projects, mainly when these projects have conflicting and different dependencies. How to Use a Python Virtual Environment?Create Python Virtual EnvironmentFirst of all, we need to create a project folder and establish a virtual environment in it. Then, launch the terminal window, input the below command, and press the enter button: We now need to apply the venv command to establish a virtual environment in the project folder. The command is below: Important: Two tools are available that are used to set up virtual environments, venv and virtualenv, that we can almost use interchangeably. The virtualenv tool supports previous Python versions and requires to be installed with the help of the pip command. Besides, the venv tool is used with the 3.3 or higher versions of Python and is added to the standard library of Python, needing no installation. Turn on Python Virtual EnvironmentWe need to execute the below command to turn on the virtual environment we made in the above steps: As we have seen after turning on the virtual environments, the name occurs at the beginning of the terminal prompt in parentheses. Executing the which python command is also a way to guarantee that this virtual environment is running. If we execute this command, it displays the position of the Python interpreter in the virtual environment. We can see the position in the virtual environment using the following command: It is good to be aware that the Python releases of the virtual environment are similar to the Python release used to establish the environment. We can see the Python release in the virtual environment using the following command: How to install Packages in the Python Virtual Environment?Now, we are in a separate virtual environment in which only setup tools and pip are, by default, installed. Let's inspect the pre-installed packages in the virtual environment by executing the pip list command: Before we wish to use pip for installing a package, we should upgrade it first to the latest version. Because we are working in the virtual environment, the below command upgrades only the pip tool within this environment, not inside the system-wide or other virtual environments. How to Reproduce the Python Virtual Environment?It is very common for reproducing any virtual environment. First, we need to list every dependency installed in the virtual environment of the project with the help of the pip freeze command, which is mentioned below: The result of using the pip freeze command is quite the same as the pip list command. However, it provides the package list installed in an accurate format on an environment for reproducing it using similar package versions that are required by the project. In the next step, we will export the package list into the file, i.e., needs.txt. To do so, we need to run the following command: The above command makes the needs.txt file inside the current folder. This newly created file includes every package and its identical versions. To see the content of this file, we can use the below command: Discovery of PythonThe python interpreter is the initial thing that we should have to be able to make a virtual environment. It will tell the tool what kind of virtual environment we would like to establish; think of it as implementation, architecture, or version. If we install virtualenv under the 3.8 release of Python, virtualenv will make virtual environments by default that are also of release 3.8. Usually, established python virtual environments are not self-contained. A full python packaging is composed of several files, so it is not able to install the whole python again into a fresh folder. Rather virtual environments are simple shells that include little in themselves and borrow almost everything from the system python. It does mean that if we upgrade our system to python, our virtual environments may break, so we need to be careful. Referring to the python system, the upside of it is that establishing virtual environments can be quick. Here we will define the built-in mechanism. The CLI flag python or p permits us to define a python specifier for what kind of virtual environment we would like; that type is either:
We have the below limitations:
Given the virtualenv specifier will use the below strategy to find/discover the system executable:
Creators Creators are what configure the virtual environment as a reference as opposed to the system python. At the moment, virtualenv has two different types of virtual environments:
Seeders Seeders will install a few seed packages for us (one or more of wheel, setuptools, pip) that enable us to install extra Python packages inside the created virtual environment. There are two different primary seed mechanisms present:
Wheels For installing a seed package by either app-data or pip mechanism, virtualenv requires to inherit a wheel of the destination package. The wheels may be inherited from more than one location:
The automatic behaviour may be deactivated by the no-periodic-update configuration option/flag. To inherit the release date of any package, virtualenv will implement the below:
Users can describe a group of local paths including extra wheels with the command line flag, i.e., extra-search-dir. When finding a wheel to apply, virtualenv performs a lookup inside the below order:
Bundled wheels are each 3 above together. If the locations don't include the requested wheel release or the download flag is set will apply pip download for loading the latest release available in the index server. Distribution Embed Wheels Sometimes, custom distributions want to use their group of wheel versions for distributing rather than a single virtualenv version on PyPi. The cause for it is attempting to keep the system releases of those packages within sync with what virtualenv applies. In such situations, they should patch the virtualenv.seed.wheels.embed module, ensuring to offer the get_embed_wheel function. The MAX, BUNDLE_SUPPORT, and BUNDLE_FOLDER variables are required if they wish to use the test suite of virtualenv to validate. Activators Activation scripts are available, and these will Mangal with the settings of our shell to make sure that commands from inside the Python virtual environment take preference over our system paths. For instance, if invoking pip through our shell given the pip of the system python before activation, when we do the activation, it should refer to the pip virtual environment. Programmatic API Virtualenv provides a CLI level interface only at the moment. If we wish to encounter python environment invocation from inside python, we should be utilized the method, i.e., virtualenv.cli_run; it takes an argument, i.e., args, where we can pass the options the similar way you would from the command line. There are some arguments of the command line interface to establish a virtual environment: Parameters
Returns Creation session object Establish a virtualenv session (similar to cli_run, but it doesn't implement the creation). Use it if we wish to know what the virtual environment will look like but not establish it: Parameters
Returns Creation session object Illustrates the creation session of a virtual environment
CLI interfaceCLI flagsPrimarily, virtualenv is a command-line application. It changes the environment variable inside a shell to establish a separate Python environment, so we will need to have any shell to execute it. We can type inside virtualenv (application's name) pursued by flags that can control its nature. Every option contains sensible defaults, and there is one needed argument, then the path/name of the virtual environment to establish. The command line option's default values can be overridden by the Environment Variables or Configuration file. Environment variables take preference over the values of the configuration file. The options that can be acknowledged to virtualenv, along with a short description and their default values, are mentioned as follows: virtualenv [OPTIONS]
Creator options
Seeder Options
Activators Options
DefaultsEnvironment VariablesAlso, default values may be specified by environment variables. The setting keys are acquired from the command line option, where more than one flag is present first detected wins. Configuration fileVirtualenv finds a standard configuration file, i.e., ini. The same location relies on the operating system we are using as defined by platformdirs definition of the application configuration. The location of the configuration file is mentioned at the completion of the output when the --help option is passed. The setting keys are acquired from the command line option, where more than one flag is present first detected wins. Extend functionalityVirtualenv permits one for extending the builtin functionality by a plugin system. For adding a plugin, we need to:
Installing virtualenv in UbuntuVirtualenv is an open-source and free tool to create separate Python virtual environments. It's widely used by Python developers and programmers to test their distinct application versions with ease. All virtual environments have their Python library (which is the same as the binary version that was used for creating this environment) and can have their independent group of installed Python packages in their site directories. Basic installation tools like pip and setuptools to operate as expected using virtual environments. Step 1: Prerequisites
Step 2: Update Our Server First, we need to update every package in our system by running the sudo apt update command. It will sync our system packages with the currently available versions through the Ubuntu repository. If any system packages are required to be upgraded, we can run the sudo apt upgrade command. Step 3: Installing Python3 We will install the Python3 package with the sudo apt install python3 command in this step. It will download and install this package with each of its dependencies. 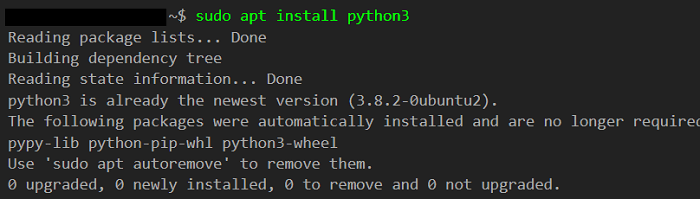
Step 4: Installing pip3 We will install the current release of the python package manager with the sudo apt install python-pip3 command because we require to have pip3 to get virtualenv. 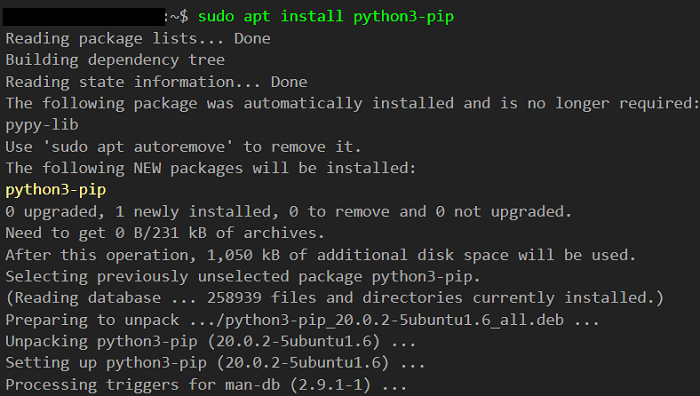
Step 5: Installing virtualenv In this step, we will install virtualenv with the pip3 install virtualenv command. If we are using a previous version of pip, we need to run the pip install virtualenv command. The command is shown in the below screenshot: 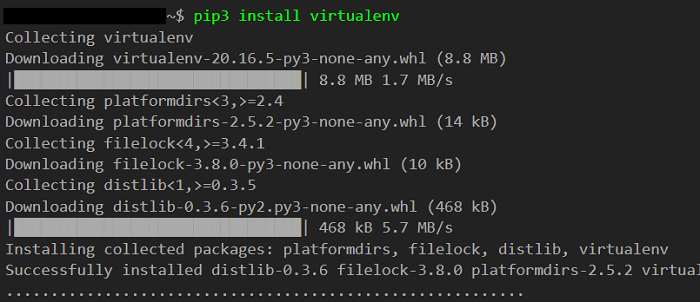
Step 6: Checking Version We need to run the virtualenv --version command to check the virtualenv installation. 
Step 7: Establishing a Virtual Environment We can establish a virtual environment with the virtualenv venv command after the installation process. 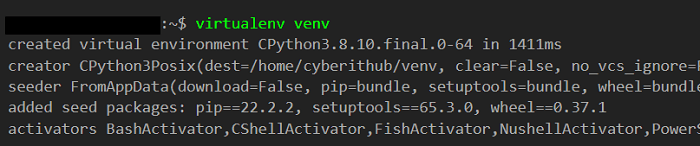
Step 8: Activating or Deactivating Environment A virtual environment can be activated or deactivated with a script in its binary directory when it is established. We need to run the source venv/bin/activate command for activating a virtual environment. We can run the deactivate command for deactivating the virtual environment.
Next TopicSafari Ubuntu
|
 For Videos Join Our Youtube Channel: Join Now
Feedback
- Send your Feedback to [email protected]
Help Others, Please Share


