JIRA Interview Questions

A list of frequently asked JIRA Interview Questions and Answers are given below.
1) What is Jira?
- Jira is a software testing tool developed by an Australian company, i.e., Atlassian.
- It is a bug tracking tool used to track the issues and bugs related to your software and Mobile apps.
- The name "Jira" comes from the Japanese word "Gojira", which means Godzilla.
- Jira is based on Agile methodology, and the current version of Jira is 6.
2) Explain Jira workflow.
Jira workflow is a set of activities performed to track and transition of an issue during the lifecycle of an issue where transition represents the link between the two statuses when an issue moves from one status to another status, and status determines the impact of the work on an issue filed by the tester.
The following are the phases that occur in a workflow:
The Jira workflow is known as defect lifecycle or bug lifecycle. The bug lifecycle consists of the following phases:
- Open issue
When the issue is created by the tester, then the issue is assigned to the software developer, and they start working on it.
- In Progress
This is the phase where the software developers start working on the issue.
- Resolved issue
When the issue is resolved by the software developer and waiting for the verification by the software tester. If the verification is successful, then the issue is closed; otherwise, the issue gets reopened.
- Reopened issue
If the verification is unsuccessful, then the issue is reopened and assigned to the software developer.
- Close issue
If the verification of the fixed bug is successful, then the issue is closed by the tester.
3) Explain the report types generated by Jira.
Jira is a defect tracking tool that creates different reports which allow you to get an overview of the current status of a project.
JIRA report is a pictorial representation of the current status of a project in the form of charts, line-charts, bar-graphs, etc.
The following are the reports generated by Jira:
- Average Age report
The average report is a bar chart that displays the average age of unresolved issues for a project or filter.
- The Average Age report is generated that depends upon the selected project, the type of issue selected in the filter, and time is chosen (hours/days/week/months).
- Created vs. Resolved Issues report
- The created vs. resolved issues report displays the difference chart between the number of issues created and the number of issues resolved within a timeframe.
- Pie chart
The pie chart is used to display the issues grouped by a specified field, and the specified field can be priority, assignee, project, issue type, etc.
- Recently created issue report
The recently created issue report represents a chart that shows the rate at which the new issues are created and how many issues are resolved during the same interval.
The resolution time report determines the length of the time taken to resolve the issues for a project/filter.
- Single Level Group by the Report
The single-level group by the report does not display the chart, but it categorizes the issues grouped by a particular field for a filter.
The time since the issue report is a bar chart that shows the number of issues of a particular data field which was set on a given date. Suppose I choose the "Created" as a data field then the bar chart shows the number of issues which are created.
4) Explain the process of how an issue is generated in Jira.
The following are the steps to create an issue:
- Click on the '+' button to create an issue. On clicking on the '+' button, the screen appears which is shown below:
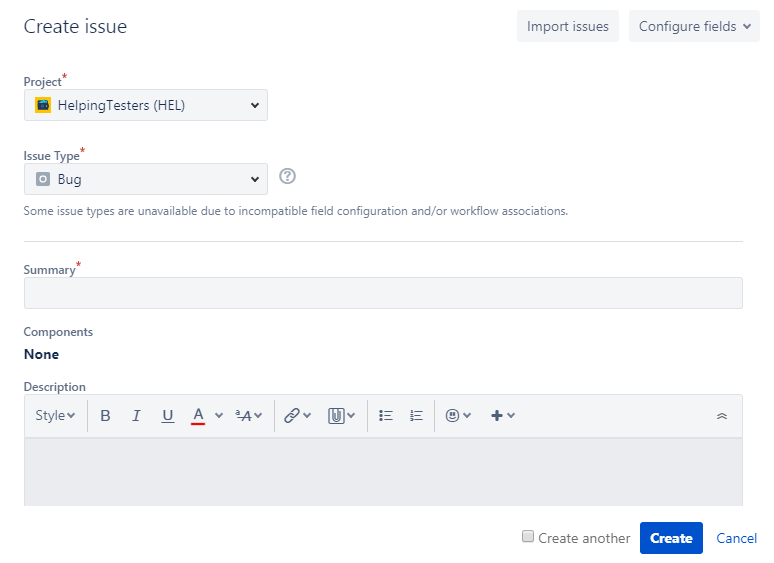
Project: It determines the name of the project.
Issue Type: It is a dropdown which displays the lists of all the issue types. You can choose either of them such as Bug, epic, task, sub task.
Summary: In the summary text field, you need to type the summary related to the issue that you are creating.
Priority: You can set the priority of an issue. It can be either medium, high, low.
When you fill all the details related to your issue, click on the create button.
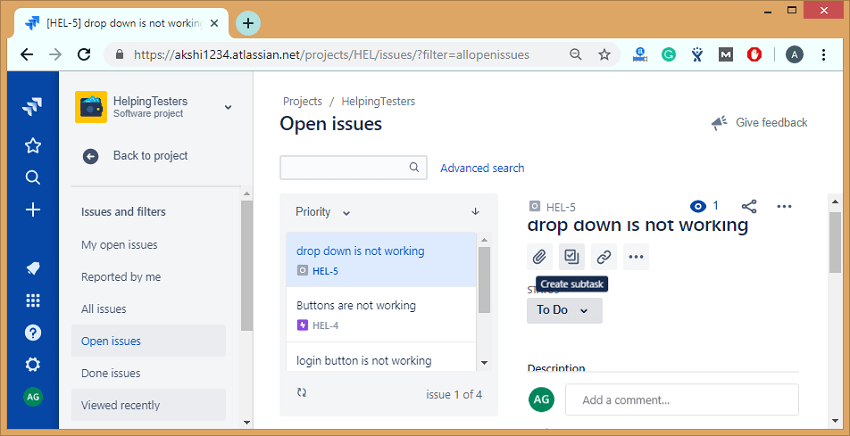
5) What is the way with which an issue can be shared with other users in Jira.
An issue can also be shared with other users in Jira. The following are the steps required to share an issue with other users in Jira:
- Suppose we have an issue that already exists in Jira, i.e., the login button is not working.
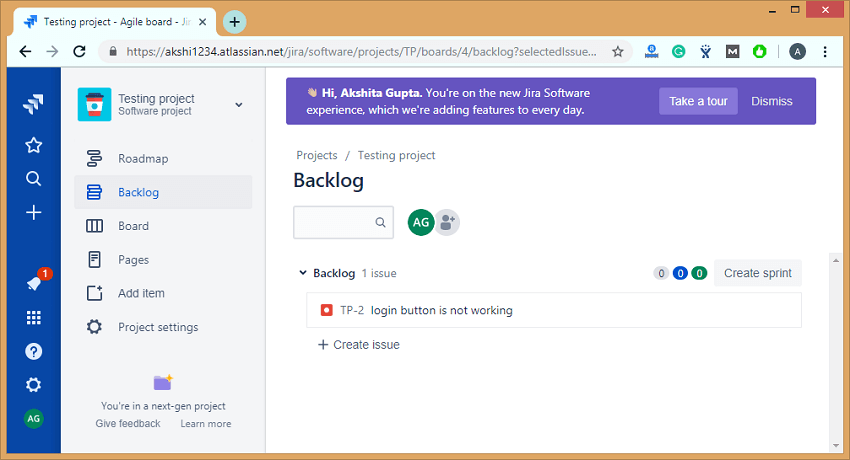
The above screen shows that an issue "TP-2 login button is not working" has been created.
- If we want to share the issue, then this can be achieved by using the share option available on the issue's description, it can be shown in the below screenshot:
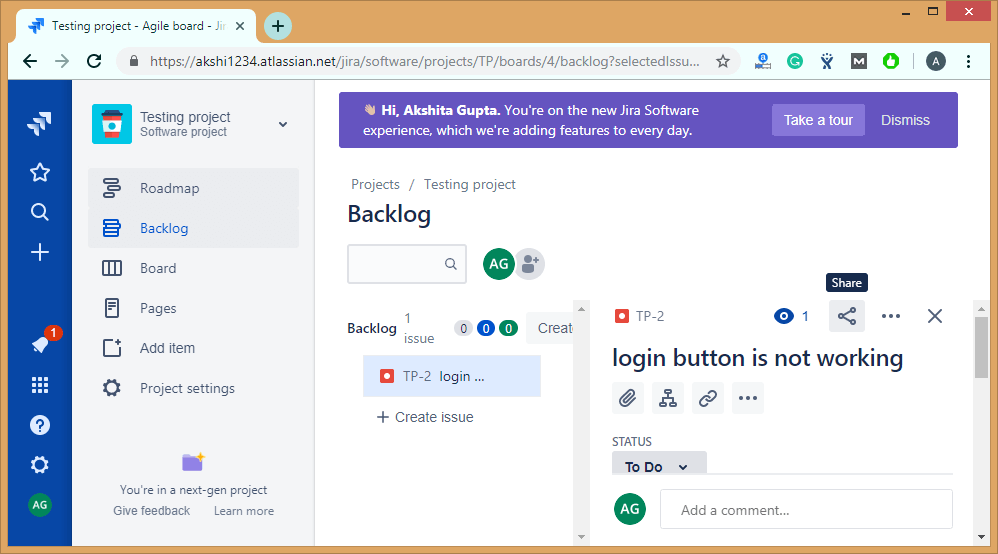
- Click on the share shown in the above screenshot. On clicking on the share, the screen appears shown below:
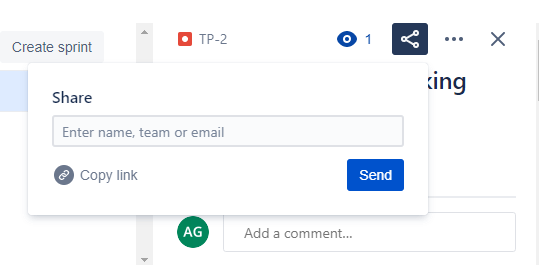
The above screen shows that the dialog box appears on clicking on the share button, and in a dialog box, you need to enter the name, team or email address of a user to which you want to share your issue.
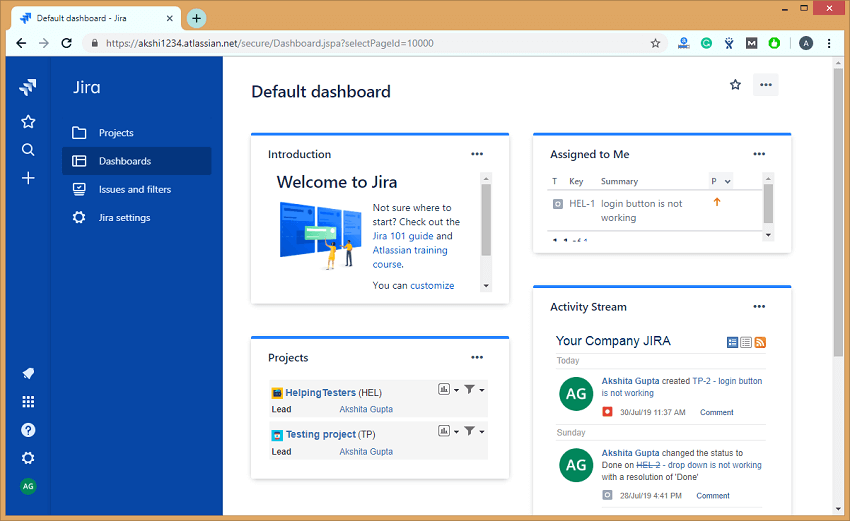
6) What is the purpose of Dashboard?
Once you log in to the Jira, Dashboard is the first display which you see. Jira admin can change the view of the dashboard, and also you can change the things that are visible on the dashboard.
A dashboard displays gadgets and apps that help the team members to track the project's progress.
The dashboard contains useful information, such as the issues assigned to the logged-in user and the user's activity stream.
On clicking on the Dashboard link appearing at the left side of the panel, the page appears which is shown below:
Following are the steps required to create a Dashboard:
- Click on the Dashboards appearing on the left side of the panel.
- Click on the (...) button appearing at the top right corner of the page.
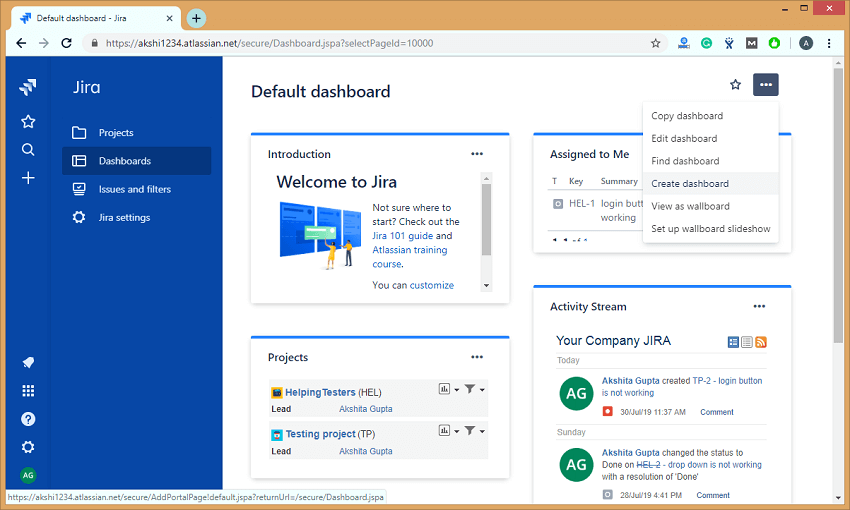
- Click on the Create dashboard option appearing in the dropdown menu of (...) option.
- On clicking on the Create dashboard, the screen appears, which is shown below:
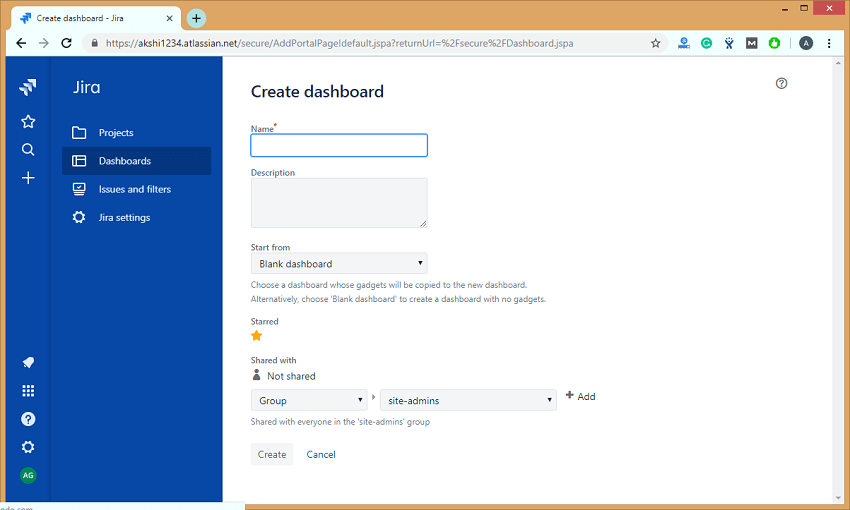
Where,
Name: It provides the descriptive name of a dashboard.
Description: It is not a mandatory field. In this field, you can add the description of a dashboard that you are creating.
Start from: Start from is a field that contains the dropdown in which you can choose either Blank Dashboard (It is a blank dashboard which does not contain any gadgets, but you can customize the dashboard according to your needs) or Default dashboard (It is pre-existing dashboard).
Shared with: Select the user and group to which you want to share your Dashboard.
7) What do you mean by scheduling an issue?
We can schedule the issues due dates which are used to track, review, and inform the team about due dates. Scheduling an issue is the most powerful feature that performs the fixed and relative date searches based on the due dates.
Advanced searches can also be performed by using the Jira Query Language.
You can schedule an issue by using the Date field. It can be done either by creating a new issue or editing an issue.
8) Explain how project details are listed in Jira?
Project in Jira comes with the main attributes, and these attributes can be a Name of the project, key, components, versions.
When you log in to the Jira, the first page that appears is the Dashboard.
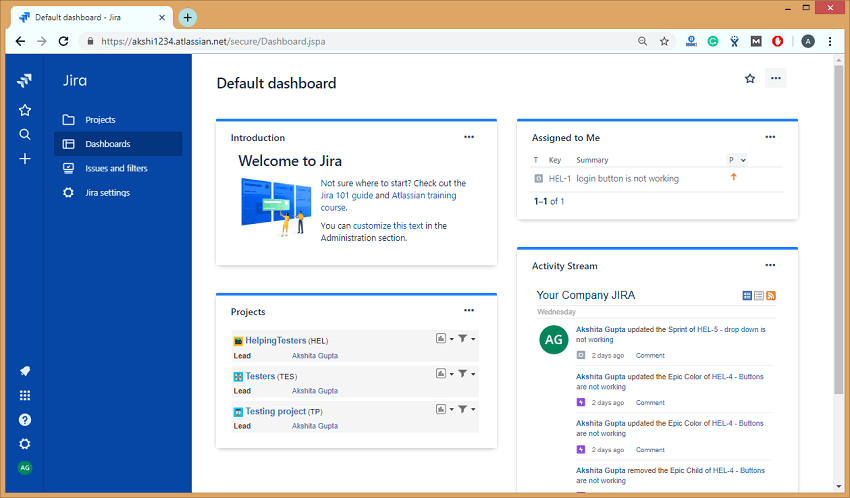
In the above screen, the right-hand side section represents the Activity Stream that contains all the activities which you performed on an issue or a project.
9) What are the issue types that are created and tracked via JIRA?
An issue in Jira can be a bug, feature, task, or any project work. Each Jira project comes with default issue types, and these issue types depend on the type of project that you are using.
There are three types of Jira projects:
- Jira Core (business projects)
- Jira Software (software projects)
- Jira Service Desk (service desk projects)
Two types of issue exist in Jira Core:
- Task
The task is a work that needs to be completed.
- Subtask
Subtask is a piece of work which needs to be done to complete a task.
Five types of issue exist in Jira Software:
- Bug
A bug is a problem that exists in the functionality of a product.
- Epic
Epic is a big user story which needs to be broken into smaller stories.
- Subtask
Subtask is a piece of work which needs to be done to complete a task.
- Task
Task is a work that needs to be completed.
- Story
The story is the smallest unit of work which needs to be completed.
Eight types of issue exist in Jira Service Desk:
- Change
It requests a change in a current IT profile.
- IT help
It requests for help related to an IT-related problem.
- Incident
It is used for reporting an incident.
- New feature
It requests for adding a new feature or capability in software.
- Problem
It is used for investigating and reporting the root cause of multiple incidents.
- Service request
It is requesting for help from an internal or customer service desk.
- Service request with approval
It is used for requesting help that requires the approval of a manager or a board.
- Support
It is used for requesting help for customer support related issues.
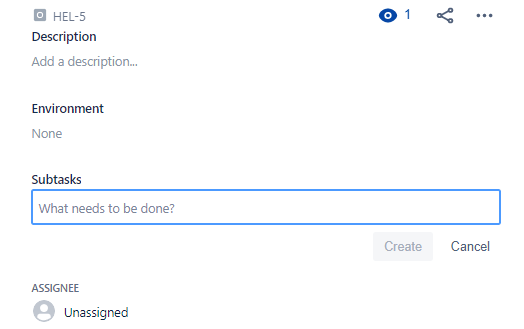
10) How is sub-task created in Jira?
The following are the steps required to create a sub-task:
Step 1: Open the issue for which you want to create the sub-task.
Step 2: Click on the icon to create a sub-task. icon to create a sub-task.
Step 3: To create a sub task, you need to enter the following screen shown in the below screen:
11) Explain the term cloning an issue?
- Cloning an issue means creating the duplicate copy of an issue within the same project. The clone issue is basically a copy of the original issue which is pertaining to the same information stored in the original issue.
- A clone issue is a separate entity from the original issue, but it can be linked to the original issue.
- Operations applied to the original issue will not have any effect on the clone issue
12) Explain Kanban board?
Kanban board is a tool used to visualize the work and limit work-in-progress.
As in scrum, we are taking some activities from a product backlog and adding in a sprint backlog. However, in Kanban, we do not have sprint, so sprint backlog activity will not be performed. This is the main difference between scrum and Kanban that scrum contains sprint backlog while kanban does not contain the sprint backlog.
Kanban board consists of three states:
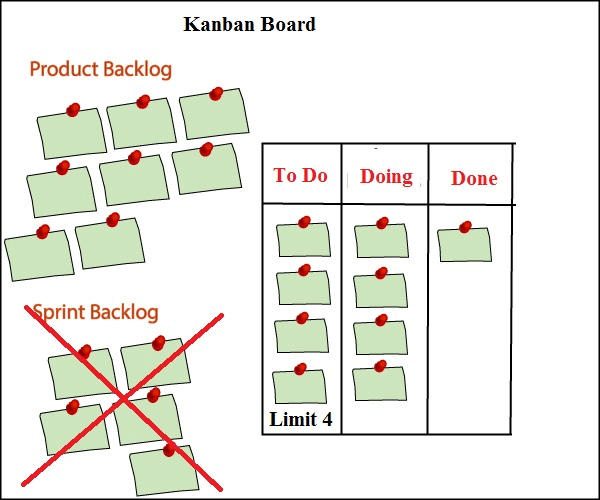
When the project is started, then we put all the activities from the product backlog to the 'To Do' state. When the team member starts working on an activity, then that activity is put in a 'Doing' state, and when the activity is placed, then it is placed in a 'Done' state.
From the Kanban board, one can get to know which activities have been done and which activities they need to develop.
One of the most important features of the Kanban board is a Limit option. In the above figure, we have eight tasks in a product backlog and limit set is 4. At a time, it will take only four tasks in a 'To Do' state, and if any of the tasks come in a 'Doing' state, then one more task from the product backlog will be placed in a 'To Do' state. In this way, we can set the limit depending on the availability of the resources.
13) Explain Scrum board?
The Scrum Board is a physical board on which the user stories present in the current sprint backlog are displayed.
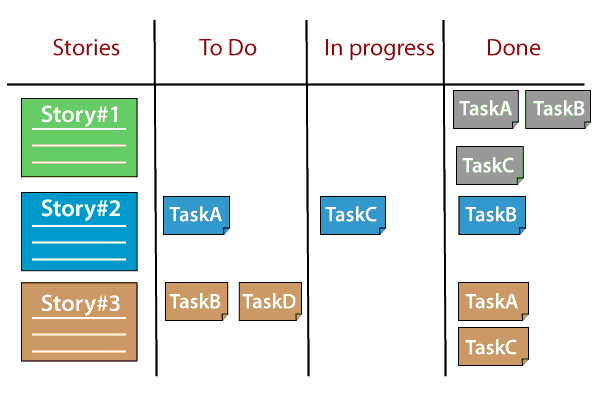
Scrum board is divided into columns such as:
- Stories: This column contains all the user stories available in the current sprint backlog.
- TODO: This state contains the subtasks of the stories on which the work has not started on.
- In Progress: This state contains all the tasks on which the work has started.
- Done: This state contains all the tasks at which all the work have been completed.
14) List all the reports generated by Kanban projects in Jira?
The two types of reports are generated by Kanban projects:
The control chart is a useful chart which helps in measuring the team's performance. The control chart displays the average cycle time of your team over a period of time. The control chart plots the following issues on the chart:
- Any issues which are outside the standard deviation known as outliers.
- It displays the average time taken to complete the tasks.
- It also displays the team's rolling average.
It displays the average cycle time of your product, version, or a sprint.
It helps you to identify whether the data from the current sprint determines the future performance of a product, i.e., the less variance in the cycle time means that median or mean can determine the future performance.
How to create a Control flow chart
The following are the steps to create a control flow chart:
- Go to the Jira official website.
- Click on the project on which you are working.
- Click on the Reports appearing at the left side of the panel.
- Select the Control chart.
- Cumulative flow diagram
- Cumulative flow diagram is a kanban tool that allows the team to view the effort and project's effort.
- Cumulative diagram consists of two axis, i.e., X-axis and Y-axis where X-axis (horizontal axis) represents the time taken to complete a task and Y-axis (vertical axis) represents the number of issues or tasks.
- The size of the area represents the number of work items currently involved in each state for the selected time period.
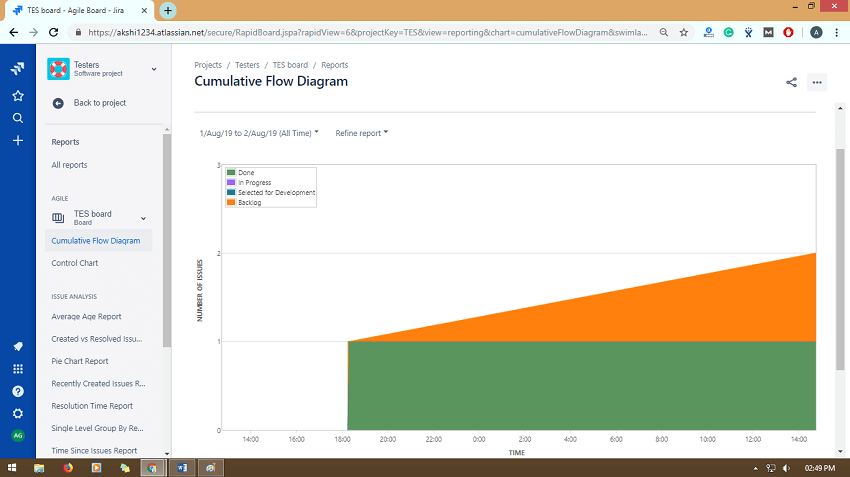
Features of Cumulative flow diagram:
- Monitor how WIP builds over time
If the line goes up, which means that WIP (Work In Progress) goes up means that the team is working on more tasks than handling them at a time. Increase in WIP results in increased cycle times, and this reduces team efficiency. So, it is important to keep the line straight.
- Observe how much team delivers
With the help of CFD diagram, we can keep track of all the tasks which have been delivered by the team. If the bottom line of the CFD diagram represents the Done state, then the slope of the line between any two points would represent the average throughput between these two points.
- Spot bottlenecks instantly
Cumulative diagram determines the exact amount of work in each state of your project. If one or more areas represent that WIP is expanding, then CFD spots this bottleneck instantly.
- Measure your past performance
The horizontal difference between the top line and bottom line at any point provides the process approximate average cycle time. The comparison between the exact cycle time and approximate cycle time provides you a good understanding of the process performance.
- Monitor your process health
Cumulative flow diagram is used to evaluate the efficiency of a process and also helps to identify the problems to achieve a stable and healthy process. The average arrival rate must be close to the average throughput to achieve a stable system, i.e., Average Cycle Time= Average Throughput.
15) List all the reports generated by scrum projects in Jira?
The following are the reports generated by scrum projects in Jira are:
- Burndown chart
Burndown chart displays the amount of work that has been completed in a sprint, and the total work is remaining.
Burndown chart is useful as it provides the following observations:
- If the team finishes its work early, which means that the team is not committed with sufficient work during sprint planning.
- If the team does not finish its work within a sprint means that they are committed with a lot of work.
- If the burndown chart drops sharply which means that the work has not been estimated properly.
How to create a Burndown chart
The following are the steps required to create a Burndown chart:
- Go the Jira official website.
- Click on the project on which you are working.
- Click on the Reports appearing at the left side of the panel.
- Select the Burndown chart.
Burnup chart is the visual representation of a sprint's completed work compared with the total scope. It is used to identify problems such as deviation from the planned project path.
How to create a Burnup chart
The following are the steps required to create a Burnup chart:
- Go to the Jira official website.
- Click on the project on which you are working.
- Click on the Reports appearing at the left side of the panel.
- Select the Burnup chart from the Reports dropdown.
The following are the important points related to the Burnup chart:
- The vertical axis represents the amount of work, and it can be measured in different ways such as Story points, issues count, or estimates while the horizontal axis represents the time in days.
-
- The distance between the lines on a chart is the remaining amount of work. When all the issues have been completed, the lines will meet.
-
16) Define a component in Jira?
Components are the subdivisions of a project and used to group the issues within a project into smaller parts.
17) How to delete a component in Jira?
Follow the below steps to delete a component in Jira:
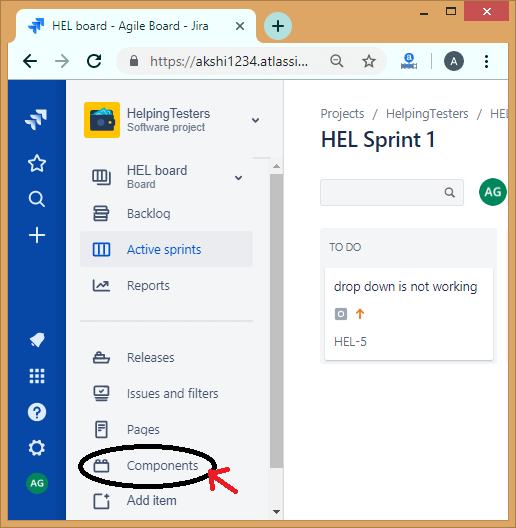
- Click on the Components appearing at the left side of the panel.
- Click on the '...' icon then the dropdown appears which shows two options, i.e., Edit and Delete.

- Click on the Delete option to delete the component from the Jira project.
18) What is a validator in Jira?
Validators check whether the input provided by the user is valid before the transition is performed.
If the validation fails, then the issue does not proceed to the destination status of the transition.
List of validators:
- Required Field validators
Required field validator ensures that the field is mandatory or required. The required fields marked with the red asterisk (*) on every transition screen. In Jira, we can use the field configuration to make the fields compulsory or mandatory. With the help of Required field validators, it is possible to make the fields mandatory that makes the overall process more user-friendly.
- Regular Expression Validator
Regular Expression Validator checks whether the input given to a certain field matches the regular expression that you define. It is a quite powerful validator, and its use cases vary from the simple validation, the user should provide the exact value that matches the use cases.
Parameters
Regular expression: It is an expression that the input field should match.
User define message: This message appears when the validation fails.
- Validator to compare to two fields with each other
This validator is used to compare the two fields. To use this validator, both the fields must be of the same type.
The following is the list of operators that this validator supports:
- > ( greater than)
- < ( less than)
- >= (greater than or equal to)
- <= (less than or equal to)
- = (equal)
- != (Not equal)
- Date Compare Validator
The Date Compare Validator is used to compare the date field with the fixed date. It can support the date field types such as Date fields (Date and date with time). We can use a fixed date in the format yyyy-mm-dd hh:mm or a pattern (days, months, weeks, years).
- Field Compare Validator
Field Compare Validator is a validator that compares the fields against the fixed values.
It supports the following operators:
- = (equal to)
- != (Not equal to)
- > (greater than)
- >= (greater than or equal to)
- < (less than)
- <= (less than or equal to)
- IN
- NOT IN
- CONTAINS
It supports the comparison types such as String, Number, and Option ID. For example, we have a field named "Salary", and its field value should not be less than 30,000, it can be represented as:
Salary>=30,000;
- User in Project Role Validator
This validator ensures that the currently logged in user should be in a certain specific role. For example, only a user with a role "Developer" can do this workflow transition.
- User in Group Validator
It validates that the current user should be in any of the specified groups.
- User in Field Validator
This validator ensures that the current logged in user is set on a certain field.
There are two options available in this validator:
- You can set the status of a current user in a field.
- He/she is not set in this field.
- Parent Issue Type Validator
This validator is used to prevent creating the subtasks from the parent issue. We can achieve this by adding a validator to the "Create" transition from the subtask. You can also provide a custom error message for this type of validator.
- Parent Issue Status Validator
This validator ensures that the parent issue should have some specific status. The status can be Reopened, In Progress, Backlog, etc.
- Field Values Changed Validator
Field Values Changed Validator ensures that the user can change the value in a field.
- JQL Validator
JQL (Jira Query Language) evaluates the current issue against the JQL query. In JQL Validator, the query is generated automatically related to the issue.
JQL Validator provides some additional fields:
Validator message: It is used to define the custom error message if the validation fails. If you do not want to provide the custom error message, then you can leave this field as empty.
Run as user: In this field, we can define a technical user with which the JQL expression will be evaluated. If you leave this field as empty, then the current user will be considered for this transition.
19) What is an issue collector?
An issue collector allows you to gather the feedback form of any website in the form of Jira issues. It can also collect the issues who do not have a Jira account.
20) What are the differences between Scrum board and Kanban board?
The following are the differences between Scrum board and kanban board:
|
Scrum |
Kanban |
| Planning |
It has fixed planning. It focussed on planning. It starts with the sprint planning and ends with the sprint review, retrospective. The daily meeting is held so that the team knows the next steps, priorities, and the learnings from the previous steps. |
It has no fixed planning, and no daily meetings are conducted. In Kanban, changes can occur at any time, i.e., frequent changes occur. |
| Timeline |
In scrum, we work on the sprint that has the fixed-time duration means that after some fixed-time, we are delivering something to the client. |
Kanban does not have the concept of a sprint, so it has no fixed timeline for delivering the product to the client. |
| Task estimates |
During sprint planning, it is decided that how many activities are to be pulled from the product backlog and add in a sprint backlog. For example, if the sprint is for two weeks, then the number of activities are selected in such a way that they can be completed within the sprint, i.e., in two weeks. |
It does not estimate the task. |
| Scrum Master |
In scrum methodology, we have one scrum master who handles the team and conducts the meeting on a daily basis. |
In Kanban methodology, we do not have any scrum master. It's the responsibility of each individual to deliver a valuable product. |
| Suitability |
This methodology is suitable for large-sized projects as large-sized projects can be divided into multiple sprints. |
It is mainly suitable for small-sized projects. |
| Constant changes |
In Scrum, constant changes can be adapted easily in shorter sprints. |
If any major change occurs, then Kanban methodology gets failed. |
| Cost |
In Scrum, the task is estimated, i.e., a fixed number of activities are taken in a sprint, so the total cost of the project is minimal. |
In Kanban, the task is not estimated, so the total cost of the project is not accurate. |
| Roles and responsibilities |
In Scrum, a specific role is assigned to the team members by the Scrum Master while the product owner tells the objectives of the product on which team members have to work. |
No predefined role is assigned to the team members. It's the responsibility of all the team members to work in collaboration to deliver a valuable product. |
| Measurement of Productivity |
The productivity is measured by using cycle time or the time taken to complete the whole project from start to the end. |
Productivity is measured by using velocity through sprints. |
| Release Methodology |
Small release after the end of each sprint. |
It provides continuous delivery. |
|


