| |

JSON ServerMost developers have heard of the term JSON. It abbreviates for "JavaScript Object Notation". JSON is nothing but an open standard file format and data interchange format. It uses human-readable text to store and transfer data objects. It generally consists of two human-readable attributes i.e. value pairs and arrays. JSON is a very common data format having different applications. For example, a web application communicating with a server uses JSON. In the similar sense, JSON Server is no different. JSON Server is a Node Module that you can use to create demo REST JSON services within a short span of minutes. All we need to do is have a JSON file as sample data. Let's learn more about how to install and set up a JSON server in our system and alongside we'll try to create a REST API. Let's learn more about it. InstallationTo get started with the installation of the JSON server, all we need to do is to open the Terminal of our system and type the following command. The next step involves the creation of a database with JSON. For the sake of learning, we have created an example database as shown below. We are almost done. The next step is to start the JSON Server and to do that use the below command. Now, if we move to http://localhost:3000/posts/1, we'll get something like this. This output signifies that our JSON server is working fine for the above attributes and is having some values in them. We can now easily create a request for the JSON Server. But, before moving further, it is good to take some key factors into account. Those key factors are: 1. If we make some requests like POST, DELETE, PUT, or PATCH, the changes are directly reflected and safely stored in the db.json file. 2. The requested JSON body should be object enclosed, just like the GET For example: 3. The ID values are not generally mutable. Any value of the ID present in the body of the PUT and PATCH request is usually ignored by default. The value set in a POST request is only taken into consideration if not already taken. 4. The PATCH, POST and PUT request should always include a Content-Type: application/json header to be used in the JSON request body. Else, it will return the 2XX status code without updating the changes made to the data. RoutesRoutes are nothing but the pathways through which the requests are processed in a pipeline. A specific route serves a specific request so that dependencies are not disturbed. Therefore, based on the previous db.json file various default routes can be added with the command --routes at the terminal. Some default routes are shown below. Singular RoutesPlural RoutesCreating REST APIRepresentational State Transfer (REST) is a software architectural style that uses a subset of HTTP. It is generally used to create an interactive application based on the available services offered by the web. All those applications that follow these web services guidelines are thereby termed RESTful. Now let's create a new JSON file with the name db.json. This file would contain the sample data that should be exposed by the REST API. For all the objects contained inside the JSON structure, CRUD (Create Read Update Delete) endpoints are automatically created. Let's take a look at the sample db.json file. The above sample db.json structure consists of an objecting employee which has 3 assigned data sets. Each of the employee objects consists of four properties like id, first_name, last_name, and email. After this step, all we need to do is to run the server through the Terminal command. The next step is to pass a parameter over the file containing the JSON structure. Also, we are making use of the watch parameter because this makes us sure that the server is being started in watch mode and the changes and updates are accordingly exposed to the API. The following console shoots after we start the server. 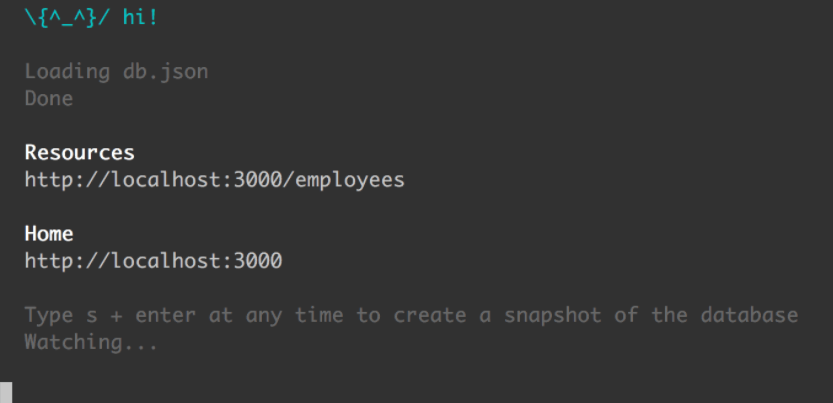
Now, if we run the URL http://localhost:3000/employees in the browser environment, we might see the following results. 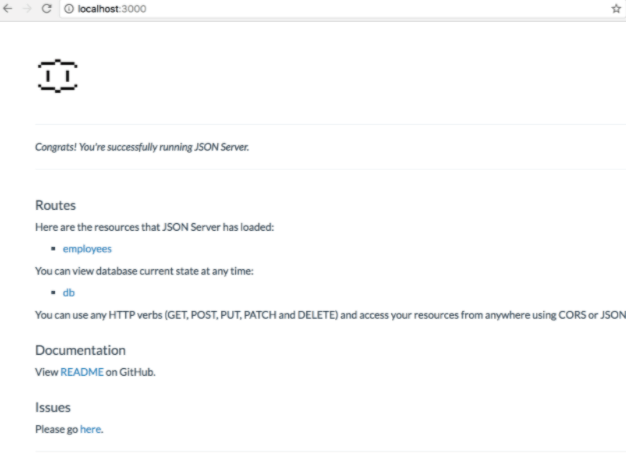
From the above image, we can see that the correct recognition of the resource employees. Now, when we click on the employees link and use the HTTP GET request to the http://localhost:3000/employees , it will show us the following JSON result. This action would create various routed endpoints like we discussed previously and on inspection, we would find the following results. The above endpoints signify that we can now make DELETE, PATCH, GET, POST, and PUT requests and any changes would certainly be automatically saved to the db.json file. Meanwhile, while creating a PATCH, PUT or POST request, never forget to include a Content-Type: application/json header because the JSON would seek content in the requested body. Else, it might result in the 200 OK without changes being made to the data. Furthermore, there's another instance of extending our URL with more parameters like filtering the parameters by modifying the existing URL with the following set of the parameter using http://localhost:3000/employees?first_name=Sebastian. In the similar sense, other requests can also be filtered easily and would be automatically reflected and saved to the db.json file. This is how we successfully created a RESTful API. We can test it, deploy it with ease using various tools like Netlify, Heroku, or Postman. Let's learn some extra actions that can be carried out with the temporary API we have created. Extra OptionsStatic file server The JSON server that we have created can be used to serve our HTML. CSS and JS compatibility but simply creating a ./public directory or use the command --static so that a different static file directory is set. Port Switch/ Alternative Port The request processing through the localhost can be shifted or switched to another port using the below command to our existing JSON Server. We just need to use the --port number flag. For example: Middleware Module If we want any validation, authentication, or behavioral changes for the API or the project you want to create by creating a module in combination with other Express middleware. Consider the below instance. Run the above file using, The path provided by us for the json.Server.router function in the above code snippet is relative to the directory from where we would be launching the node process. If we run the above code snippet from another directory, it is highly recommended to use an absolute path: For any other in-memory database, we simply need to pass an object to jsonServer.router() function in the existing Express project. Data Mocking of JSON ServerAs of now, we learned to expose data by creating a fake API manually in a JSON file. However, if we need large data sets, this manual way can result in hectic and absurd. Therefore, to cope with this issue, we can use Faker.js because it can handle large amounts of data for JSON Server. It does that by generating fake data when integrating with JSON and API. This can be done by using the following steps. Next, install Faker.js by using the command: Faker.js will successfully be installed in the node_modules folder. Now, create another file in the employees.js and insert the below given sample JavaScript code. In the above code snippet, we are implementing the function generateEmployees() to generate JSON-based object containing the data of 50 employees. Thus, to obtain fake data for the first name, last name, and the email that we are using, we would be using the methods faker.name.firstName(), faker.name.lastName() and faker.internet.email(). Moreover, the JSON Server requires exporting the general employees() function in the above code which is done by using the method. Having added that export, we would now be able to pass the employees.js file directly to the json-server command by The work is done. We have successfully exposed REST API that will give us the access to all the 50 employees data sets by the means of Faker.js. SummaryIn this tutorial, we learned about the JSON Server from scratch to advance. We tried to blend in the use cases of it and eventually learned its implementation along with setting up the local environment, creating requests, etc. We also learned about routes that are quite important because we can use them to create pathways for data to move to our files and then trace back the requests like POST, DELETE, etc. In the later section, we learned to set up middleware with Express environment followed by mocking up the JSON Server with Faker.js. We can therefore jump to conclusion that JSON Server covers tremendous application in the development since most of the developers use this format for establishing data manipulation, access, and storage mechanism and carrying out overall data-driven paradigms.
Next TopicPHP JSON Example
|
 For Videos Join Our Youtube Channel: Join Now
Feedback
- Send your Feedback to [email protected]
Help Others, Please Share


