| |

Layers in Adobe XDLayers are the fundamental elements of the Adobe XD. Every object in Adobe XD is added as layers. Layers are like separate pieces of paper which are arranged in order to create a complete design. We can select a specific layer and perform several operations such as move, resize, make it transparent, and so on. To Move a layer, select the layer and drag to any direction; it will move accordingly. Layers take place at the top of the workspace and are stacked in a defined order. We can manage the layers from the layer panel given at the bottom of the left sidebar menu. We can open the layers by clicking on the below layer icon: 
We can also display the layer panel by using the "Ctrl + Y" (for Windows) and "CMD + Y" (for Mac) key combination as a shortcut. Once we select the layer icon, it will list all the layers with an active layer in a new additional side panel as follows: 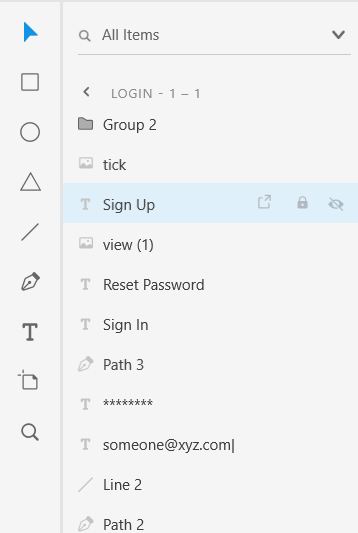
In the above panel, all the layers in the current artboard will be displayed. How Layers Work?Artboards are the canvas where we place the design components. It is the core element of design architecture. When we add a new component over our artboard, it will be added to a new layer to manage them. When we select a design element, the respective layer will be automatically activated. Now, the applied actions will be applied to this layer. For example, if we select a label, then the layer corresponding to that label will be selected. Now, if we apply any operation such as applying color, increasing the font size, or changing the font family, it will only apply to this label. Consider the below image: 
From the above image, we have selected a label. If we apply any operation, it will only affect the selected label. We can apply different operations using the right sidebar menu. Layer Panel LayoutAdobe products are known for their intuitive user interface. They always came with an interesting and innovative way of displaying the tools. The Adobe XD layer panel is slightly different than other tools such as Photoshop. In Photoshop, there is a single canvas that contains different elements, but, in Adobe XD we can have multiple artboards. The layers panel, by default, displays all the available artboards in the project. If an artboard is selected, then it will display the layers for the components available in it. It makes it easy to navigate through the different layers. Thus, it simplifies the workflow in big projects having multiple modules and provides a seamless user experience. If there is no artboard selected, the layer panel will list the available artboards in the project. Adobe XD also facilitates an AI layer recognition feature by labeling it with the layer type icon. We can easily identify a layer by its icons. For example, if the layer contains text, a text icon will be labeled next to the corresponding layer. Similarly, it will also have different icons rectangle, circle, ellipse, etc. How to Manage Layers?We can easily manage these layers using the layers panel. The layers can be stacked on top of another layer to make an intuitive user interface. We can also clip multiple layers in one layer. Layers are very flexible. Several operations can be applied to layers to manage them. These operations include delete, add, reposition, define order, etc. To define the order of a layer, select it and drag it to the top or bottom as your requirement. Also, we can use " Ctrl + } " or " Ctrl + { " key combination to increase or decrease the layer order. How to Search Within Layers?We can search the layers by their names using the layer panel or filter them by their content, such as text, shapes, etc. The search panel is optimized to only display the search string layers. Recent searches are saved to the filter dropdown to access the recent searches assets panel easily. 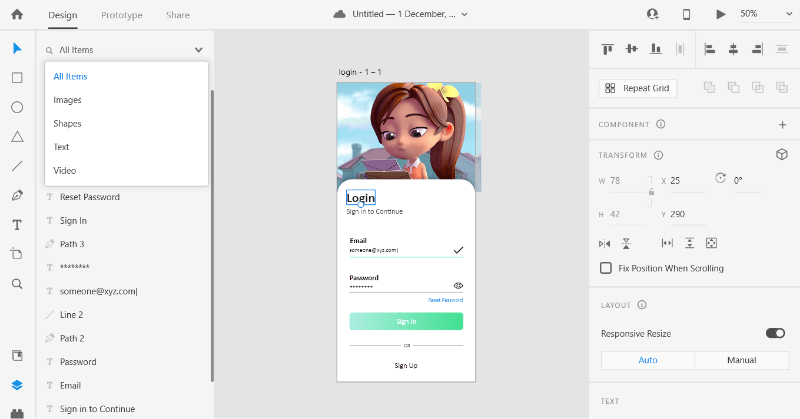
By default, each newly added object takes place in a new layer. For example, if we create a new button in the artboard, its shape name will be added to a new layer. When we group layers, then it will be named a group and replaced with a single layer. Just like this, if we add a layer using the Boolean operation, then it will be replaced with a single layer with the name of the Boolean operation. You can manage layers, for example, group, rename, duplicate, or export layers, using the Layers panel: Operations on LayersGroup: To multiple group layers, select the layers by holding the Ctrl and clicking on the layer. It will select the multiple layers. Now, right-click and select the group from the context menu. It will group all the layers. We can also use the "Ctrl+G" key combination as a shortcut to group layers. Rename Layer: To rename a layer, select the layer and right-click on it. We will have different layer options; select the Rename option from it. We can also double-click on a layer to rename it. Duplicating Layers: To duplicate a layer, right-click on the layer and select the Duplicate option from the given layer options. It will make another copy of the operating layer. Hide & Show a Layer: To hide a layer, hover on the layer; here, we will have 3 different icons for the export, lock, and hide. Select the eye icon (Third in the list); it will hide the layer content from the artboard. Similarly, we can show the layer. Lock & Unlock a Layer: To lock a layer, select the lock icon (Second in the list); it will lock the layer. We cannot alter the content and move a locked layer unless it is unlocked. We can also press the "Ctrl+L" key combination as a shortcut to lock and unlock a layer. Similarly, we can unlock the layer. Export a Layer: We can export a layer in different image formats such as png, jpg, etc. To export a layer, select the export icon (First in the list) on hover. Now, it will ask for the export options, select the required options, and press the export icon. It will save the layer file in the selected image format. We can also use the Ctrl+E key combination as a shortcut to export the layer. Create Component Using Layer: We can also create a layer or group of layers as a component. To make the component from a layer, right-click on the layer and select the Make Component option. It will make the layer a component to reuse throughout the project. Delete a Layer: To delete a layer, right-click on the layer and select the delete option from the layer options. It will delete the layer from the workspace. Here, we have discussed different types of layers such as text, shape, image, etc., further; we also discussed how to create and manage the layers in Adobe XD. The layers are a very fundamental component of the design. We will be using several layer operations through the tutorial.
Next TopicAdobe XD Scroll Groups
|
 For Videos Join Our Youtube Channel: Join Now
Feedback
- Send your Feedback to [email protected]
Help Others, Please Share


