Linux telnet Command
Introduction to telnet
In Linux, the telnet command is used to create a remote connection with a system over a TCP/IP network. It allows us to administrate other systems by the terminal. We can run a program to conduct administration.
telnet is used to negotiate with another host with the help of the TELNET protocol. If the telnet command invokes without a host argument, it comes in command mode, represented by its prompt. It accepts and runs the command listed as follows in this mode. It implements an open command with those arguments if it's invoked with arguments.
It uses a TELNET protocol. However, this protocol has some security defects, but it is one of the most used networking protocols due to its simplicity. It is not a secure protocol because it transfers data in unencrypted form. Often Linux user prefers ssh over telnet because ssh transfers data in encrypted form. This utility is similar to the Remote Desktop feature in Windows. The syntax for the telnet is as Follows:
Options of telnet
The options are below:
- -7: Strip the 8th bit on output and input. By default, telnet is 8-bit clean but does not transfer the option, i.e., TELNET BINARY, unless forced.
- -8: Runs an 8-bit data path. It tries to communicate with the option, i.e., TELNET BINARY, on both output and input.
- -E: Stops a character from being identified as an escape character.
- -F: This option permits the local credentials to be sent to the remote system, such as those already sent to the local environment if Kerberos V5 authentication is used.
- -K: It does not specify automatic login for the remote system.
- -L: On output, it specifies the 8-bit data path. It leads the option, i.e., BINARY, to be communicated on output.
- -X atype: It deactivates the atype authentication type.
- -a: It attempts automatic login. It transfers the user name by the ENVIRON option's USER variable if supported via the remote system.
- -b hostalias: It uses bind(2) to bind the local socket to an aliased address or to another interface address than the one selected by connect(2) naturally. It can be helpful during connection to services that apply IP addresses for server reconfiguration and authentication is undesirable.
- -c: It deactivates the reading of the .telnetrc file of the user.
- -d: It sets the starting debug toggle value to TRUE.
- -e escapechar: It sets the starting escape character of telnet to escapechar. There will not be any escape character if escapechar is absent.
- -f: This option permits the local credentials to be sent to the remote system if Kerberos V5 authentication is used.
- -k realm: This option claims that telnet brings tickets for the remote host in the realm rather than the realm of the remote host if Kerberos authentication is used.
- -I user: If the remote system accepts the ENVIRON option when connecting to a remote system, the user will be transferred to the remote system due to the value for the USER variable. This option signifies the -a flag. Also, it may be used with the command, i.e., open.
- -n tracefile: This option is used to open tracefile to record trace information.
- -r: It specifies the user interface the same as rlogin(1). The escape character is fixed to the tilde character unless changed by the -e flag.
- -x: It turns on data stream encryption if possible.
- -port: It represents a port number (an application address). The telnet port is the default port if the number is not named.
- -host: It represents the official name, a remote host's internet address, or an alias.
Commands in telnet
Some important telnet commands are listed and explained below. Only enough of all commands to uniquely identify it require to be typed.
- auth argument[...]: This command can manipulate the details sent by the option, i.e., TELNET AUTHENTICATION. For this command, some valid arguments are described below:
- disable type: It disables the named authentication type. We can use the command, i.e., auth disable, to get the available type list.
- enable type: It enables the named authentication type. We can use the command, i.e., auth enable, to get the available type list.
- status: It specifies the current status of various authentication types.
- close: It closes the TELNET session and comes back to command mode.
- display argument[...]: It displays some or all toggle and set values.
- encrypt argument[...]: This command can manipulate the details sent by the option, i.e., TELNET ENCRYPT. Some valid arguments for this command are described below:
- disable type [input|output]: It disables the named encryption type. If we omit output and input, both are disabled. We can use the command, i.e., encrypt disable, to get the available type list.
- enable type [input|output]: It enables the named encryption type. If we omit output and input, both are enabled. We can use the command, i.e., encrypt enable, to get the available type list.
- input: It is similar to the command encrypt start input.
- -input: It is similar to the command encrypt stop input.
- output: It is similar to the command encrypt start output.
- -output: It is similar to the command encrypt stop output.
- status: It specifies the current encryption status.
Install Telnet on Linux (Ubuntu)
Installing telnet on Linux is a straight forward process. We can install it by executing the following commands:
Update the Linux system by executing the below command:
The above command will prompt for the user password. Type the password and press ENTER key; it will start a daemon process and take a while to update your system.
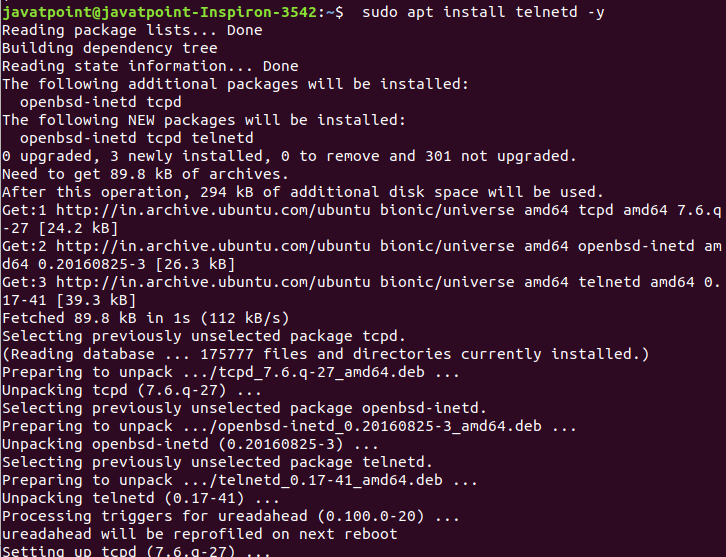
To install the telnet, execute the below command:
The above command will install the required package for the telnet protocol. Consider the below output:
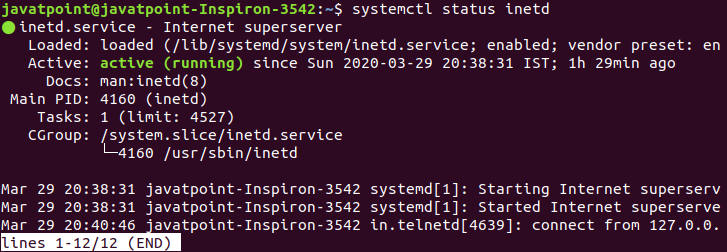
To verify the installation and whether the service is running or not, execute the below command:
Consider the below output:
Now, we have to open port23 in the ufw firewall. Execute the below command:
The above command can only be executed by the root user. If you are not a root user, use sudo before this command. Consider the below output:

The next step is to reload the firewall to apply the changes. To reload the firewall, execute the below command:
Now, we have successfully installed the telnet in our machine.
Start Telnet shell
The interactive shell can be started by executing the telnet command as follows:
This shell allows us to execute some commands exclusive for telnet. It will look like the below snap:

The shell facilitates with various commands to create a remote connection. We can list all the commands by executing the help command, execute the help command by typing h. Consider the below output:
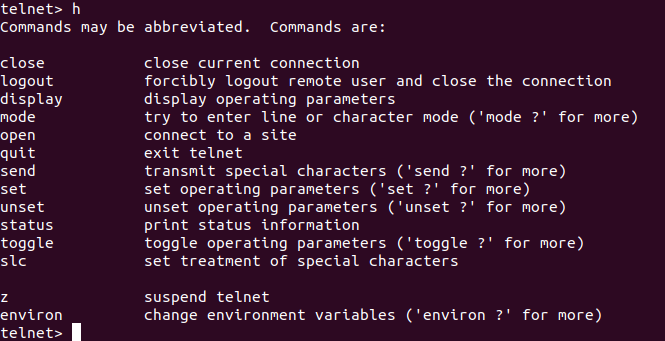
As from the above snap of shell, all commands are listed with their usage. There are many command-line utilities listed such as close, logout, display, mode, open, quit, send, and more.
How to connect by telnet command in Linux?
To create a connection between two systems by telnet command is a simple process, execute the telnet command followed by the hostname.
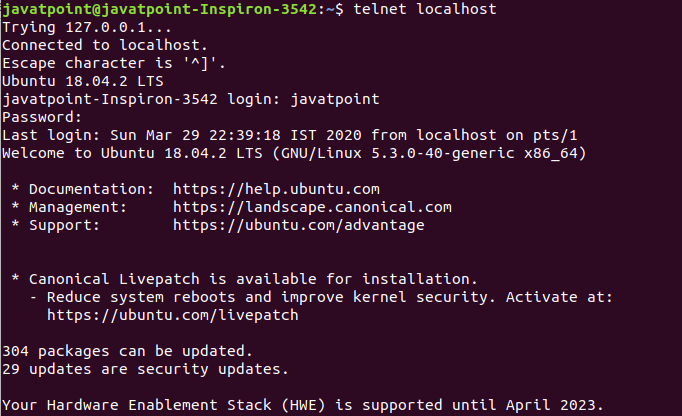
For example, we are connecting our system with the localhost. Execute the command as follows:
The above command will ask for the user name and password, enter the credential to proceed. Consider the below output:
After connecting, we can execute the commands as done before. The only difference is that now the machine is treated as a remote machine.
To exit the telnet command, execute the logout command.
consider the below output:

Now we have successfully logged out from the remote connection.
|

 For Videos Join Our Youtube Channel: Join Now


