| |

Masking in Adobe XDMasking is a process to merge two objects while making one primary. It is used to cut off, or hide, portions of a shape or object below any shape or object. Like the cropping process, masking also allows us to fit the content in the upper shape or object and show only the desired object's parts. Masking helps us add any object with other objects to make it more attractive and meaningful. We can create fills off odd objects with an image or gradient color to create the perception of depth in our designs. Using it, we can easily hide any unwanted part of the object to draw attention to the main subject. For example, we have a circle and an image behind it; now, we want to add the image within the circle so that it looks like it fits in the circle. We can do so by masking the circle and image. It will fit the image into the circle. There are several other use cases of masking. Masking is performed using more than one object; these objects can be shape, text, and image. There are different types of masking techniques. Let's understand how masking works in Adobe XD: How to Mask Objects in Adobe XD?There are several ways in Adobe XD to mask the objects to achieve an eye-catching result. We can mask the shape with images or text. The following are some useful methods of creating masks: Basic Image MaskingBasic image masking is useful if you want to fit the image in any vector shape. To mask the image with a vector shape, drag the image and drop it in shape. It will automatically mask the image with the shape. When we mask the image using this method, it works like the background fill. It will fit the image in the given vector shape. The masked image always maintains its aspect ratio as per the shape box. When we increase or decrease the size of the box, the image will maintain its aspect ratio according to the shape. The masking is useful for creating a profile pic section. Consider the below example: 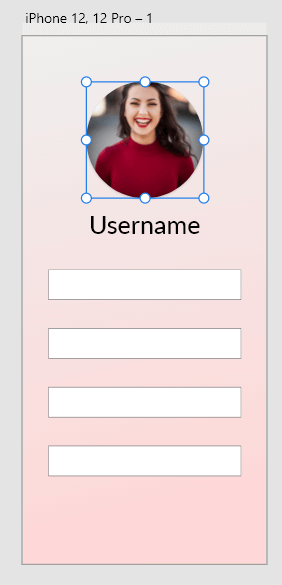
From the above dummy profile pic section, we created a circle for the profile pic and dragged the image into it. When we drag the image into the circle, it automatically masks the image with the box. If we increase the box size, the image size will also be increased accordingly. We can also update the content after the masking. For example, the masked image is not looking as per expectation, so we can update it after it is masked by double-clicking on it. When we double-click on it, it will temporarily extract the image from the shape. 
Now, we can adjust it by dragging it in any direction. Once you get the desired result, leave the image. It will fit the image to its current position. Thus, we can change and define how much of the image is shown in shape. Masking with ObjectsMasking with objects allows us to mask two objects together. It is useful for masking two shapes or the image already on the canvas. We can easily mask two shapes by using this feature. To mask two objects, select both the objects by holding the Shift key and navigating to the Object menu, and selecting the Mask with Shape option. It will mask the two objects. We can also use the Shift+Ctrl+M keys shortcut to do the same. 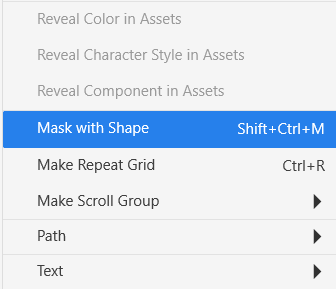
Once we select this option, it will mask the objects. Make sure to keep the main object layer above the secondary object. It will be useful for masking the two different shapes or images with the different sized shapes. We can also edit the masks whenever we want by double-clicking on the mask. It will temporarily extract the layers for adjusting. Drag the object to your desired position and leave; it will fit it accordingly. Masking with TextWe can also mask the text with any object or image to provide some unique effect. It is useful for making the text out of the box and providing a unique or meaningful text. Using the masking with text, we can set the backgrounds in the text. For example, we can use the title for the mountains, vegetables, or fire. We can set a similar background image to provide meaning to its title. In other cases, we can also mask the text with a shape. It is quite tricky to mask the text with an object. To add the mask to the text, add some text and shape or image to the artboard. Now, convert the text into the path by navigating to the Objects-> Path menu and selecting the Convert to Path option. It will convert the text to the path so that it can be easily masked with the image. 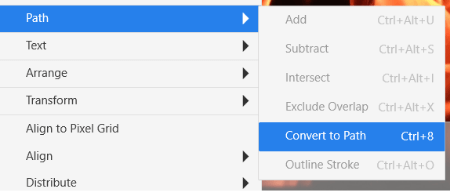
Alternatively, we can use the Ctrl+8 keys as a shortcut to do the same. Now, our text is in the form of the vector path. 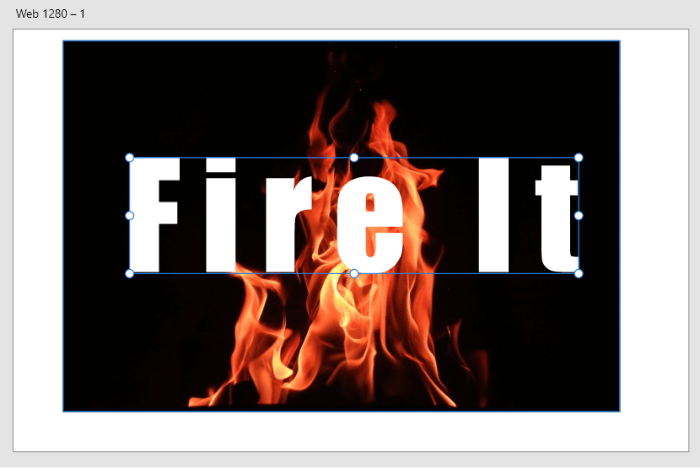
Now, select both the objects by holding the Shift key. Make sure to keep the text layer above the image layer because the order will determine which object acts as the mask and which is being masked. The bottom object will be masked by the top-level object. If we keep the image on top of the text, then the text will be masked with the image, which may not be visible. So ensure to keep the text top of the image. Now, navigate to the Object menu and select the "Mask with object" option to mask the image with the new text path. It will mask the image with the available text. Consider the below image: 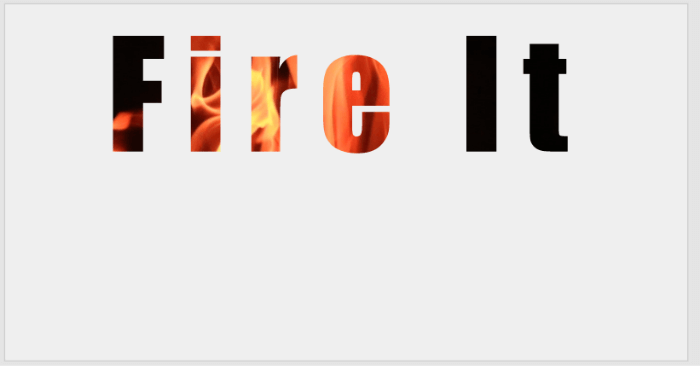
When we update the aspect ratio of the text path, the masked image size will also be maintained as per the text. We can also edit the text mask whenever we want by double-clicking on the mask. It will temporarily extract the layers for adjusting. Drag the image to your desired position and leave; it will fit it accordingly. How to Draw a Mask?Adobe XD provides several built-in tools for creating shapes and pen tools. We can create any mask shape using these tools. We can create, ellipse, circle, rectangle, square, or any other shape using the XD tools. To create a mask shape, select any of the shape tools from the left panel of the XD workspace. For the complex shapes, use the pen tool. Summary: We discussed different types of masks in Adobe XD. Now, we can easily create masks shapes with the image and text. The masking will be useful for making the meaningful text, profile section, or any other designing aspect. To read more about the masking, visit Photoshop layer mask.
Next TopicResponsive Resize in XD
|
 For Videos Join Our Youtube Channel: Join Now
Feedback
- Send your Feedback to [email protected]
Help Others, Please Share


