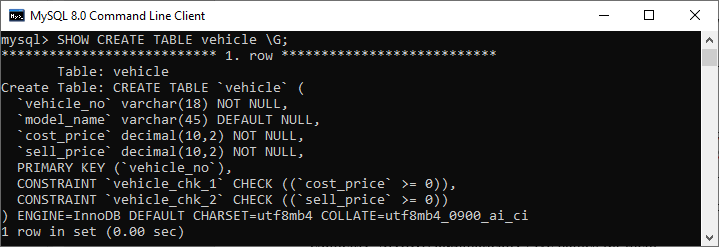
MySQL CHECK CONSTRAINTThe check constraint is an integrity constraint that controls the value in a particular column. It ensures the inserted or updated value in a column must be matched with the given condition. In other words, it determines whether the value associated with the column is valid or not with the given condition. Before version 8.0.16, MySQL uses the limited version of this constraint. In the previous versions, we can create this constraint, but it does not work. It means its syntax is supported but not works with the database. With an earlier version, the CREATE TABLE statement can include a CHECK constraint, but they are parsed and ignored by MySQL. We can use it with the below syntax in the previous versions: If we use previous versions and want to use check constraint, we can use constraint by emulating it using a view WITH CHECK OPTION or a trigger. After version 8.0.16, MySQL uses the CHECK constraints for all storage engines, i.e., table constraint and column constraint: In this syntax, we first need to write the name for the check constraint we want to create. If we do not write it, MySQL generates a name automatically with the below convention: Here, n indicates the numeric number such as the CHECK constraints names for the user table will be user_chk_1, user_chk_2, and so on. Next, we need to specify a Boolean expression that should be evaluated as TRUE or UNKNOWN for each table record. If this expression returns FALSE, the constraint violation occurs for the given value. Third, we can optionally use an enforcement clause to verify whether the check constraint is enforced or not. If we want to create and enforce the constraint, use the ENFORCED or omit clause. And if you want to create a constraint without enforcing it, use the NOT ENFORCED clause. We have discussed earlier that the CHECK constraint can be used as a table constraint or a column constraint in MySQL. If we have specified the CHECK constraint as a table, it may apply to multiple columns. In contrast, if we have defined this constraint for a column, it can be referenced to the only column where it is defined. MySQL CHECK Constraint ExamplesLet us understand how to use the check constraint with columns and tables using various examples. 1) MySQL CHECK constraint with columnThe following statement creates a new table called vehicle where we specify the check constraint on a column: In the statement, we can see two CHECK constraints columns that are the cost_price and the sell_price column. As mention earlier, if we do not specify the check constraints names explicitly, MySQL automatically gives names for them. We can use the SHOW CREATE TABLE statement to display the table information with the CHECK constraint name as follows: We should get the below output where we can see that MySQL generated the names for the check constraints as vehicle_chk_1 and vehicle_chk_2. 
Next, we will insert some records into the table using the below statement: This statement is executed correctly because it does not violate the check constraint condition. MySQL opposes the change and gives an error message whenever we insert or update a value in the check constraint column that causes the Boolean expression's evaluation to be incorrect. See the below statement that tries to insert new records into the vehicle table: After executing this statement, MySQL issued an error as follows: 
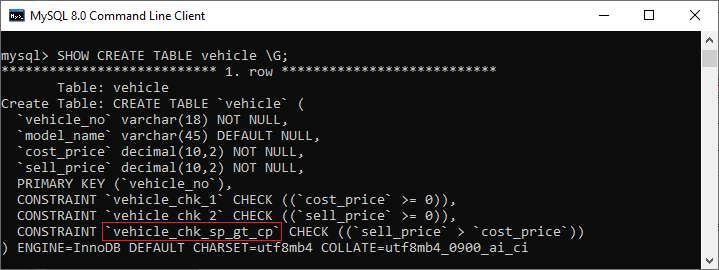
We will get this error because the sell_price value column is negative that violates the check constraint rule by evaluating the expression price >= 0 to FALSE. 2) MySQL CHECK constraint with tableFirst, we will delete the above table using the below statement: Next, we will create the same table name vehicle again with one more check constraint using the below statement: In this statement, we can see a new clause that defines a table CHECK constraint to ensure the sell_price is always higher than the cost_price as below: Since we have defined the name for the check constraint explicitly, MySQL adds this new constraint with the specified name in the table definition. We can again use the SHOW CREATE TABLE statement to display the table definition with the CHECK constraint name as follows: 
In the output result, we can see that MySQL generated the check constraints name for a table at the end of the table description after the column list, as shown in the red rectangular box. Next, we will add some records into the table as follows: This statement is executed correctly because it does not violate the check constraint condition. Again, we will try to attempt to insert a new record into the table whose sell_price is less than cost_price: MySQL rejects the change and gives an error message due to the constraint violation. See the below output: 
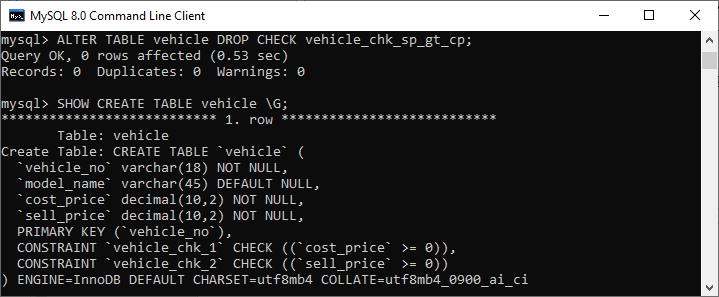
How to drop the check constraint?We can drop the check constraint from the table or column by using the following statements: For example, if we want to delete the check constraint from a table vehicle, we may execute the statement as follows: This statement drops the specified constraint. After verification, we can see in the output that the specified constraint name has been deleted successfully. 
Next TopicMySQL Change Storage Engine
|
 For Videos Join Our Youtube Channel: Join Now
Feedback
- Send your Feedback to [email protected]
Help Others, Please Share


