| |

Padding in Adobe XDPadding is the space within the container edge to the edge of its content. Setting the padding value for an object will force the container to maintain the distance within it. By defining the fixed padding, we can create editable buttons, dropdowns, tools tips, modals, and other design elements. If we define the padding for a component, it will not destroy its shape while increasing the content. For example, we created a button component of fixed width without defining the padding. So, while reusing it, we want to increase the button text, then it will be extended to out of the button. In such cases, padding is very important. If we define the padding for the button component, it will always maintain the spacing within the button. It will save our time from manually defining the button width every time and keep consistency through the application. Using padding, we can easily maintain the content-aware layouts for different components such as buttons, dropdowns, tooltips, or modal dialogs. Padding can also be defined with the states and automatically scale the background when content changes are made. It will reduce the design friction and cognitive overload while creating the components or objects. Being a designer, you must be aware of the time as creating a perfect design is time-consuming. So using a few smart techniques and features, you can reduce the effort and time to make the design more perfect by focusing on the other aspects. Padding is one of the finest features of the content-aware layout. In this section, we will discuss how to use padding in Adobe XD to save time and effort and make the design consistency through the application. Further, we will use fixed padding to create content-aware layouts for different components. Working with PaddingBy default, Adobe XD identifies the background for an object when:
However, we can control the background space for the placed object by manually defining the padding values. To precisely control the background size using the padding, follow the below steps: Step1: From the property inspector area, turn on the padding toggle switch; if you are not able to see the padding option, make sure the selected element is a component, then make it as a component by pressing the Ctrl+K keys. Step2: You'll see the following padding options: 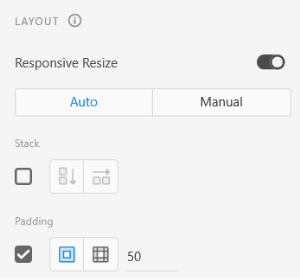
The first option defines the padding from all sides and the second option allows us to define separate padding from all sides of the object. Step3: Now, we can define the padding values as per our requirement. To set the padding values, select the component and enter the padding value for all directions or Different padding for each direction. 
It will automatically update the space for the component based on the provided padding value. Now it will always maintain its padding with the content while resizing it. The padding option is only visible when the background element of the layer structure is placed last in the group and overlaps other objects. Otherwise, you'll not be able to see the padding option in your layout section. While resizing or moving the content of the component, XD will identify its background and update it by calculating the padding values. If you don't have any visual background, the padding value is set to 0. Padding in components Using StatesComponents follow and inherit the padding values from their parent component; this means the child component will follow the padding value of its parent component across instances or states. It will override the values if we:
Padding Limitations in XD
Tips for the PaddingWhile enabling the padding, keep the following points in mind:
Here, we have discussed the padding feature of the Adobe XD to maintain the space and alignment for a component. If we define the padding value, the Adobe XD will force the master component to maintain the spacing within it.
Next TopicComponents in Adobe XD
|
 For Videos Join Our Youtube Channel: Join Now
Feedback
- Send your Feedback to [email protected]
Help Others, Please Share


