| |

Convolutional Neural Network implementation in PyTorchWe used a deep neural network to classify the endless dataset, and we found that it will not classify our data best. When we used the deep neural network, the model accuracy was not sufficient, and the model could improve. This improvement will be made with the help of the convolutional neural network. Let's start the implementation of our Convolutional Neural Network for Image Recognition. There are the following steps to implement the CNN for image recognition: Step 1: In the first step, we will define the class which will be used to create our neural model instances. CNN model includes LeNet model, AlexNet model, ZFNet model, and GoogleNet model. These models are of increasing complexity and performance, and we will use LeNet model. This model is simple, effective, and should be sufficient for accurate classification of the endless dataset. The LeNet model looks like: 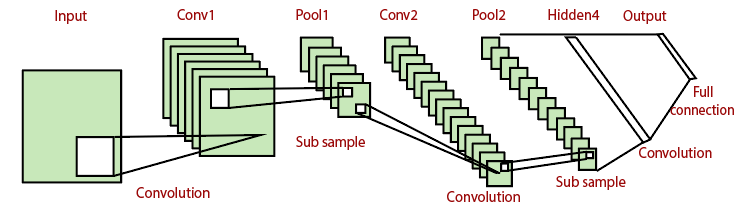
The class will be inherited from the nn module, so we first have to import the nn package. Our class will be followed by an init() method. In init() method first argument will always self. Step 2: In the second step, we recall the init() method for the provision of various method and attributes. We will initialize the convolution layer with four input parameters i.e., number of input channels (It is an input layer so we will be used 1 input channel ), number of output channels(we will be used 20 output channels for effective feature extraction), kernel size(we will be used 5 for kernel size) and stride length( we use 1 for stride length because if we are chosen a larger stride length, it will result in less effective extraction). We will unwrap this entire command into a variable and attached to self-object within our class. Similarly, we will define our next convolution layer and will adjust its parameters accordingly. Step 3: In the next step, we will define our two fully connected layers using nn.Linear() with appropriate arguments. The first convolution will decrease the dimensions of the input images from 28 by 28 to 24 by 24. The data will then feed through a 2 by 2 pooling layer which cuts the size of the images and converts it into 12 by 12. The next convolution layer decreases the size of 12 by 12 image to 8 by 8 images. Another 5 by 5 pooling layer cut the size of 8 by 8 images into 4 by 4 images. So the input channels which will pass into the first fully connected layer will be 4�4�50 and 500 output channels as a second argument. Similarly, we will define the second fully connected layers by adjusting its parameters accordingly. Step 4: Now, we will define the pooling layer and the activation functions of each layer in the forward function, but before it, we will import the torch.nn.functional package, and then we will use the forward() function and place self as a first argument and x for whatever input we will try to make the prediction. Now, we will define our relu function and connect to our first convolution layer, and then we will define the pooling layer with the help of max_pool2d() with appropriate argument. The first argument will be feed-forward x value, and the next two-arguments will define the size of the max-pooling kernel and will be unwrapped into the x variable. Similarly, this process will do for our second convolution and pooling layer. Step 5: In the next step, we will set up out model constructor. There is no need to pass anything in initializer. So Our CNN model is implemented and now, we will discuss about its implementation in Implementation of CNN Complete Code:
Next TopicTraining of CNN
|
 For Videos Join Our Youtube Channel: Join Now
Feedback
- Send your Feedback to [email protected]
Help Others, Please Share


