| |

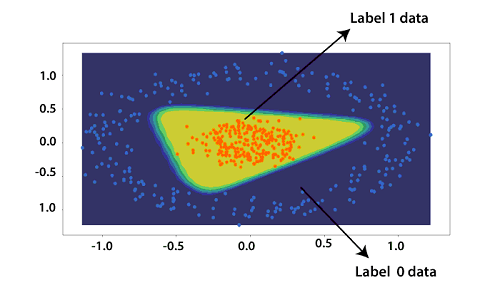
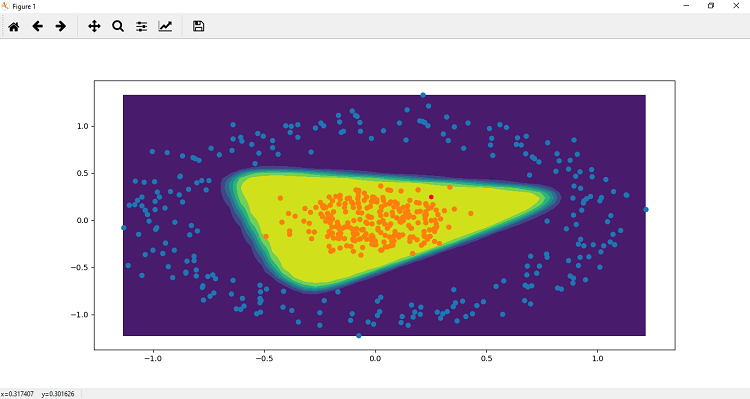
Testing of Deep Neural Network in PyTorchWe will plot our dataset with a precise decision boundary which will separate our categorical result. In this, we will also test out model. There are the following steps to train our model: Step 1: In the first step, we define a function plot_decision_boundary() which contains two arguments i.e., our training data x and out label y. This function will return a contour plot of the decision boundary. Step 2: In this step, we define a grid which properly spans our data. The process begins by defining the span of the x and y coordinates within our dataset. x_span and y_span will defined as 50 equally spaced points as Step 3: In the next step, we will define xx and yy variables. Both xx and yy variables store a square two-dimensional array which will obtain from meshgrid() function of numpy. meshgrid() function takes both vector x_span and y_span as an argument. Both vectors contain 50 elements, and this function will return a two dimensional of 50 *50 matrix. The newly added rows will be repeated copies of the original row in the x_span vector and will return to xx variable. The process is the same for y_span; it will return two dimensional of 50*50 matrix in which the newly added column will be repeated copies of the original column in the y_span vector. This matrix will return to yy variable. Step 4: With the help of these newly created matrices xx and yy, we will create a Cartesian grid which covers our entire dataset. For this, we first have to convert the xx and yy matrix in one-dimensional using ravel() method. Step 5: Now, we will have 50 x coordinates and to define our grid we have to concatenate these arrays in column y arrangement. This will be done with the help of c_[]. Now, we will convert these into tensors using the torch.Tensor(). This will convert out 50*50 grid to tensor data. Step 5: Now, ultimately, we can use model .forward() with the grid as the sole arguments. By feeding the entire grid tensor into the model.forward() function, the trained model is going to test all the points inside of our 50*50 grid, and this will return a tensor of predictions. This prediction indicates the probability of any given point being labeled as one and we will store this tensor in a variable pred_func. Step 5: Now, what we will reshape the pred_func into the same shape of dimension as our original xx and yy dimension. This will generate an error; we will us detach method which excludes any subgraph from gradient computation, which would be associated with the value from pred_fun. Step 6: Now, our next step is to link our prediction result to their appropriate coordinate counterparts. For this purpose, we will use plt.contourf() which will create a contour plot of our predicted results with xx, yy and z Step 7: Now, we will first call plot_decision_boundary() method, and then we will call scatter_plot() method which we defined earlier. This will visualize our data as 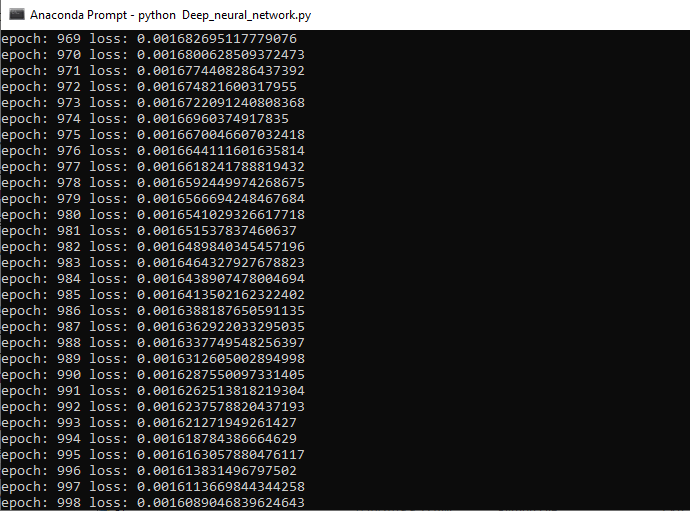
Step 8 We will re-plot our fitted model, and for this, we have to make a prediction on a random point which we will initialize. We will take two points for better understanding of Step 9 Now, the next step is to plot this point for visualization purpose so that we can determine the point is in which class either 1 or 0. The point p1 is initially in the form of tensor, so we changed this point into numpy by typecasting. 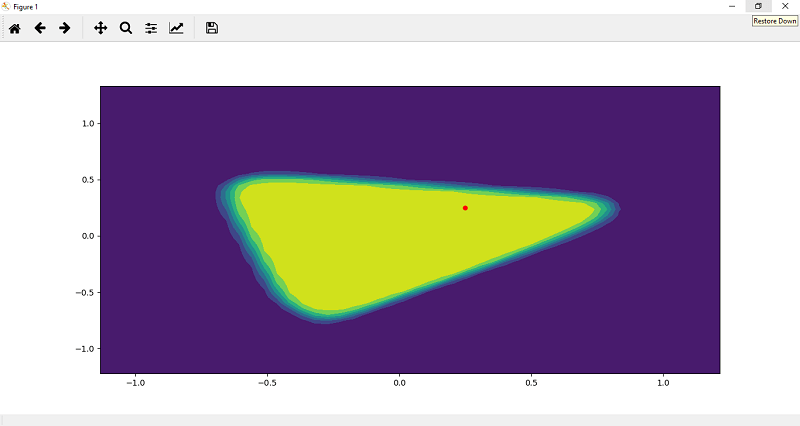
Step 9 We can make a prediction of the point. We will predict the probability of the point belongs to the positive region 2 class 1. We know all the orange points are labeled as 1, and all the blue points are labeled as 0. So the probability is determined as 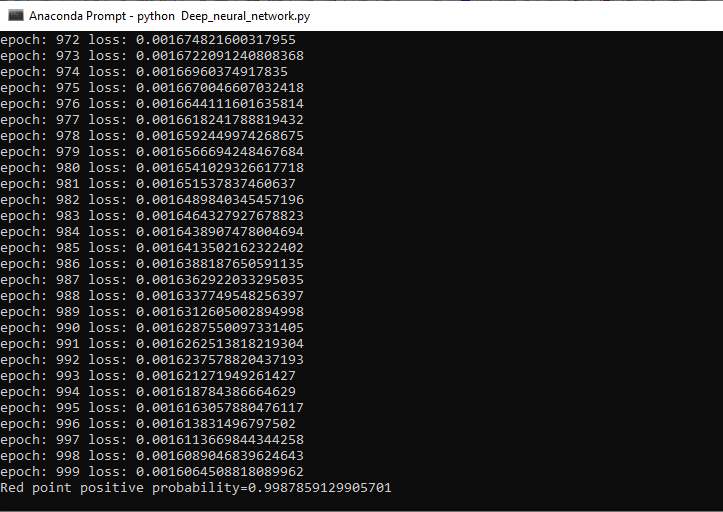
Step 10 Now, we will be going back to our class initialization and create a method called predict which have a parameter. We use self.forward(x) to find the probability. If the probability is greater than 0.5, then we will return class 1 otherwise return 0. Step 11 At last, we will add the print statement which tells us about the class using the predict method as 
It's clear that our model works smoothly and give us an accurate result with random data. Complete codeOutput:
Next TopicImage Recognition
|
 For Videos Join Our Youtube Channel: Join Now
Feedback
- Send your Feedback to [email protected]
Help Others, Please Share


