| |

Share Design and Artboards Using Adobe XDThe interactive prototypes can be easily shared with the team and stakeholders by a web link. The team can experience a complete preview of the application and provide valuable feedback right from their browsers. Adobe XD provides an easy way to share the selected artboards with their interactive prototypes. We can also share all the artboards without prototyping them manually. It will automatically add all the artboards to the shared link. The following are a few scenarios where we can share the artboards directly from the Design mode: We can share a single artboard or multiple artboards for quick review. We can share the artboards by placing them in a certain order without wiring them. Let's understand how to share the artboards? How to Share Selected Artboards from the Design Mode?To share the artboards straight from your design, select one or multiple artboards you want to include in the shareable link. To add more than one artboard, either shift-click the artboards that you want to include or marquee-select them. Now, navigate to the Share tab. 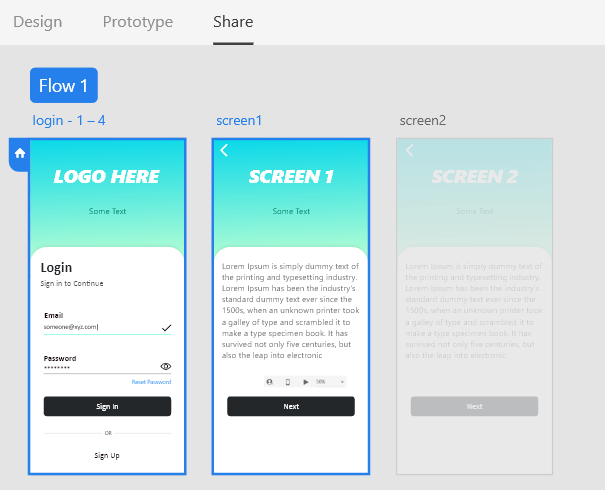
It will automatically wire the selected artboards and order them from left to right and top to bottom to create a linear flow. The user can access them by pressing the left and right arrow keys. By default, a tap trigger will be added to the selected artboard to navigate them to the next artboard. Viewers can also tap into an artboard to move to the next artboard. If you have not specified any home artboard, then it will make the upper left artboard a home screen. Now, navigate to the right property inspector area to create a share link. We can specify the link name, view setting, and link access in the link setting section to specify the access and other controls. For reviewing the design, specify the settings as follows: 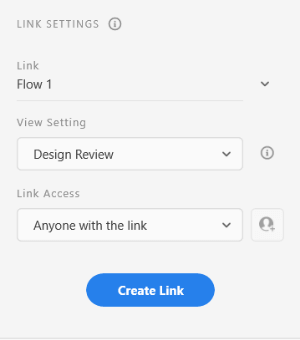
You can choose any of the link names. It will allow users to review the design and leave their feedback right from their browser. Once everything is finalized, click on the Create Link button. It will generate a link copy that links and share with your team and stakeholders. They will be able to access your design using that link. Auto Create Link: We can have an auto-create link feature in Adobe XD. it is recommended to deselect the auto-create link feature while sharing to prevent XD from auto-generating a shareable link. We can create a link whenever required by clicking on a single button. To deactivate the auto-creating feature, follow the below instructions:
Adding or Removing the Artboards after Generating Shareable LinkWe can update the shareable link once it is generated. The viewers will see an updated flow. For example, if you want to add or remove a screen to the existing flow. You can do so by using the wiring options in the prototyping mode. To add or remove the screen in the existing link, switch to the prototype mode update the wires using the prototypes options. To add a screen, click on the blue arrow on the source artboard and drag to another screen that you want to add. To delete an artboard, click on the wire connected with it and press the delete key. It will remove the selected screen from the artboard. After finalizing the screens and prototypes, navigate to share mode and click on the Update Link button. It will update the link. Now, the user will experience the updated flow using the same link. Setting Access Permission for the Shareable LinksWe can specify the access permission for the shareable links. There are several presets options for specifying the access permission. There are the following options available in the access menu. 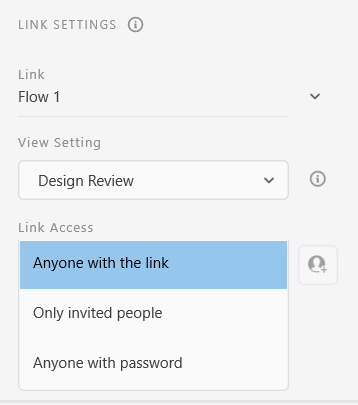
Public links: The public links are accessible for anyone who has the link address. They can preview the design and prototype using the link. The public links have fewer security restrictions. These types of links are useful for sharing the designs with a broad audience. To create a public link, select the "anyone with the link" option in the link access drop-down menu, then create a link. Private links: The private links are only accessible to the set of invited collaborators. To create a private link, select the "only invited people" option in the link access drop-down menu, then create a link. Password links: The password links can be accessed through a password. The team members or stakeholders must enter the password to access the shared design spec or prototype. To create a public link, select the "anyone with password" options in the link access drop-down menu, then create a link.
Next TopicExport Design Assets in Adobe XD
|
 For Videos Join Our Youtube Channel: Join Now
Feedback
- Send your Feedback to [email protected]
Help Others, Please Share


