| |

Simple WEP CrackIn this section, we are going to learn how to crack a WEP key in a simple way. For this, we are going to generate a new unique IV using aireplay-ng replay an ARP packet. In turn, we crack the WEP key by airplay-ng through creating the new unique IVs. AssumptionsThe solution we are going to provide assumes the following things:
Now we have to confirm that all the assumptions described above are true. In the following example, we have to change the interface name wlan0 to our wireless card interface name. Equipment usedThere are the following types of equipment which we have used in this tutorial:
When we are working on a network, we have to gather all the equipment information about our working network. Now we have to change the value according to the specific network. SolutionWe have to gather a large number of IVs if we want to crack the WEP for an AP. These IVs are not quickly generated by normal network traffic. If we are patient and want to crack the WEP, by listening and saving the network traffic, we can gather sufficient IVs and crack them. But practically, none of us are patient. That's why to speed up the process; we use the injection technique. In injection, we have the access point, and very rapidly, it resends the selected packets. Due to this, in a short period of time, we can capture a huge amount of initialization vectors (IVs). Now to determine the WEP key, we can use these large numbers of captured IVs. The basic steps to do this are as follows:
Start the wireless interface in monitor mode on the AP channelIn this section, we are going to put our network in monitor mode. Normally, the packets which are only addressed to us are listened to by our card. But in the monitor mode, every packet which is in the air is listened to by our card. Using every packet, we can select some packets according to our wish for injection. For non-Atheros cards, this procedure is different. Firstly, we have to stop wlan0 by using the following command After executing this command, the system will respond as follows: Now we will ensure that there are no other wlanX interfaces using the "iwconfig" command. After executing this command, it will look like this: If we found any remaining wlanX interfaces, we need to stop everyone. Now we have to confirm that there are none left using the "iwconfig" command. Now we will start the wireless card in monitor mode on channel 6 using the following command: In the above command, our access point runs on for "6". The following steps will work properly if our wireless card is locked to the access point channel. In this command, instead of using "wlan0", we are going to use our wireless interface of "wifi0". This is because we are using a madwifi-ng driver. Use the name of the wireless interface like "rausb0" or "wlan0" for other drivers. The following output is responded by the system: We can see in the above execution that wlan0 is reported in monitor mode. Now enter the "iwconfig" command to make sure that the interface is setup properly. After this command, we will get the following response by the system: The above response shows that wlan0 is in monitor mode. On channel number 6, it has a 2.452GHz frequency, and our wireless card's MAC address is indicated by the access point. Only the madwifi-ng driver indicates our wireless card's MAC address. We should prior confirm all the above information to the proceeding. Otherwise, it will impact the following steps. Test wireless device packet injectionIn this step, we are going to confirm that our card is within our AP distance and can inject packets to it. For this, we are going to enter the following command: Where -6 indicate the injection test. -e BS1A-Y is used to indicate the name of a wireless network. -a 00:14:6C:7E:40:80 is used to indicate the MAC address of the access point. wlan0 is used to indicate the name of a wireless interface After executing this command, we will get the following response from the system: In the above execution, the last line is important for us. It tells us a very high percentage or 100%. If it shows a low percentage, that means we are too close from the AP or too far. If the percentages show 0, that means injection is not working, and we should use different drivers or patch our drivers. To capture the IVs, Start airodump-ngIn this section, we are going to capture the generated IVs. If we want to use the specific access point to capture the IVs, we can use the airodump-ng. In order to capture the IVs, open another console and then enter the following command: Where -c 6 is used to indicate the wireless network channel -- bssid 50:C8:E5:AF:F6:33 is used to indicate the MAC address of AP. In order to eliminate extraneous traffic, we will use it. --write is used to store all the data in a file named as output. If we want to skip this part, we can do this because it is not mandatory. wlan0 is used to indicate the interface name in monitor mode The screen will look as follows when the injection is taking place later: 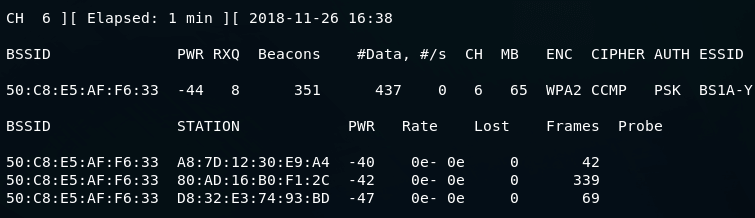
Use aireplay-ng to do a face authentication with the AP.The source MAC address must be associated to accept a packet by the access point. If we inject a source MAC address that is not associated, then the access point ignores the packets, and in cleartext, it sends out a "DeAuthentication" packet. Now the AP is ignoring all our injected packets that are why no new IVs are created. The biggest reason for injection failure is that there is a lack of association with the AP. We should keep in mind that by using the already associated client's MAC or by using the fake authentication, AP must be associated with the MAC which we use for injection. Use fake authentication to associate with an AP Where -1 indicates the fake authentication 0 indicates the reassociation timing in seconds -e BS1A-Y indicates the name of a wireless network -a 00:14:6C:7E:40:80 indicates the access point MAC address -h 00:0F:B5:88:AC:82 indicates the MAC address of our card wlan0 indicates the name of a wireless interface Troubleshooting TipsSelected MAC address is allowed by some configured access point to association and connection. In this case, we have to know a little bit about the allowed list and know one of the MAC addresses. Otherwise, we can't successfully do fake authentication. When we try to do fake authentication, we should use the following command if we suspect that this is the problem. For this, we are going to use another session and run the command as follows: After this command, we will look for an error message like this. We can use tcpdump and confirm any time that we are probably associated or not, and we can also look at the Packets. For this, we will use another session and then run the command as follows: After running this command, the tcpdump error message that we are going to get is as follows: The source (00:0F:B5:88:AC:82) is not associated is told by access point (00:14:6c:7e:40:80). It means the injected packets are not processed or accepted by AP. We can use: "tcpdump -n -e -s0 -vvv -i ath0 | grep -i DeAuth" if DeAuth packets are only selected with the tcpdump. If we want to pick out the exact packets, we should tweak the phrase "DeAuth". Start aireplay-ng in ARP request replay modeThis step is very useful if we want to start aireplay-ng in a mode that listens for ARP requests and reinjects them back into the network. The AP normally broadcasts the ARP request packet and generates a new IV. That's why we choose ARP request packets. Again, our main objective is to use less time to obtain the IVs in a large number. Now we will open another console and then enter the following command: ARP request is started to listen by the above command, and when it hears one, injection of it is immediately started by aireplay-ng. After waiting a long time, if our screen says "get 0 ARP requests", to generate ARPs, see the generating ARPs topic. When we inject the ARP requests, we will get the following response: Using our airodump-ng screen, we can confirm that we are injecting. There is a rapid increase in the data packets. The decent number is indicated by "#s". The large variety of factors is dependent on decent. Per second typical range of data packets are 300 to 400. Troubleshooting Tips When we get the messages like "Got a deauth/disassoc packet. Is the source mac associated?", it specifies that our association with the AP has lost. They will ignore all our injected packets. Now we should return a fake authentication step, and then we will successfully associate with the AP. Run aircrack-ng to obtain the WEP keyNow we will use the previously gathered IVs to get the WEP key. If we are using it for learning purposes and want to increase the speed of the cracking process, we can use a 64 bit WEP key on our access point. In this case, we can limit the checking of 64 bits keys by including "-n 64". We will be shown two methods. Both methods are recommended for learning purposes. If we try both methods compared to the FMS/Korek method, we will see that WEP is quickly and successfully determined by the PTW method. Only with the arp request/replay packets, this PTW method will work successfully. Using the airodump-ng, we capture the full packet. That means we will not use "--ivs" option. Now we will use another session and then enter the following command: Where -b 00:14:6C:7E:40:80 is used to select the one access point according to our interest. We have applied filer to capture the data for this access point only. That's why this is optional. output*.cap is used to collect all the files which end with ".cap" and start with "output". Now we are going to use the FMS/Korek method. For this, we will use another console session and then enter the following command: Where -K is used to invoke the FMS/Korek method -b 00:14:6C:7E:40:80 is used to select the one access point according to our interest. We have applied filer to capture the data for this access point only. That's why this is optional. output*.cap is used to collect all the files which end with ".cap" and start with "output". For FMS/Korek attack, add the "-k" option if we are using 1.0-rc1. 1.0-rcl default to PTW. While generating packets, we can run this command. The WEP keys will be presented and calculated in a short time. For 64 bit keys, we need approx 250,000 IVs, and for 128 bit we need 1,500,000 IVs. While PTW attack, if we have a 64-bit key, we need approx 20,000 packets and if we have 128 bit, we need 40,000 to 85,000 packets. Generating ARPsAl least one ARP packet must receive by us so that this tutorial can work. In order to generate an ARP packet on our home network, the simplest way is as follows. We will take a wireless or wired computer, ping an IP which is not existing on our home LAN. Using the Ethernet cable when a PC is connected to our LAN, it is called a wired PC. Suppose the address space of our home LAN is 192.168.1.1 through 192.168.1.254. The network device is assigned by some IP between 1 to 254, and all the remaining IP will ping by us. Suppose we ping 192.168.1.213 because this IP is not being used. Due to this, wireless AP will broadcast an ARP, and in turn, this will use the aireplay-ng to kick off the reinjection of packets.
Next TopicMethods of attacking DNS spoofing attack
|
 For Videos Join Our Youtube Channel: Join Now
Feedback
- Send your Feedback to [email protected]
Help Others, Please Share


