| |

Splunk Data IngestionData ingestion in the Splunk is done with the help of an option/menu/feature Add Data, that is the second option present on your welcome screen or the default dashboard, as shown in the following image. This option helps us to add or forward the data in Splunk. After adding the data, the it used to extract its essential features. 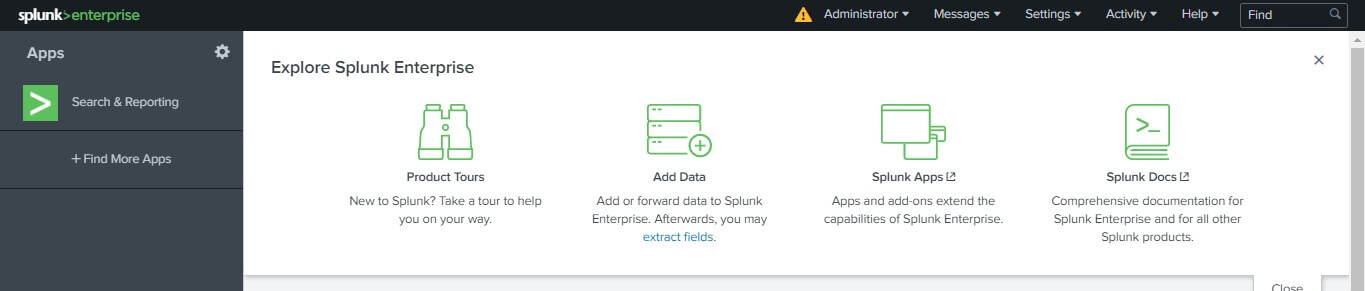
Click on the Add Data button, Add Data window appears on the screen. It shows what type of data you want to send to the Splunk platform. There are three options to add data in Splunk:
Upload It is used to upload the data from an external source into our system. We can upload plenty of formats in our system; a detailed discussion will be done further. Monitor If we need to monitor any data from the outer source like from any website, app, etc. in Splunk platform, we use the monitor option. For example, HTTP, WMI, TCP/UDP, etc. Forward We can use the forward option to get the incoming data and visualize it by Splunk forwarder as it is a very vast aspect. We will discuss it later in this tutorial. How to get Data?The Data for Splunk can be obtained from many resources including the Splunk official website. It is available free of cost, or we can use the Kaggle website to obtain data for free. We can use it to understand how we can upload the data and extract the required features from it. The data downloaded from these sources will be the zipped file. We have to extract these files on the local system and then upload it to use. For this process, we will use the 1st option in our list i.e., Upload. The upload option can be used to upload a variety of files that contains data in our system. Here we will use the .csv file. Given in the image is a list of file types you can use to upload in your Splunk. 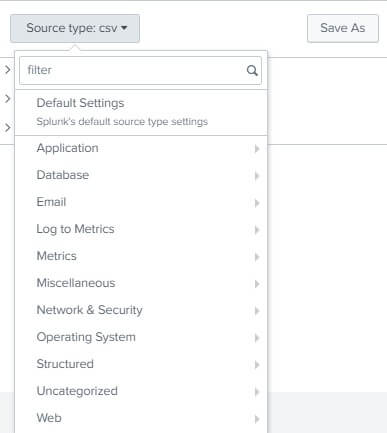
We have downloaded the titanic data from the Kaggle website, and we will upload it. Splunk has an inbuilt feature of the auto-detection of the uploaded file. We will click on the Upload option. 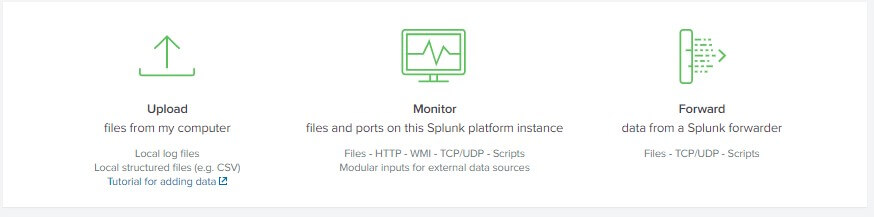
A new window will appear, prompting you to select the source of the data. Here you have to click on the Select file button. Select the extracted file from your local system and then click on the Next button. Or you can also drag and drop your file from your system into the given box. Note- You can only upload a file up to 500Mb.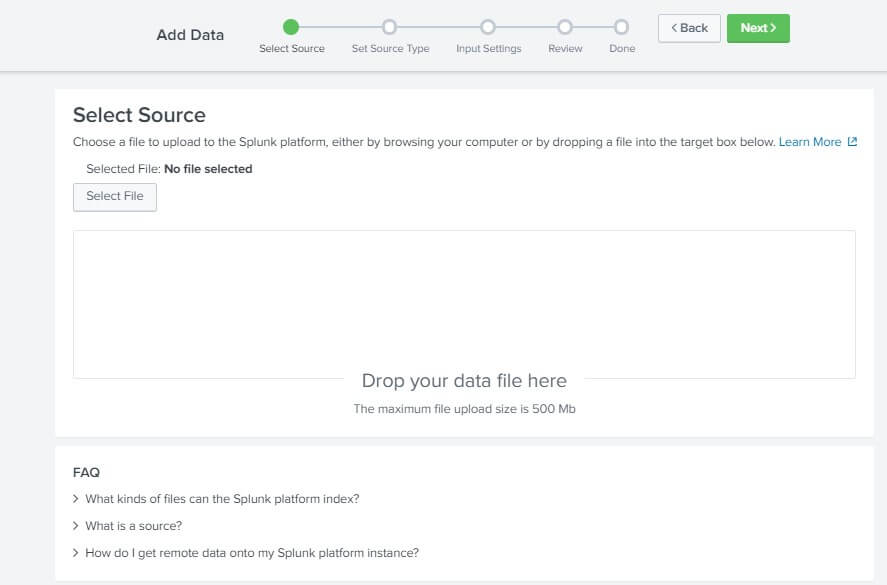
After clicking on the Next button, a new page will appear asking you to Set Source Type. This page helps you to see how the Splunk platform will see the Data you are uploading to it. Take a look to your data at the left and if the timestamp and everything looks fine then you can click on the Next button on the top right corner. Also, here you can see on the left most corner there is a drop-down menu of Source type. When we click on that menu, it will show us the default selected type of the Data we have uploaded. It will also show us the list of all the standards of the data type that we can upload in our Splunk platform with a short but relevant description. It will be best if you can follow along on the IDE of Splunk. We have also shown the image of the data list in this tutorial; it's the 2nd image from the starting. 
After you click on next, a new page will appear asking you the Input Setting. On this page, you can set the additional input setting to your data. There are several options on this page. Host field value - It will contain the value or the name of the host i.e., your laptop name by default. You can also change that value if you want. The host value must be the name of the machine from which the event is generated. Also, here we will check the radio button for constant value as the file in which we are uploading contains the value, which is definite. One can choose between the given three options depending on the type of content of the data. Index Value The incoming data is stored as an index in the Splunk platform. The default is the the value selected for the data to be stored in the sandbox. Although we can change the value latter from the setting, if you want to create a new index, then you can also create one by clicking on the Create a new index option. In simple words, the index is the name or the place by which your Data is recognized in the Splunk platform so that it can easily be found by the search operation when the user demands it. 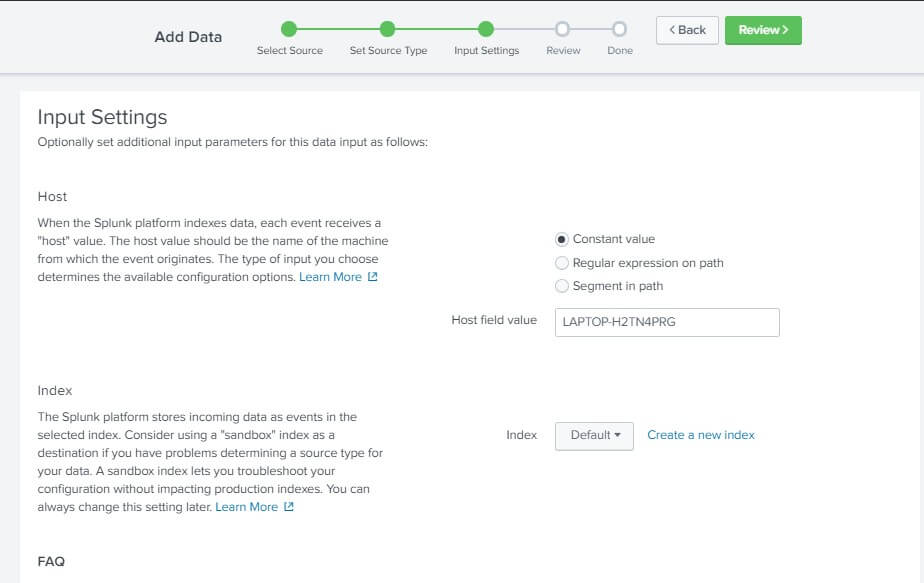
Now, after the input setting is done. Click on the next, which will redirect you to a new page named Review. This page has nothing much to do; it just shows us the small summary of the work i.e., data and settings that we have configured. Which must have the following fields -Input type, Filename,Source type, Host, Index. Take a look at it, and if everything is as expected, then hit on the Submit button. 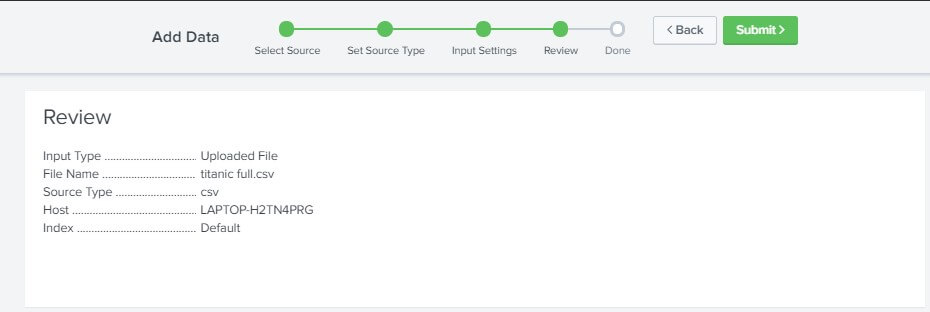
After hitting on the submit button, the following page, as shown, must appear stating that Your file has been uploaded successfully. And if at any point you want to re-configure your input setting, then you can do that by visiting Settings > Data Input. 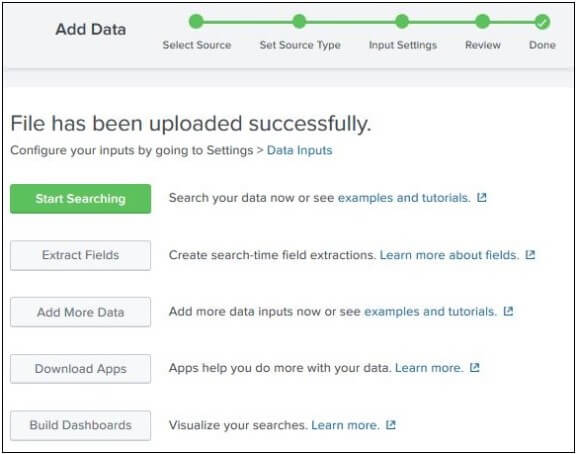
Boom! You have just successfully uploaded your 1st data in the Splunk platform. Now go on hitting and exploring all the different fields in your IDE and start searching and visualizing your data.
Next TopicSplunk Data Sources Type
|
 For Videos Join Our Youtube Channel: Join Now
Feedback
- Send your Feedback to [email protected]
Help Others, Please Share


