| |

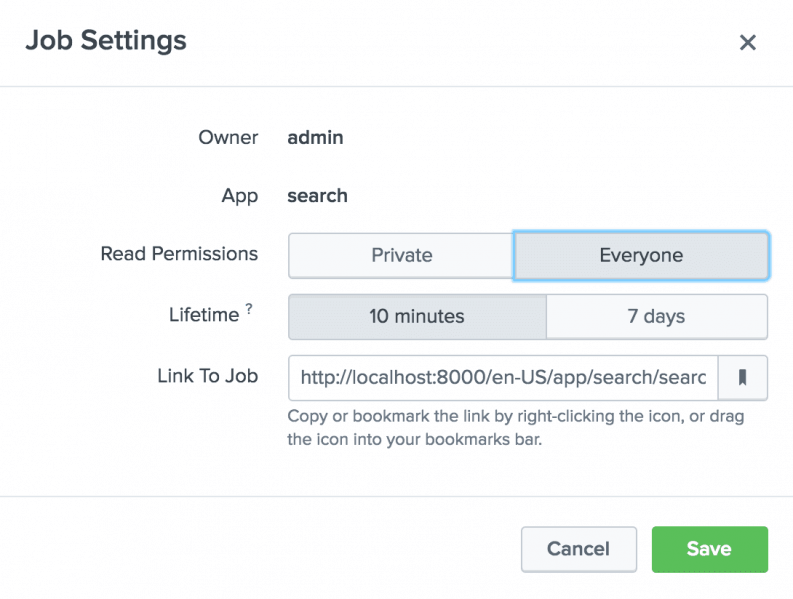
Splunk Sharing and ExportingThere are many ways to share and export the file in many formats as per our needs. We can even set the expiry of a job and also extend it. In this section, we are going to export the file and reports of the searches that we are doing in the data. Along with this we will also view and compare the job, sort the job, create a job, and extend the expiry of the job. Share jobs and export resultsWe can share a job with other Splunk users, or export to archive the event data, or use it with a third-party charting program. Share a job with others.When sharing a job, we share the results of a particular search run. There are multiple ways we can share a particular job with other Splunk users. To share our Work with other users, we can change the permissions for a search job. We can also share a job by sending the URL to a Splunk user for search jobs. We can modify permissions only, or share a connection to our current Work. Change job permissionsBy changing the permissions, we can share a job on that job. All jobs are Private by default.
Share a job URLBy giving them a connection to the Work, we can share a job with other Splunk users. This is useful if we want another person to see the results that the Work produces. The users to whom we are sending the connection must have permissions for using the device to which the job belongs. Decide which method to use to get a connection to a job. We can use either the Sharing icon or the Work menu. To use the Share icon:
The rights on the job are changed to Everyone automatically, and the work-life is automatically extended to 7 days. 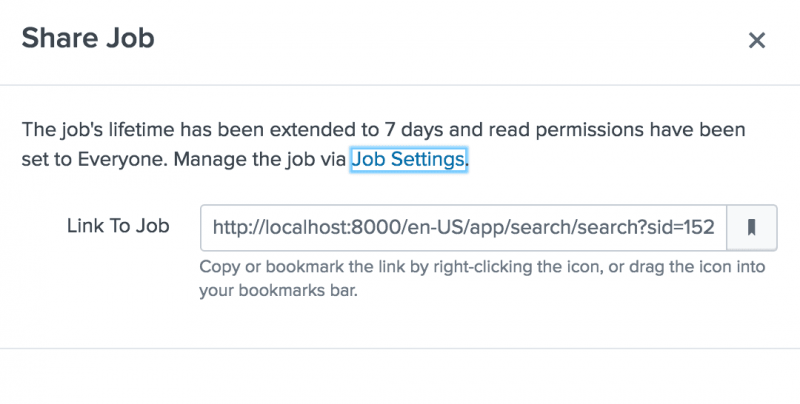
To use the Job menu:
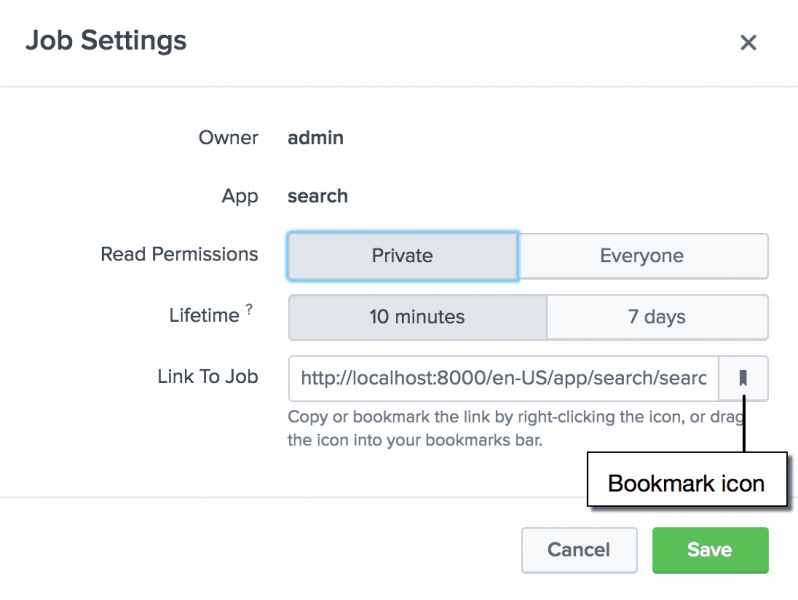
We may also use the Bookmark icon to save the connection for our use. The bookmark icon will appear both in the Job Settings dialog and in the Sharing Employment dialog box. We can click and drag the Bookmark icon to our Web browser's bookmark bar. Manage search jobsWe can use the Jobs page to review and manage any job that we own. If we have the Admin role or a role with an equivalent set of capabilities, we can manage the search jobs run by all users of our Splunk implementation. Opening the Jobs page
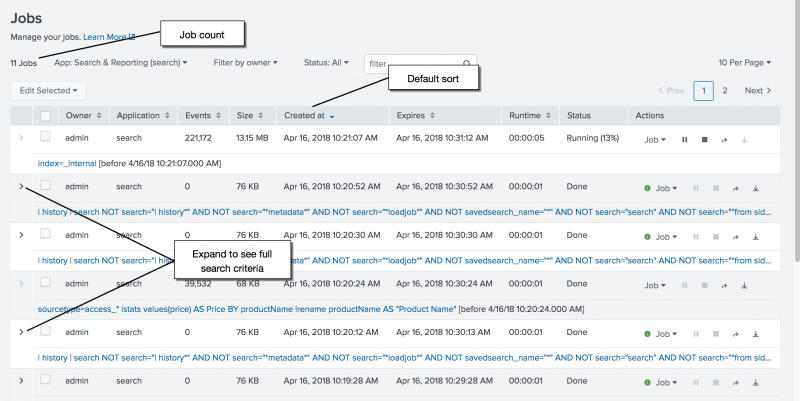
It displays a list of different types of jobs.
Refreshing the jobs listThe worklist in the Jobs tab doesn't refresh automatically.
Reload the tab to refresh the Work tab. Job actionsThe Actions column can be used to perform acts on a job. 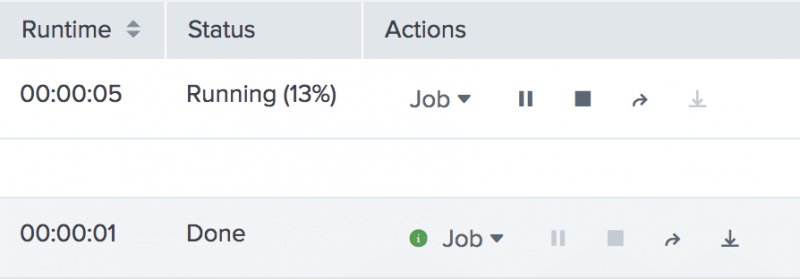
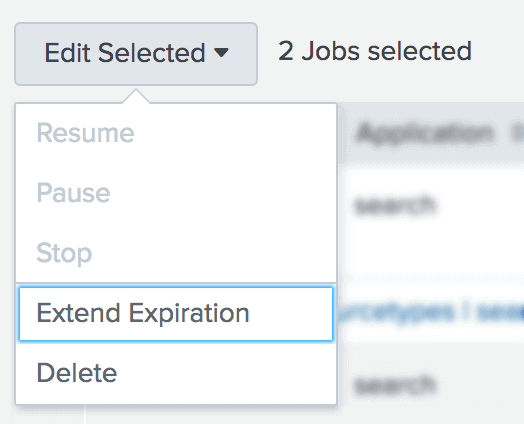
Use the Work drop-down to change job settings, extend the life of our employment, audit the job, or delete the employment. Pause, stop exchange, and export jobs using the action icons. Pick the jobs and press Edit Selected to execute those acts on multiple jobs. Then pick the action we wish to perform. View and compare jobsWe will see a list of the recently dispatched or saved jobs for later analysis. We are using the list to compare job statistics, including run time, the total number of matched incidents, size, etc. Active job countThe count of the total number of jobs in the list appears in the upper right corner of the Jobs tab. The count represents the number of jobs we've been opening the Jobs list. If a job expires when the Jobs page is open, it does not refresh the work count. Sort the job listBy default in the Splunk, the list of jobs is sorted at a column by the Made. We can sort the list by any column in the column heading, which displays a sort button. We may sort the list, for example, by the expiry of the job or by the work owner.
Filter the job listWe can filter the list of jobs by application, by the owner, and by status.
For example, we can specify disk usage, EMBED AND diskUsage=8*, or label=EMBED AND diskUsage=8* in the Filter box. View job search resultsWe can display the results of a search which appears on the Jobs page. 1. To show results relevant to a particular work, click on the search button. O For ad hoc searches, the search criteria are the ties. O For saved searches, the link in the report name, dashboard panel, or pivot panel. The results will open in the view of the Search app. Check the progress of ongoing jobs.We can inspect jobs dispatched by scheduled searches, real-time searches, and long-running historical searches. Using the Status column to test the progress of ongoing Work. The Status column displays the number of recorded events. Present workers have Working status. Jobs that work in the background have Backgrounded status. Change the per page job count.We can change the number of jobs appearing on the list on each page. The default is to have 10 jobs displayed on every page. We can view 10, 20, or 50 jobs per page on the right-hand side of the window. Inspect jobsWe can inspect a job to look more closely at what a search is doing, to see where the Splunk app spends much of its processing time. Use the Search Work Inspector to show current job details, such as the cost of performing jobs and search job assets.
For more information about using the Search Job Inspector, see View search job properties. Extending search job lifetimesThere are many ways to change the life span of a career from the Careers tab. See Extending working hours to learn more about lifetimes for different types of workers. Quickly extend job lifetimes.We can quickly extend the Lifetime of a job.
Extend the lifetimes for multiple jobsWe can extend the lifetimes of multiple jobs at the same time.
Export job results in a file.We can export the results of our job in a variety of formats, including CSV, JSON, PDF, Raw Events, and XML. We can then store the file, or use it with a charting program from a third party. The format choices depend on what kind of job artifact we are working with.
The file that will be exported will be saved in the default download directory for our browser or operating system. There are several methods for distributing search results. Some of these include the Splunk Network, CLI, SDKs, and REST methods. Many methods are designed for volume, while others are ideal for extremely large sets of events. See Export search results for a full list of the export methods and links to the specific steps.
Next TopicSplunk SQL to SPL
|
 . This icon is one of the search action icons.
 For Videos Join Our Youtube Channel: Join Now
Feedback
- Send your Feedback to [email protected]
Help Others, Please Share


