| |

Spring Boot H2 DatabaseWhat is the in-memory databaseIn-memory database relies on system memory as oppose to disk space for storage of data. Because memory access is faster than disk access. We use the in-memory database when we do not need to persist the data. The in-memory database is an embedded database. The in-memory databases are volatile, by default, and all stored data loss when we restart the application. The widely used in-memory databases are H2, HSQLDB (HyperSQL Database), and Apache Derby. It creates the configuration automatically. Persistence vs. In-memory DatabaseThe persistent database persists the data in physical memory. The data will be available even if the database server is bounced. Some popular persistence databases are Oracle, MySQL, Postgres, etc. In the case of the in-memory database, data store in the system memory. It lost the data when the program is closed. It is helpful for POCs (Proof of Concepts), not for a production application. The widely used in-memory database is H2. What is the H2 DatabaseH2 is an embedded, open-source, and in-memory database. It is a relational database management system written in Java. It is a client/server application. It is generally used in unit testing. It stores data in memory, not persist the data on disk. Advantages
Configure H2 DatabaseIf we want to use H2 database in an application we need to add the following dependency in pom.xml file: After adding the dependency, we need to configure data source URL, driver class name, username, and password of H2 database. Spring Boot provide an easy way to configure these properties in application.properties file. In the spring.datasource.url property, mem is the name of an in-memory database and testdb is the name of schema that H2 provides, by default. We can also define our own schema and database. The default username is sa and the blank password denotes an empty password. If we want to change the username and password, we can override these values. Persist the data in H2 DatabaseIf we want to persist the data in the H2 database, we should store data in a file. To achieve the same, we need to change the datasource URL property. In the above property, the sampledata is a file name. Create Schema and Populate DataWe can define schema by creating a SQL file in the resource folder (src/main/resource). schema.sql We can populate data in the table by creating a SQL file in the resource folder (src/main/resource). data.sql Spring Boot automatically picks up the data.sql file and run it against the H2 database during the application startup. H2 ConsoleBy default, the console view of the H2 database is disabled. Before accessing the H2 database, we must enable it by using the following property. Once we have enabled the H2 console, now we can access the H2 console in the browser by invoking the URL http://localhost:8080/h2-console. The following figure shows the console view of the H2 database. 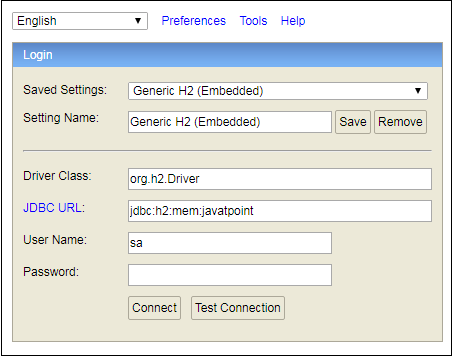
In the above screenshot, we have defined our own database named javatpoint. Spring Boot H2 ExampleLet's set up a Spring Boot application with the H2 database. Step 1: Open Spring Initializr http://start.spring.io. Step 2: Select the Spring Boot version 2.3.0.M1. Step 2: Provide the Group name. We have provided com.javatpoint. Step 3: Provide the Artifact Id. We have provided spring-boot-h2-database-example. Step 5: Add the dependencies Spring Web, Spring Data JPA, and H2 Database. Step 6: Click on the Generate button. When we click on the Generate button, it wraps the project in a Jar file and downloads it to the local system. 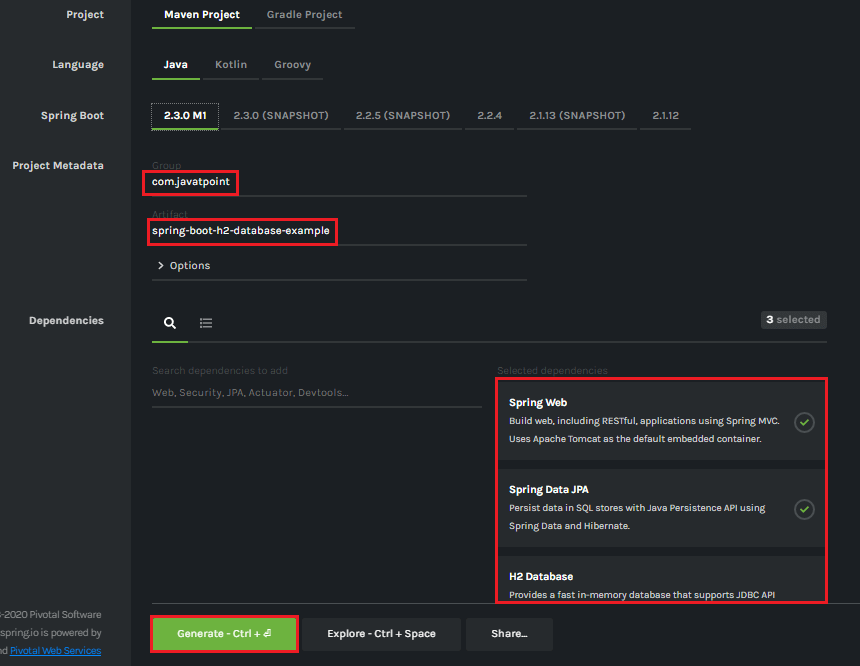
Step 7: Extract the Jar file and paste it into the STS workspace. Step 8: Import the project folder into STS. File -> Import -> Existing Maven Projects -> Browse -> Select the folder spring-boot-h2-database-example -> Finish It takes some time to import. Step 9: Create a package with the name com.javatpoint.model in the folder src/main/java. Step 10: Create a model class in the package com.javatpoint.model. We have created model class with the name Student. In the Books class, we have done the following:
Student.java Step 11: Create a package with the name com.javatpoint.controller in the folder src/main/java. Step 12: Create a Controller class in the package com.javatpoint.controller. We have created controller class with the name StudentController. In the StudentController class, we have done the following:
StudentController.java Step 13: Create a package with the name com.javatpoint.service in the folder src/main/java. Step 14: Create a Service class. We have created a service class with the name StudentService in the package com.javatpoint.service. StudentService.java Step 15: Create a package with the name com.javatpoint.repository in the folder src/main/java. Step 16: Create a Repository interface. We have created a repository interface with the name StudentRepository in the package com.javatpoint.repository. It extends the Crud Repository interface. StudentRepository.java Now we will configure the datasource URL, driver class name, username, and password, in the application.properties file. Step 17: Open the application.properties file and configure the following properties. application.properties Note: Do not forget to enable the H2 console.After creating all the classes and packages, the project directory looks like the following. 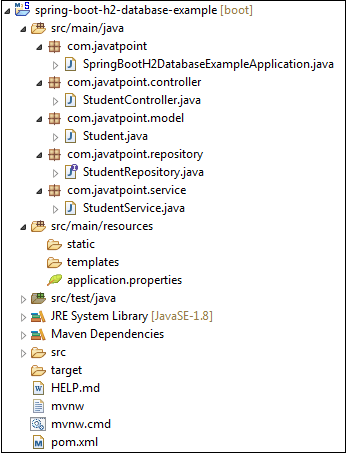
Now we will run the application. Step 18: Open SpringBootH2DatabaseExampleApplication.java file and run it as Java Application. SpringBootH2DatabaseExampleApplication.java In the next step, we will use rest client Postman for sending the POST and GET request. If the Postman is not installed in your system, follow the steps below:
Step 19: Open the Postman and do the following:
When the request is successfully executed, it shows the Status:200 OK. It means the record has been successfully inserted in the database. Similarly, we have inserted the following data. Let's access the H2 console to see the data. Step 20: Open the browser and invoke the URL http://localhost:8080/h2-console. Click on the Connect button, as shown below. 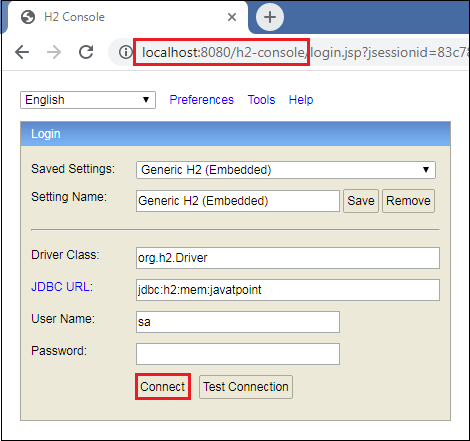
After clicking on the Connect button, we see the Student table in the database, as shown below. 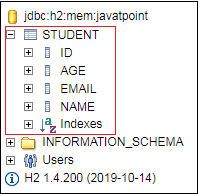
Step 21: Click on the Student table and then click on the Run button. The table shows the data that we have inserted in the body. 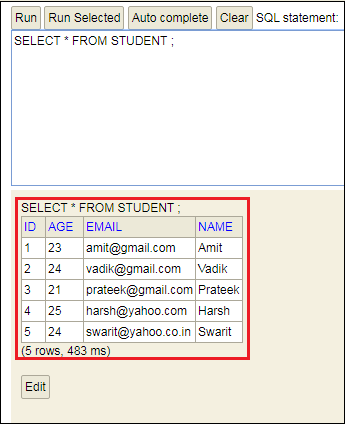
Step 22: Open the Postman and send a GET request. It returns the data that we have inserted in the database. 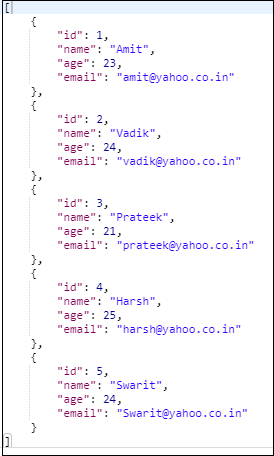
Let's send a GET request with the URL http://localhost:8080/student/{id}. We have invoked the URL http://localhost:8080/student/3. It returns the detail of the student whose id is 3. 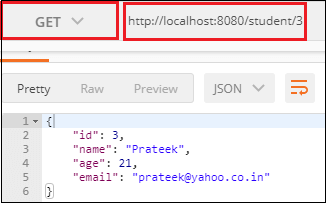
Similarly, we can also send a DELETE request. Suppose we want to delete a student record whose id is 2. To delete a student record, send a DELETE request with the URL http://localhost:8080/student/2. We see that the student whose id is 2 has been deleted from the database. 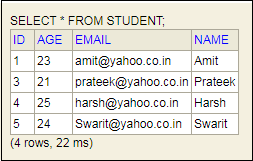
Next TopicSpring Boot CRUD Operations
|
 For Videos Join Our Youtube Channel: Join Now
Feedback
- Send your Feedback to [email protected]
Help Others, Please Share


