| |

Spring Boot JPAWhat is JPA?Spring Boot JPA is a Java specification for managing relational data in Java applications. It allows us to access and persist data between Java object/ class and relational database. JPA follows Object-Relation Mapping (ORM). It is a set of interfaces. It also provides a runtime EntityManager API for processing queries and transactions on the objects against the database. It uses a platform-independent object-oriented query language JPQL (Java Persistent Query Language). In the context of persistence, it covers three areas:
JPA is not a framework. It defines a concept that can be implemented by any framework. Why should we use JPA?JPA is simpler, cleaner, and less labor-intensive than JDBC, SQL, and hand-written mapping. JPA is suitable for non-performance oriented complex applications. The main advantage of JPA over JDBC is that, in JPA, data is represented by objects and classes while in JDBC data is represented by tables and records. It uses POJO to represent persistent data that simplifies database programming. There are some other advantages of JPA:
JPA FeaturesThere are following features of JPA:
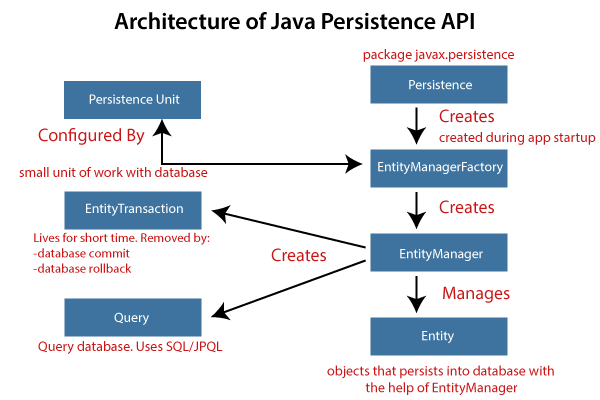
JPA ArchitectureJPA is a source to store business entities as relational entities. It shows how to define a POJO as an entity and how to manage entities with relation. The following figure describes the class-level architecture of JPA that describes the core classes and interfaces of JPA that is defined in the javax persistence package. The JPA architecture contains the following units:
JPA Class RelationshipsThe classes and interfaces that we have discussed above maintain a relationship. The following figure shows the relationship between classes and interfaces. 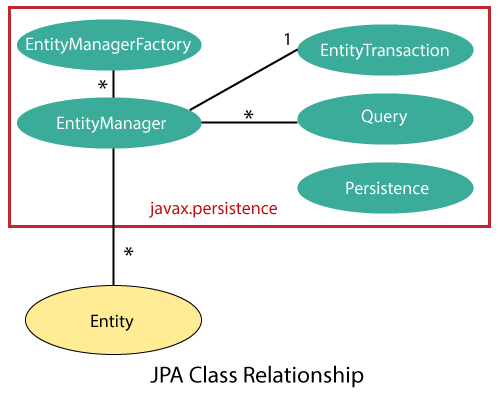
JPA ImplementationsJPA is an open-source API. There is various enterprises vendor such as Eclipse, RedHat, Oracle, etc. that provides new products by adding the JPA in them. There are some popular JPA implementations frameworks such as Hibernate, EclipseLink, DataNucleus, etc. It is also known as Object-Relation Mapping (ORM) tool. Object-Relation Mapping (ORM)In ORM, the mapping of Java objects to database tables, and vice-versa is called Object-Relational Mapping. The ORM mapping works as a bridge between a relational database (tables and records) and Java application (classes and objects). In the following figure, the ORM layer is an adapter layer. It adapts the language of object graphs to the language of SQL and relation tables. 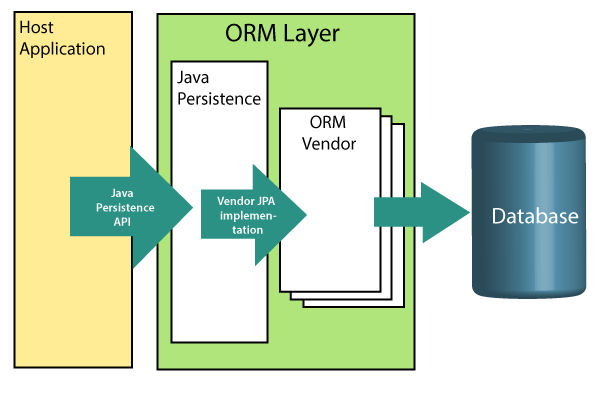
The ORM layer exists between the application and the database. It converts the Java classes and objects so that they can be stored and managed in a relational database. By default, the name that persists become the name of the table, and fields become columns. Once an application sets-up, each table row corresponds to an object. JPA VersionsEarlier versions of EJB defines the persistence layer combined with the business logic layer using javax.ejb.EntityBean Interface. EJB specification includes the definition of JPA. While introducing EJB 3.0, the persistence layer was separated and specified as JPA 1.0 (Java Persistence API). The specifications of this API were released along with the specifications of JAVA EE5 on May 11, 2006, using JSR 220. In 2019, JPA renamed to Jakarta Persistence. The latest version of JPA is 2.2. It supports the following features:
Difference between JPA and HibernateJPA: JPA is a Java specification that is used to access, manage, and persist data between Java object and relational database. It is a standard approach for ORM. Hibernate: It is a lightweight, open-source ORM tool that is used to store Java objects in the relational database system. It is a provider of JPA. It follows a common approach provided by JPA. The following table describes the differences between JPA and Hibernate.
Spring Boot Starter Data JPASpring Boot provides starter dependency spring-boot-starter-data-jpa to connect Spring Boot application with relational database efficiently. The spring-boot-starter-data-jpa internally uses the spring-boot-jpa dependency. Spring Boot JPA ExampleLet's create a Spring Boot application that uses JPA to connect to the database. In the following example, we have used in-memory database Apache Derby. Apache Derby: It is an open-source, embedded relational database implemented entirely in Java. It is available under the Apache License 2.0. There are following advantages of Apache Derby:
Spring Boot can auto-configure an embedded database such as H2, HSQL, and Derbydatabases. We do not need to provide any connection URLs. We need only include a build dependency on the embedded database that we want to use. In Spring Boot, we can easily integrate Apache Derby database just by adding Derby dependency in pom.xml file. Step 1: Open Spring Initializr https://start.spring.io/. Step 2: Select the latest version of Spring Boot 2.3.0(SNAPSHOT) Step 3: Provide the Group name. We have provided com.javatpoint. Step 4: Provide the Artifact Id. We have provided apache-derby-example. Step 5: Add the dependencies: Spring Web, Spring Data JPA, and Apache Derby Database. Step 6: Click on the Generate button. When we click on the Generate button, it wraps the project in a Jar file and downloads it to the local system. 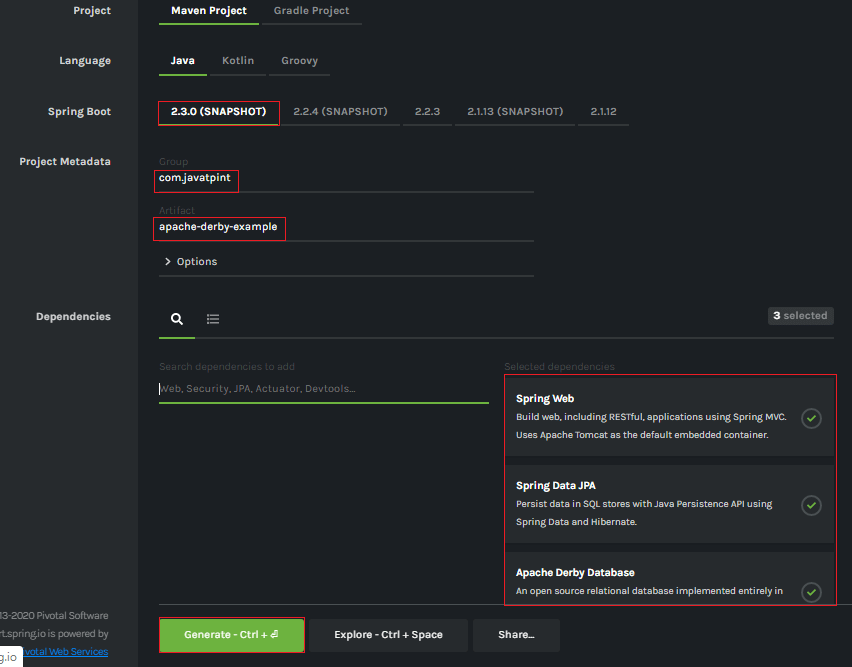
Step 7: Extract the Jar file and paste it into the STS workspace. Step 8: Import the project folder into STS. File -> Import -> Existing Maven Projects -> Browse -> Select the folder apache-derby-example -> Finish It takes some time to import. Step 9: Create a package with the name com.javatpoint.model in the folder src/main/java. Step 10: Create a class with the name UserRecord in the package com.javatpoint.model and do the following:
UserRecord.java Step 11: Create a package with the name com.javatpoint.controller in the folder src/main/java. Step 12: Create a Controller class with the name UserController in the package com.javatpoint.controller and do the following:
UserController.java Step 13: Create a package with the name com.javatpoint.service in the folder src/main/java. Step 14: Create a Service class with the name UserService in the package com.javatpoint.service and do the following:
UserService.java Step 15: Create a package with the name com.javatpoint.repository in the folder src/main/java. Step 16: Create a repository interface with the name UserRepository in the package com.javatpoint.repository and extends CrudRepository. UserRepository.java Step 17: Now, open the ApacheDerbyExampleApplication.java file. It created by default when we set-up an application. ApacheDerbyExampleApplication.java Now, we have set-up all the necessary classes and packages according to the requirements. Notice that we have not provided any connection URL for the database. After completing all the above steps, the project directory looks like the following: 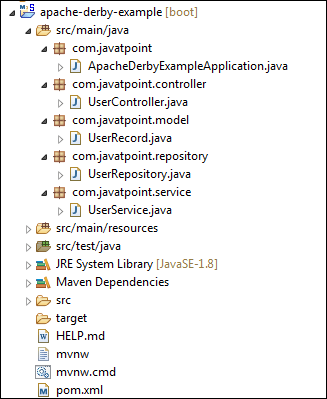
Let's run the application. Step 18: Open the ApacheDerbyExampleApplication.java file and run it as Java Application. Step 19: Open the browser and invoke the URL http://localhost:8080/. It returns an empty list because we have not added any user in the List. To add a user to the database, we will send a POST request by using the Postman. Step 20: Open the Postman and do the following:

When we click on the Send button, it shows Status:200 OK. It means the request has been successfully executed. Step 21: Open the browser and invoke the URL http://localhost:8080. It returns the user that we have inserted in the database. 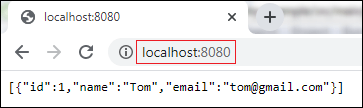
Next TopicSpring Boot JDBC
|
 For Videos Join Our Youtube Channel: Join Now
Feedback
- Send your Feedback to [email protected]
Help Others, Please Share


