| |

Spring Boot Multi-Module ProjectMulti-Module ProjectA Spring Boot project that contains nested maven projects is called the multi-module project. In the multi-module project, the parent project works as a container for base maven configurations. In other words, a multi-module project is built from a parent pom that manages a group of submodules. Or A multi-module project is defined by a parent POM referencing one or more submodules. The parent maven project must contain the packaging type pom that makes the project as an aggregator. The pom.xml file of the parent project consists the list of all modules, common dependencies, and properties that are inherited by the child projects. The parent pom is located in the project's root directory. The child modules are actual Spring Boot projects that inherit the maven properties from the parent project. When we run the multi-module project, all the modules are deployed together in an embedded Tomcat Server. We can deploy an individual module, also. Parent POMThe parent POM defines the Group ID, Artifact ID, version, and packaging. In the previous Maven projects, we have seen that the parent POM defines the packaging jar. But in the multi-module project, the parent POM defines the packaging pom. The packaging pom refers to other Maven projects. Why we need multi-module projectSplitting the project into multiple modules is useful and easy to maintain. We can also easily edit or remove modules in the project without affecting the other modules. It is useful when we required to deploy modules individually. We only need to specify all the dependencies in the parent pom. All the other modules share the same pom, so we need not to specify the same dependency in each module separately. It makes the code easier to keep in order with a big project. Child module-ear, war, and jarThe child module may be any project and can have any packaging. We are free to create any type of dependency between modules and bundles together. For example, we are creating an EAR (Enterprise ARchive), WAR (Web ARchive), and JAR (Java ARchive) file. A JAR file is bundled into a war file that is bundled into an EAR file. The EAR file is the final package that is ready to deploy on the application server. The EAR file contains one or many WAR files. Each WAR file contains the service project that has common code to all WAR files and packaging type in the JAR. 
Maven child projects/ modules
Multi-Module Project Directory StructureLet's understand the multi-module project directory structure. In the following image, we have created a project named spring-boot-multi-module-project. It contains the parent pom at the bottom of the directory. After that, we have created two Maven Modules named module1 and module2, respectively. These two modules contain their own pom files. 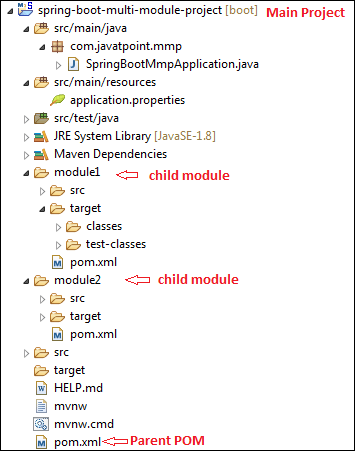
Let's open the parent POM and see what it configures when we create Maven modules in the project. pom.xml The above pom file is same as we have seen in the previous examples. But in this pom file, two things to be noticed: packaging and modules. When we create multi-module project, we need to configure packaging pom in the parent pom file instead of jar. When we create Maven Modules in the project, Spring Boot automatically configures the modules in the parent pom inside the module tag, as shown below. Now, we are going to see what inside the pom file of module1. pom.xml Here, a point to be noticed that the above pom file does not contain the common dependencies like starter-web, web-mvc, etc. It inherits all the common dependencies and the properties from the parent pom. Spring Boot Multi-Module Project ExampleLet' create an example of a multi-module application.
Application Module The application module is the main module of the project. It contains the application class in which the main method is defined that is necessary to run the Spring Boot Application. It also contains application configuration properties, Controller, views, and resources. The Application Module includes Model Module, Service Implementation Module as dependency that contains Model Module, Repository Module, and Service API module. Model Module The Model Module contains Entities and Visual Objects to be used in the project. Repository Module The Repository module contains repositories to be used in the project. It depends on the Model Module. Service API Module The Service API module contains all project services. It also depends on Model Module. Service Implementation Module The Service Implementation module implements the service. It depends on Repository Module and Service API Module. POM Aggregator (Parent POM)The parent pom contains all the application modules. It also includes all the common dependencies and properties that are needed by more than one module. Dependencies are defined without version because the project has defined the Spring IO Platform as a parent. Let's understand the structure of the multi-module application that we have created. Step 1: Create a Maven Project with the name spring-boot-multimodule. Step 2: Open the pom.xml (parent pom) file and change the packaging type jar to pom. pom.xml (parent pom) One thing to be noticed in the above pom file is that there is no maven module configured because we have not created yet. Now we will create Maven Modules one by one that we have specified above. Step 3: Create a Maven Module with the name application. Step 4: Open the pom.xml file of application module and ensure that the packaging type is jar. pom.xml Step 5: Create the main class. It is the class that is to be run. SampleWebJspApplication.java Step 6: Create a Controller class with the name WelocameController under the package smaple.multimodule.web. WelcomeController.java Step 7: Create a HTML file with the name show.html under the folder src/main/resource -> templates ->welcome. show.html Step 8: Open theapplication.properties file, configure the application message and thymeleaf cache to false. application.properties After creating all the above files, the application module directory looks like the following: 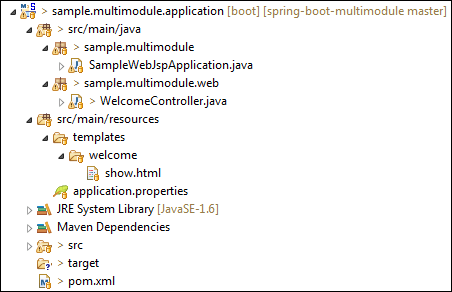
Let's create the second module that is model. Step 9: Create a Maven Module with the name model. Step 10: Open the pom.xml file of model module and ensure that the packaging type is jar. pom.xml Step 11: Create a class with the name Account under the package sample.multimodule.domain.entity. Account.java After creating all the above files, the model module directory looks like the following: 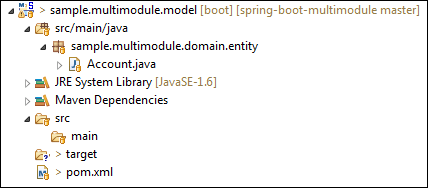
Let's create the third module that is the repository. Step 12: Create a Maven Module with the name repository. Step 13: Open the pom.xml file of application module and ensure that the packaging type is jar. pom.xml Step 14: Create a class with the name AccountRepositoryunder the package sample.multimodule.repository. AccountRepository.java After creating all the above files, the repository module directory looks like the following: 
Let's create the fourth module that is service-api. Step 15: Create a Maven Module with the name service-api. Step 16: Open the pom.xml file of application service-api and ensure that the packaging type is jar. pom.xml Step 17: Create a package with the name sample.multimodule.service.api. Step 18: Create a class with the name AccountNotFoundException. It handles the exception if the account is not found. AccountNotFoundException.java Step 19: Create a class with the name AccountService. It provides the service related to account, such as find and create an account. AccountService.java After creating all the above files, the service-api module directory looks like the following: 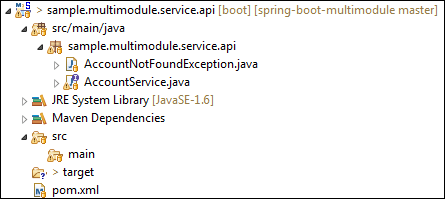
Step 20: Create a Maven Module with the name service-impl. Step 21: Open the pom.xml file of application service-impl and ensure that the packaging type is jar. pom.xml Step 22: Create a class with the name AccountServiceImpl under the package sample.multimodule.service.impl. AccountServiceImpl.java After creating all the above files, the service-impl module directory looks like the following: 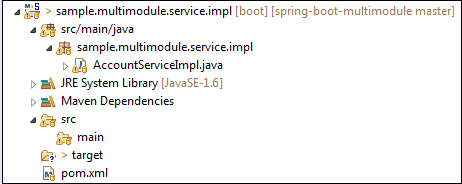
Now open the parent pom file, we see that all the Maven Modules that we have created is configured in the parent pom inside the 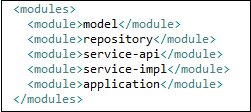
Now ensure that all the five modules are created, as shown below: 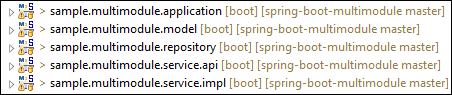
After creating all the modules, the main project directory looks like the following: 
Step 23: Now run the SampleWebJspApplication.java file as Java Application. Step 24: Open the browser and invoke the URL http://localhost:8080. It returns the Message and account number that is 23. 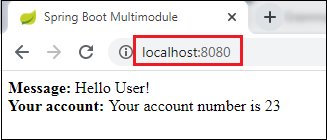
Next TopicSpring Boot Packaging
|
 For Videos Join Our Youtube Channel: Join Now
Feedback
- Send your Feedback to [email protected]
Help Others, Please Share


