SSH Command
SSH is short for "Secure Shell". SSH can be defined as a protocol that is used for securely connecting to a remote system or server. It is secure because it can transfer the information in encrypted format among the client and the host.
It also transfers inputs through the client to a host. This command executes at the 22th port of the TCP/IP.
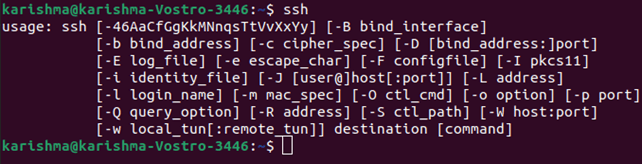
Syntax of the SSH command:
Prerequisites of the SSH Command
Before we can create a secure Remote Desktop protocol using a remote machine, here are some command requirements to match:
- The remote computer should be turned on at each time and has a network connection.
- The server and client applications have to be enabled and installed.
- We require the name or the IP address of the remote machine we wish to connect to.
- We require to have mandatory permissions for accessing the remote system.
- Various firewall settings are required to permit the remote connection.
Parts of the SSH Command
SSH command in Linux includes 3 distinct parts which are listed and discussed below:
- ssh command guides the system for establishing the encrypted secure connection to the host machine.
- user_name illustrates the account which is being authenticated over the host.
- The host can be defined as a machine which could be a router or a computer that is being authenticated. It could be a domain name (e.g. www.domainname.com) or an IP address (e.g. 192.168.1.124).
Note: The commands will implement as when they were specified to the host terminal directly after logging into a host computer.
Using an SSH key pair or a public-private key pair for logging into a remote host is more protected than using the passwords.
To generate the public-private key, we can use the following command:
A private key should remain hidden at the time the public key should be copied to a remote host.
The connection would be created not with the password but with the help of an SSH key after copying a public key to a remote host.
Options in SSH Command
There are various options in the SSH command of Linux. These options are explained as follows:
- -1: It is used for forcing the ssh command to apply only the SSH-1 protocol.
- -2: It is used for forcing the ssh command to apply only the SSH-2 protocol.
- -4: It is used for allowing only IPv4 addresses.
- -6: It is used for allowing only IPv6 addresses.
- -a: It is used for enabling the authentication agent connection forwarding procedure.
- -A: It is used for disabling the authentication agent connection forwarding procedure.
- -C: It is used for compressing every data (including stderr, stdout, stdin, and data for TCP and X11 forwarded connections) for a faster data transfer.
- -f: It is used to request the ssh command for going to the background only before the execution of the command.
- -g: It is used for allowing various remote hosts to link to the local forwarded ports.
- -p port_number: It is a port for connecting to over the remote host.
- -n: It is used for preventing the reading from the stdin.
- -q: It is used for suppressing every warning and error.
- -V: It is used for displaying the number of the version.
- -v: It stands for Verbose mode and it is used for echoing everything it is operating at the time of creating any connection. This option is very helpful in connection failures debugging.
- -X: It is used for enabling the X11 forwarding or GUI Forwarding.
- -c cipher_spec: It is used for selecting the cipher specification to encrypt the session. A particular cipher algorithm would be selected only when both the server and the client support it.
Significantly, ssh is more secure as compared to other various protocols like telnet due to the data encryption.
There are 3 widely used techniques of encryption which are used by the SSH protocol are as follows:
1. Symmetrical encryption: Symmetrical encryption operates over the principles of the production of a single key to encrypt and data decryption as well. The secret key produced is sharing between the hosts and the clients for a more secure connection. This encryption technique is the most common and works best if data is decrypted and encrypted over an individual machine.
2. Asymmetrical encryption: Asymmetrical encryption technique is more secure due to it produces two distinct keys which are listed below:
- Public key
- Private key
A public key is shared to distinct types of host machines during the private key are over the client machine securely. Any secure connection is created with the help of the public-private pair of the key.
3. Hashing: In this method, one-way hashing can be defined as an authentication method that makes sure that the data is unchanged and comes through the genuine sender.
The hash function can be used for generating the hash code through the data. It's possible to re-produce the data through a hash value.
This value is measured at the side of the sender and the end of the receiver as well. The data is accurate if the hash values are the same.
Working of SSH
We need two important components for establishing the SSH connection. These components are as follows:
- SSH Client Component
- SSH Server-side Component
1. SSH Client Component: The SSH client can be defined as an application we install on our computer which we will use for connecting to a server or another computer.
The client will use the given remote host data for initiating the connection. It also establishes an encrypted connection when the credentials are authenticated.
2. SSH Server-side Component: On the side of a server, there is an element known as SSH daemon. Constantly, it is listening to a particular TCP/IP port for feasible requests of client connection.
The SSH daemon responds with the protocol versions and software and these two will swap their identification information.
The SSH establishes a newer session for an appropriate environment if the given credentials are accurate.
The default version of SSH protocol for SSH client and SSH server communication is the 2 version.
How to implement an SSH Connection
Since establishing the SSH connection needs both a server and a client component, we need to ensure that they have been respectively installed over the remote and local machine.
The OpenSSH tool is widely used for various Linux distributions. It is an open-source tool of SSH and easy to install relatively. It needs access to our terminal over the computer and server that we use for the connection.
Note: By default, Ubuntu doesn't have any SSH server which is installed.
OpenSSH Client Installation
Before we proceed to install the SSH client, ensure that it's not installed already. Several distributions of Linux already contain an SSH client. We can also install PuTTY or other clients of our choice for gaining access to any server for Windows machines.
For checking if a client has existed on our Linux based systems, we are required to:
- Load the SSH terminal. We can either click CTRL+ALT+T or find for "terminal" on our keyboard.
- Types inside ssh and click Enter within the terminal.
- We will get a response when the client has existed.
It means that we are ready for connecting to any virtual or physical machine remotely.
Otherwise, we will need to install an OpenSSH client.
- Execute the below command for installing the OpenSSH client on our computer.
sudo apt-get install openssh-client
- Input inside our superuser password if asked.
- Press the Enter button to finish the installation process.
Now, we can access SSH on any machine along with the server-side application over it, given that we require the important privileges for gaining access, IP address, and hostname as well.
We can also check that the ssh is installed on our system or not by entering the below command:
OpenSSH Server Installation
A machine requires to include the server-side segment of an SSH software toolkit for accepting SSH connections.
If we first wish to check that the OpenSSH server has existed on Ubuntu of a remote computer that requires to accept the SSH connections, we can try connecting to localhost:
- On the server machine, open our terminal. We can either find "terminal" or click CTRL+ALT+T on our keyboard.
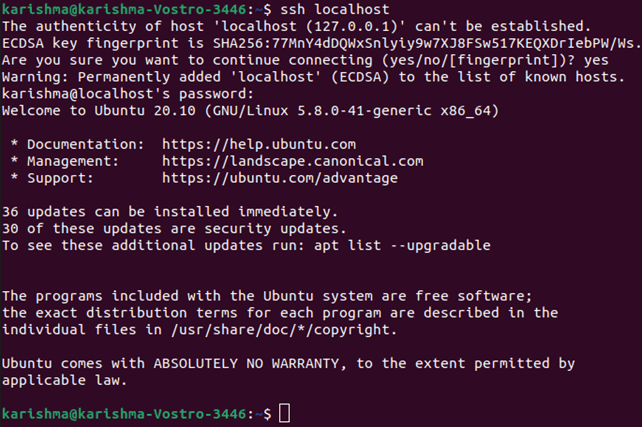
- Type inside the ssh localhost and press Enter.
- The response would seem like below for those systems without an SSH server installed:

We will have to install an OpenSSH server when the above is the situation. Open the terminal and:
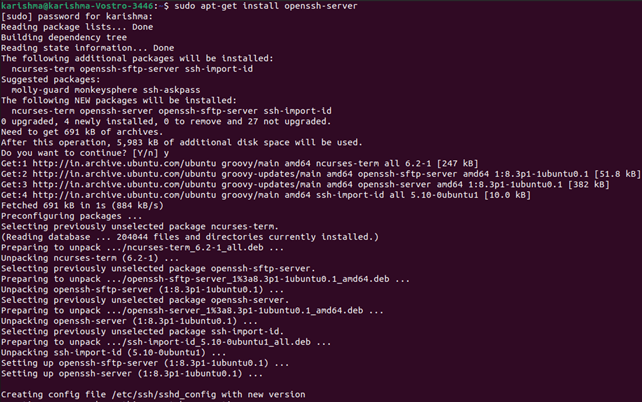
- Execute the below command for install an SSH server:
sudo apt-get install openssh-server
- Input inside our superuser password if asked.
- Press Enter and Y for allowing the installation process to proceed later with the disk space prompt.
The necessary support files would be installed, then we can inspect if an SSH server is executing over the machine by using the following command:
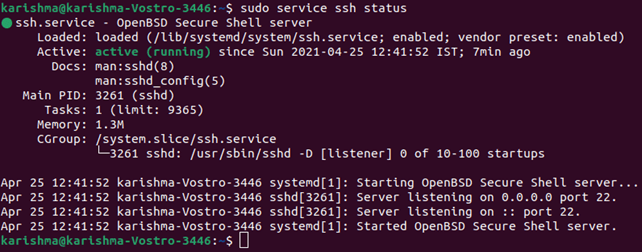
In the terminal, the response should seem the same as this when the SSH service is executing.
Other ways for testing the OpenSSH server is properly installed or not is to accept the connections for trying executing the command, i.e., ssh localhost again in our terminal prompt. The outcome will appear as:
Enter y or yes to continue.
Now, we have set up our server for accepting the requests of the SSH connection from a distinct computer with the help of the SSH client.
Important Tip
Now, we can edit the configuration file of the SSH daemon. For example, we can modify the port (default) for various SSH connections. We can execute the following command inside the terminal prompt:
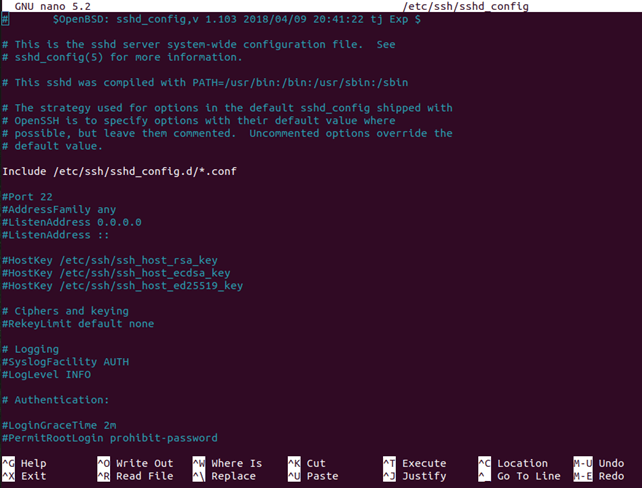
The configuration file would open inside the editor of our choice. We can use nano in this type of case.
We can run the following command if we have to install Nano:
Note: We have to reboot the SSH service all the time we create any modifications to the file, i.e., sshd_config by executing the following command:

Connection via SSH
Now, we have the OpenSSH server and client installed on all the machines we need. We can create a remote connection securely with our servers. For doing so:
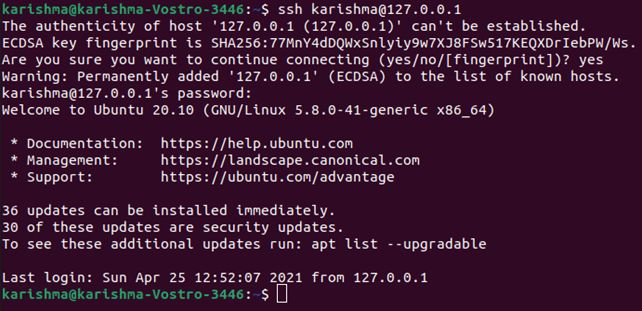
1. Start the SSH terminal prompt on our machine and execute the below command:
When the username on our local machine is the same as the one over the server we are trying to link to, we can only type:
After that press the 'Enter' button.
2. Type inside our password and press the Enter button.
Note: We will not receive any feedback over the screen during typing. If we are pasting our password, ensure that it is safely stored and not in any text file.
3. If we are connecting to any server for the first time, it will confirm us if we wish to continue connecting. We have to only type yes and press the Enter button.
This information occurs this time only since a remote server has not been recognized on our local machine.
4. Now, an ECDSA key fingerprint is included and we are connected to a remote server.
When the computer we are trying to connect to remotely is on a similar network, it's best to use a private IP address rather than a public IP address. We will otherwise need to use only a public IP address.
Additionally, ensure that we know the accurate TCP port OpenSSH understands the connection claims and the various settings of port forwarding are accurate.
Port 22 is the default when nobody modified the configuration inside the file, i.e., sshd_config. Also, we may only append the port number later to the host IP address.
Now, we can control and manage the remote machine with the help of our terminal. If we have any trouble connecting to the remote server, we need to ensure that:
- The remote machine IP address is accurate.
- The port SSH daemon is receiving is not blocked through a firewall or incorrectly forwarded.
- Our password and user name are accurate.
- The SSH software is properly installed.
Note: We can now create a connection to our server with the help of SSH, we highly suggest some further steps for improving the security of SSH. When we leave our setup along with the various default values, then it is possible that our system will be hacked and our server could easily become a destination of scripted attacks.
| 
 For Videos Join Our Youtube Channel: Join Now


