| |

Ubuntu BionicIntroduction to Ubuntu BionicThe 18.04 LTS version of Ubuntu (Bionic Beaver) is a long-term support release that was published on 26 April 2018. The 18.04.1 LTS version of Ubuntu was published three months after 26 July 2018. The 18.04.2 LTS version of Ubuntu was published six months later, on 15 February 2019. Further incremental update publications of the 18.04 LTS cycle were published as 18.04.4 and 18.04.3 at six months release cycle approximately on 8 August 2019 and 12 February 2020, respectively. The 18.04.5 version of Ubuntu was published after six months on 18 August 2020. The 18.04.6 LTS version of Ubuntu was published after thirteen months on 17 September 2021. Plans to add a new theme were announced on 5 February 2018, developed by the Ubuntu community. However, as the theme development was buggy and unfinished as of 13 March 2018, the 18.04 LTS version of Ubuntu didn't add a new theme and rather had the Ambiance theme from 2010 as its default theme. The newer theme existed as a snap package.
This version employed the 4.15 version of Linux Kernel, which consolidated a CPU controller for the cgroup v2 interface, developed SATA Link Power Management, and support for AMD secure memory encryption. By default, a few applications were delivered as snaps for the very first time. Support Lifespan This release contains basic LTS support for 5 years until April 2023 and paid support for ESM existing from Canonical for an extra 5 years until April 2028. For 5 years, it will be supported for Ubuntu Core, Ubuntu Server, and Ubuntu Desktop. The 18.04 version of Ubuntu Studio will be supported for nine months. Every other flavor will be supported for three years. New aspects in 18.04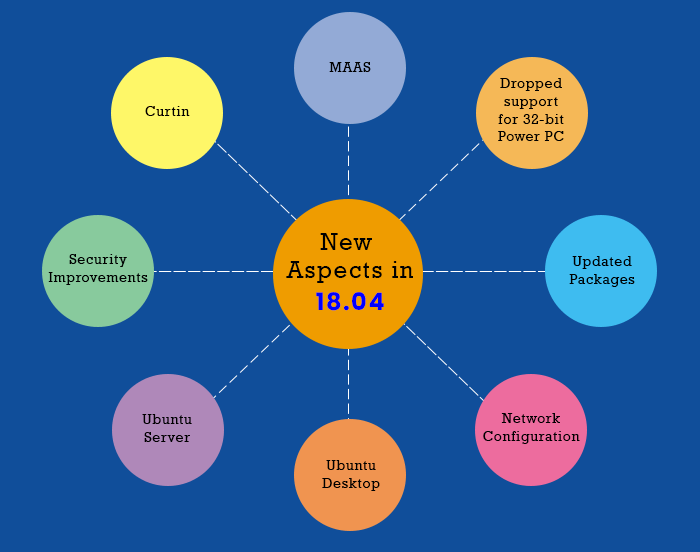
Dropped support for 32-bit PowerPC
Updated PackagesThe 18.04.4 version of Ubuntu ships with a v5.3-based Linux kernel updated from the v5.0-based kernel in 18.04.3. It enables the latest peripherals and hardware available from Intel, IBM, and others. The 18.04 kernel offers new aspects acquired from upstream, which are as follows:
Also, we see remarkable Ubuntu-specific accomplishments with:
OpenJDK OpenJDK 11 is the default version in 18.04 as of the 18.04.4 version. OpenSSL The OpenSSL default is upgraded from 1.1.0 to 1.1.1 LTS series getting improved ability and performance to use TLSv1.3 in some packages. Security Improvements In the 18.04 version of Ubuntu, gcc is fixed to default for compiling apps as PIE (Position Independent Executables) and with immediate binding to create more efficient use of ASLR (Address Space Layout Randomization). In main, every package has been re-created to take benefit of it with some exceptions. Mitigation is in place for protecting against Meltdown and Spectre. thunderbolt and bolt tools have been approved to main to offer security management for Thunderbird devices. Network ConfigurationSince 18.04.2 netplan.io has developed support for IPv6 DHCP, Extension overrides, IP tunnel support, support for 802.1x authentication and WPA Enterprise wifi, as well as integrated error reporting. Now, netplan.io will get network devices even when no IP address is described for them if they are constructed in a file in the /etc/netplan directory. It permits configuring "anonymous" integrations and bridges with networked services. Since 17.10 With libteam, teaming support is present in NetworkManager. Since 16.04 LTS The DNS resolver (default) is systemd-resolved. In netplan.io, ifupdown has been detracted and is no longer available on newer installs. The installer will produce a configuration file in /etc/netplan for netplan.io. This configuration (netplan.io) renders backend-specific configuration by either NetworkManager or systemd-networkd. Desktop users will see the system completely managed by NetworkManager because it has been the situation in old releases. Now, server users will see the network devices managed by systemd-networks. It applies only to new installations. Note:The ifup and ifdown commands are also unavailable if the ifupdown command is by default no longer installed. We can use the command, i.e., ip, to gain the same functionality.Other base system modifications since 16.04 LTS
Ubuntu Desktop
Since 17.10
Other features since 16.04 LTS
Ubuntu Server
Since 17.10 Server installer Subiquity (the next generation server installer) gets the speedy install and comfortable live session of Ubuntu desktop to the server users at last. A new aspect of the server installer in 18.04.3 is that it can automatically check a new release of the installer, snap over start-up and provides an update to a new release if it's available. New in 18.04.3 is also supporting encrypted LVM volume groups and reutilizing previous partitions as well as bonds, vlans, RAID, and LVM, which were included in 18.04.1. There are a few known restrictions in the existing partition reuse:
Ifupdown has been detracted in netplan.io and is not available on new installs. On the Ubuntu server, backend configuration is by default given by systemd-networkd. LXD 3.0 LXD is a system container manager that ports with every Ubuntu server.
QEMU 2.11.1 QEMU has been upgraded to the 2.11.1 version. Migrations from former releases are supported as usual. When upgrading, it's always recommended for upgrading the machine types permitting guests to completely benefit from every improvement and fix of the most recent release. libvirt 4.0 It has been upgraded to the 4.0 version. Now, the packaging creates storage drivers as pluggable libraries. It can slim down the installation needs, but a few drivers of less interest will find in the universe. Besides, it means that some formerly developed features like zfs or rbd now might need us to install the package after updating. DPDK 17.11.x Ubuntu contains 17.11.x, the latest stable version DPDK branch. Chrony Crony will substitute ntpd as the suggested server for the NTP Protocol in Ubuntu 18.04. The comparison between Chrony maintainers and NTP servers may interest a few users looking to find a high-level cause for why this modification was made. The base system comes with the systemd-timesyncd for general time sync requirements. Chrony is just required to operate as a time server or, if we wish, the advertised more efficient and accurate syncing. Cloud-init The release was upgraded to 18.2. Some remarkable new aspects are as follows:
curtin The release was upgraded to 18.1. Some remarkable new aspects are as follows:
MAAS The release was upgraded to 2.4b2. Some remarkable new aspects are as follows:
Installing Ubuntu BionicUbuntu 18.04 LTS has been published with various new aspects and improvements. A few of the important aspects are as follows:
Minimal system requirement of Ubuntu Bionic
Steps for installing Ubuntu Bionic on our Desktop or LaptopStep 1: Ensure that we have the latest release of Ubuntu 18.04 LTS. If not, we can download the ISO file. We can install a 64-bit version on a system that is supported by 64-bit architecture because Ubuntu 18.04 LTS comes in a 64-bit version only. Step 2: Make a bootable disk Once the above file is successfully downloaded, now we need to burn our downloaded ISO image into the DVD/USB or flash drive to restart the system from that drive. Make sure we also modify the boot sequence so that the computer restarts with the bootable DVD/CD or flash drive. Step 3: Boot from DVD/USB or Flash Drive We can see the below screen displayed before the options, including "Install Ubuntu" and "Try Ubuntu", as displayed in the following image once a computer is booted with the bootable disk. Even though if we click on the "Try Ubuntu" option, we can have a sneak peek into the 18.04 LTS without installing it on our system. Our aim here is to install Ubuntu 18.04 LTS in our system, so we need to click on the "Install Ubuntu" option to proceed with the installation process. 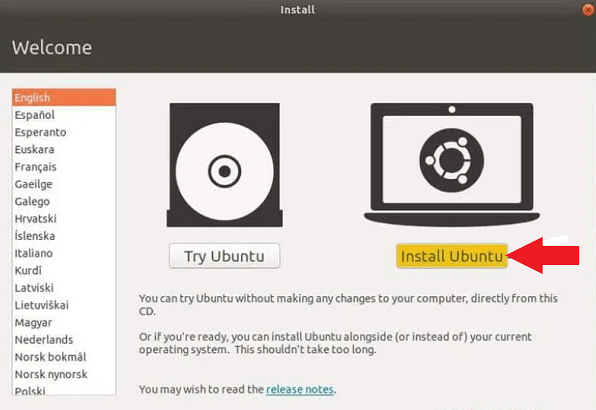
Step 4: Select the keyboard layout We can select our preferred keyboard layout and press the "Continue" button. English keyboard is by default selected, and if we wish to change it, we can change it here and press "Continue". 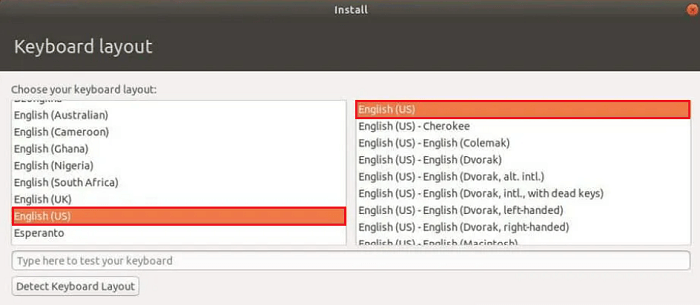
Step 5: Preparing for installing Ubuntu OS and other software We will be given the below options on the next screen, including:
Press the "Continue" button to continue with the installation. 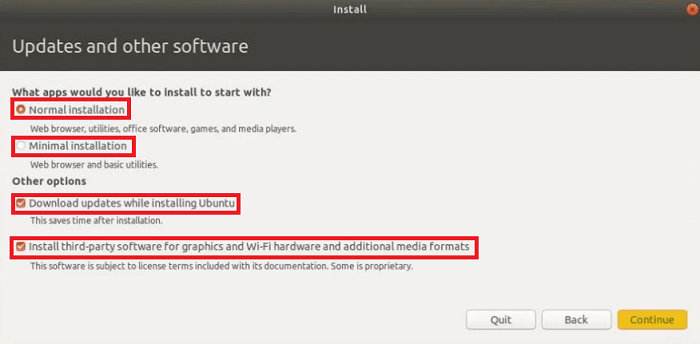
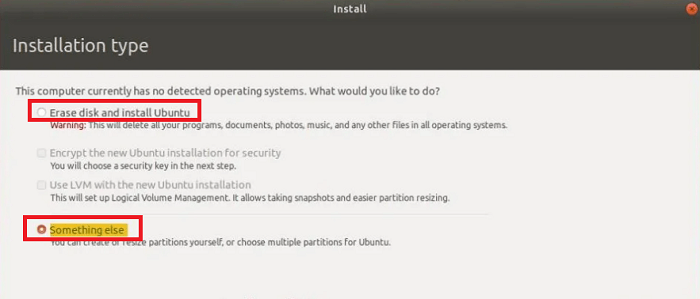
Step 6: choose the right installation type The installer will present us with the below installation options, which are as follows:
Step 7: Select the time zone We can select our time zone and press the "Continue" button. 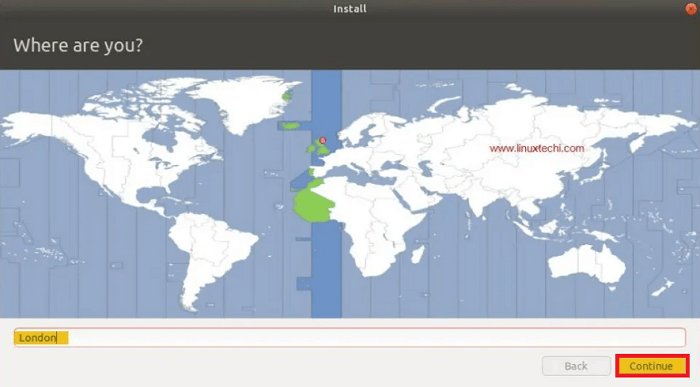
Step 8: Provide the user credentials On the next screen, we will be asked to give our user credentials. We need to give our name, username, computer name, and password for logging into Ubuntu 18.04 LTS. Press the "Continue" button to start the installation process. Step 9: Installing Ubuntu 18.04 LTS The installation process of Ubuntu 18.04 LTS begins now and will take approx 5-10 minutes, depending on our computer speed. 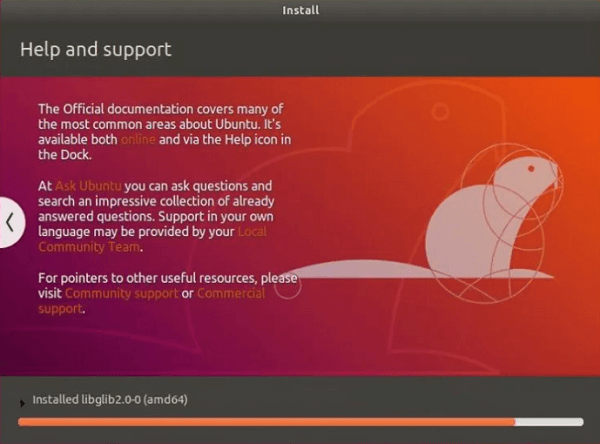
Step 10: Reboot the system Remove the DVD/USB from the drive and press the "Restart Now" option to restart our system once the installation process is completed. Step 11: Log in to our Ubuntu 18.04 desktop Once our system has been restarted after the installation process, we will receive the login screen and provide the username and password that we fixed during installation.
Next Topic#
|
 For Videos Join Our Youtube Channel: Join Now
Feedback
- Send your Feedback to [email protected]
Help Others, Please Share


