| |

What is a Notebook in Ms Azure?A notebook is a web-based user interface for a document that includes executable code, graphics, and narrative prose. It also includes articles on making data visualizations, sharing visuals as dashboards, using widgets to parameterize notebooks and dashboards, leveraging notebook workflows to build complicated pipelines, and best practices for defining classes in Scala notebooks. The Workspace API, the UI, and the CLI may all be used to manage notebooks. This article focuses on using the UI to accomplish notebook operations. How to Create a notebook in Microsoft AzureUse the Create button to begin.We can simply click on the Create button and create the notebook in our default folder:
In any folder, make a notebook.In order to create the notebook in any folder, we must follow the following steps (for example, the Shared folder):
Opening a notebookIn order to open a notebook, we must Select a notebook in our workspace. When you hover your mouse over the notebook title, the notebook path appears. Copy notebook pathIn order to copy the path of the notebook, just right-click the notebook name and select Copy File Path to copy the notebook file path and even without having to open the notebook. 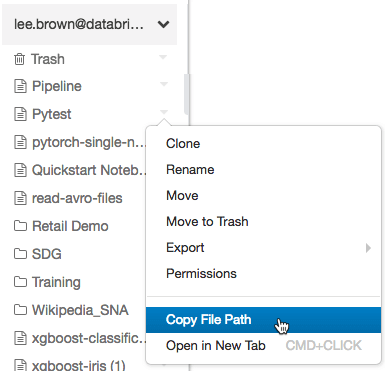
Rename a notebookClick the title of an active notebook and modify inline, or go to File > Rename to rename it. Control access to a notebookWe even have the option in out notebook for the control of access. It means that we can provide control to the users that who can access the notebook. We have the option of workspace access control but only if our account is a azure premium plan. Notebook external formatsExternal notebook formats supported by Azure Databricks include:
Import a notebookAn external notebook can be imported from a URL or a file. 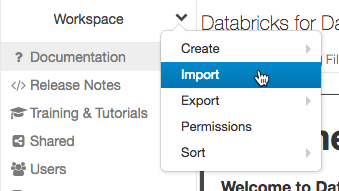
Export a notebookIn order to export a notebook, we can select File option and then click on the Export option and a format from the notebook toolbar. Note If you don't clear the results when exporting a notebook as HTML, IPython notebook, or archive (DBC), the results of running the notebook are included.It is applicable for a single and all notebooks means multiple notebook as well.Export all notebooks in a folderTo create a ZIP archive of all folders in a workspace folder, follow these steps:
Notebooks and clustersYou must first link a notebook to a cluster before you can conduct any work in it. This section explains how to add and remove notebooks from clusters, as well as what occurs behind the scenes when you do so. A cluster can only have a certain amount of execution contexts (145). You can't attach a notebook to the cluster or establish a new execution context after the number of execution contexts reaches this limit. Idle execution contextsWhen the previous completed execution occurs after a given idle threshold, an execution context is deemed idle. The idle timer is set to 24 hours by default. The notebook that used the context is remains attached to the cluster and shows in the cluster's notebook list even if the context is removed. Streaming notebooks are always considered active, and their context is not evicted until their execution is completed. The UI displays a notice if an idle context is evicted, indicating that the notebook using the context was disconnected owing to being idle. 
If you try to attach a notebook to a cluster with the maximum number of execution contexts and there are no idle contexts (or if auto-eviction is turned off), the UI displays a message stating that the current maximum execution contexts threshold has been reached, and the notebook will remain detached. 
When you fork a process, an idle execution context remains idle until the request that forked the process completes. With Spark, it is not suggested to fork distinct processes. Configure context auto-evictionThe Spark property spark.databricks.chauffeur.enableIdleContextTracking can be used to allow context auto-eviction.
Attaching a cluster to a notebook.It requires a cluster level permission in order to attach it to a notebook. In order to attach a notebook to a cluster, one need to follow the steps:
Determine Spark and Databricks Runtime versionRun the following command to identify the Spark version of the cluster to which your notebook is connected: PythonCopy spark.version Run the following command to find the Databricks Runtime version of the cluster to which your notebook is connected: Scala ScalaCopy dbutils.notebook.getContext.tags("sparkVersion") Python PythonCopy spark.conf.get("spark.databricks.clusterUsageTags.sparkVersion") Tip Detaching unwanted notebooks from a cluster is recommended by Azure Databricks. This allows the driver to have more RAM. All notebooks associated with a cluster can be viewed. On the cluster details page, the Notebooks tab lists all of the notebooks associated with a cluster. The condition of each attached notebook is also displayed, as well as the last time a command was ran from the notebook.
Next TopicWhat is Azure Resource Manager
|
 Create a notebook in the sidebar by selecting it from the menu. The dialog box for creating a notebook appears.
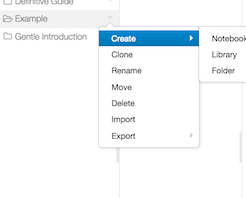
 For Videos Join Our Youtube Channel: Join Now
Feedback
- Send your Feedback to [email protected]
Help Others, Please Share


