| |

What is an Angular Service?Service is a piece of reusable code with a focused purpose. A code that you will use across multiple components in your application. Our components need to access the data. You can write data access code in each Component, but this is very inefficient and breaks the rule of single responsibility. The Component should focus on presenting the data to the user. The task of receiving data from the back-end server should be delegated to another class. We call a class a service class because it provides each Component with the data it needs. What is Angular Services used for?Features independent of components such a logging services
How to create a Service in AngularAn Angular service is just a JavaScript function. All we have to do is create a class and add methods and properties. Then we can create an instance of this class in our Component and call its methods. One of the best uses of services is to get data from a data source. Let us create a simple service, which receives product data and sends it to our Component. Product ModelPlease create a new file under the folder src/app and call it product.ts product.ts The Product class above is our domain model. Product Angular ServiceNext, we create an Angular service, which returns a list of products. Please create a new file under the src/app folder and call it product.service.ts.product.service.ts First, we set the Product model to product.ts. import from Next, create a ProductService class and export it. We need to export so that components and other service classes import it and use it The Get Products method returns a collection of products. In this example, we have hardcoded the products. In real life, you would send an HTTP GET request to your back end API to get the data service is ready. Note that the above class is a simple JavaScript function. There is nothing angular about it. Invoking the ProductServiceThe Next step is to invoke the ProductService from the Component. Open the app.componet.ts and add the following code. app.component.ts We start with importing Product & ProductServiceWe create an instance of ProductSerivce in the AppComponent's constructor. In real-life Angular apps, we use dependency injection in Angular to inject ProductSerivce into the constructor. We will learn this in the next tutorial. The getProducts method calls the getProducts method of the ProductService. It returns a list of products, which we store in local variable products. 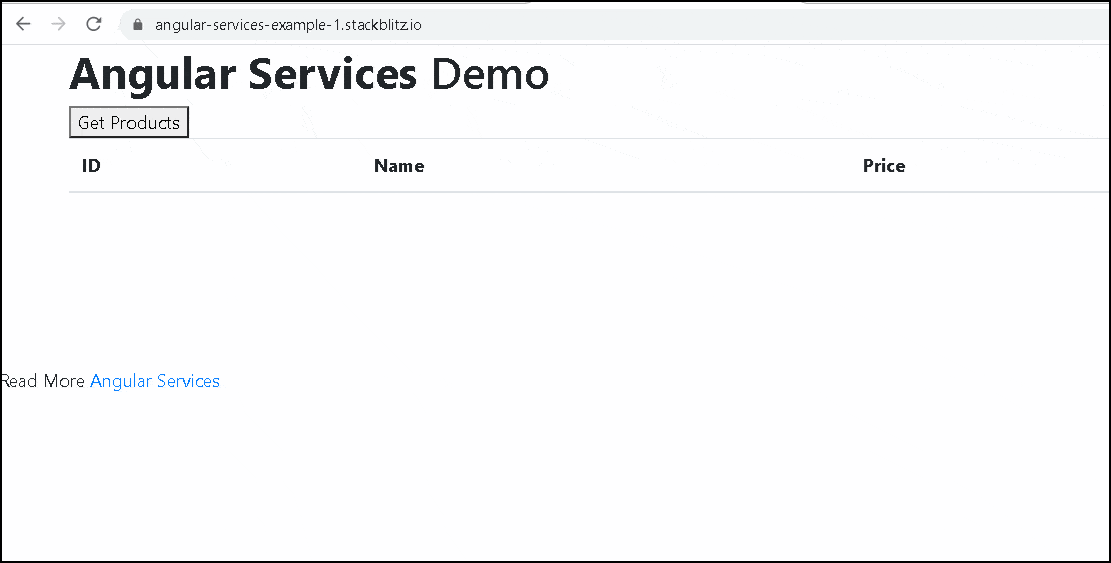
Injecting Services into Component In the example, we instantiated the product-service directly in the Component, as shown below: As shown above, there are several disadvantages to instantiating the service.
We can solve this by using Angular Dependency Injection. Add Services Tour of Heroes Heroes component is currently receiving and displaying fake data. After the refactoring in this tutorial, HeroesComponent will be lean and focused on supporting the view. It will also be easier to unit-test with a mock service. For the sample application described on this page, see the live example/download example. Services are a great way to share information between classes that don't know each other. You will create a MessageService and inject it in two places.
create hero serviceUsing Angular CLI, create a service called Hero. The command generates a skeleton HeroService class in src/app/hero.service.ts as follows: Note that the new service imports the Angular injectable symbol and annotates the class with the @Injectable() decorator. It marks the class that participates in the dependency injection mechanism. The HeroService class will provide an injectable service and may also have its injectable dependencies. It doesn't have any dependencies yet, but it will soon. The @Injectable() decorator accepts a metadata object for the service, just as the @Component() decorator did for your component classes. Get Hero DataHeroService can get Hero data from anywhere-a web service, local storage, or a simulated data source. Removing data access from components means that you can change your mind about the implementation at any time without touching any components. They don't know how the service works. Import the Hero and HEROES.Provide the HeroServiceBy registering a provider, you need to make HeroService available to the dependency injection system before Angular can inject it into HeroesComponent. A provider may create or deliver a service; In this case, it instantiates the HeroService class to provide the service. To ensure that HeroService can provide this service, register it with Injector, the object responsible for selecting and injecting the provider where the application needs it. By default, the Angular CLI command ng service registers a provider with the root injector for your service by including the provided provider metadata: 'root' in the @Injectable() decorator. When you provide a service at the root level, Angular creates a single, shared instance of HeroService and injects it into any classes that ask for it. Registering the provider in the @Injectable metadata allows Angular to customize an application by removing the service if it is no longer used. HeroService is now ready to be plugged into HeroesComponent. It is an interim code sample that will allow you to provide and use HeroService. The code will be separated from the Hero service in "Final Code Review". Update Heroes ComponentOpen the HeroesComponent class file. Delete the HEROES import because you won't need that anymore. Import the HeroService instead. Replace the definition of the Hero's property with a declaration. Inject the HeroServiceAdd a private heroService parameter of type HeroService to the constructor. The parameter simultaneously defines a private heroService property and identifies it as a HeroService injection site. When Angular creates a HeroesComponent, the Dependency Injection system sets the heroService parameter to the singleton instance of HeroService. Add getHeroes()Create a method to retrieve the heroes from the service. Call it in ngOnInit()While you can call getHeroes() in the constructor, this is not a best practice. Reserve the constructor for minimal initialization, such as wiring up constructor parameters to properties. The constructor should do nothing. It certainly shouldn't be calling a function that makes an HTTP request to a remote server as an actual data service. Instead, call getHeroes() inside the ngOnInit lifecycle hook and let Angular call ngOnInit() at the appropriate time after the HeroesComponent instance has been created. After the browser refreshes, the application should run as before, showing a list of heroes and a hero detail view when you click on a hero name. Observable dataThe HeroService.getHeroes() method has a synchronous signature, implying that the HeroService can fetch heroes synchronously. The HeroesComponent consumes the getHeroes() result as if heroes could be fetched synchronously. It will not work in a real application. Now you're getting away with it because the service currently returns fake heroes. But soon, the application will fetch heroes from a remote server, which is an inherently asynchronous operation. HeroService must wait for the server to respond, getHeroes() may not return immediately with hero data, and the browser will not block while the service waits. HeroService.getHeroes() will return an Observable because it will eventually fetch the Heroes using the Angular HttpClient.get method, and HttpClient.get() returns an Observable. Observable HeroServiceObservable is one of the major classes of the RxJS library. In a later tutorial on HTTP, you will learn that Angular's HttpClient methods return RxJS Observables. This tutorial will simulate with RxJS of() function to get data from the server. Open the HeroService file and import the Observables and symbols from RxJS. content_copyimport { Observable, of } from 'rxjs'; Replace the getHeroes() method with the following: Of (HEROES) returns an Observable In the HTTP tutorial, you'll call HttpClient.get< Hero []>() which also returns an Observable< Hero []> that emits a single value, an array of heroes from the body of the HTTP response. Subscribe in HeroesComponentThe HeroService.getHeroes method used to return a Hero[]. Now it returns an Observable You'll have to adjust to that difference in HeroesComponent. Find the getHeroes method and replace it with the below code. Observable.subscribe() is the critical difference. The previous version provides an array of heroes for the Component's Heroes property. Assignment occurs when the server may return heroes immediately, or the browser UI may freeze while waiting for the server's response. The new version waits for the Observable to emit the array of heroes, which can happen several minutes later. The subscribe() method passes the emitted array to the callback, setting the Component's heroes property. This asynchronous approach will work when HeroService requests heroes from the server. This section has the following:
create message componentUse the CLI to create the MessagesComponent. The content_copying component generates the message CLI creates component files in src/app/messages folder and declares MessagesComponent in AppModule. Modify the AppComponent template to display the generated MessagesComponent. src/app/app.component.html You should see the default paragraph from MessagesComponent at the bottom of the page. Create the MessageService
Open MessageService and replace its contents with the following. src/app/message.service.ts The service exposes its cache of messages and two methods: one to add() a message to the cache and another to clear() the cache. Inject it into the HeroServiceIn HeroService, import the MessageService. src/app/hero.service.ts (import MessageService) Modify the constructor with a parameter that declares a private messageService property. Angular will inject the singleton MessageService into that property when it creates the HeroService. src/app/hero.service.ts It typical "service-in-service" scenario: you inject the MessageService into the HeroService, injected into the HeroesComponent. Send a message from HeroServiceModify the getHeroes() method to send a message when the heroes are fetched. src/app/hero.service.ts Display the message from HeroServiceThe MessagesComponent should display all messages, including the message sent by the HeroService, when it fetches heroes. Open MessagesComponent and import the MessageService. Modify the constructor with a parameter that declares a public messaging property. When it creates the MessagesComponent, Angular will inject the singleton MessageService into that property. src/app/messages/messages.component.ts The messageService property must be public because you're going to bind to it in the template. Angular only binds to public component properties. Bind to the MessageServiceReplace the CLI-generated MessagesComponent template with the following. src/app/messages/messages.component.html This template connects directly to the Component's messaging.
|
 For Videos Join Our Youtube Channel: Join Now
Feedback
- Send your Feedback to [email protected]
Help Others, Please Share


